learnVue3 小满
Chapter1
1.介绍vue
Vue (读音 /vjuː/,类似于 view) 是一套用于构建用户界面的渐进式框架。与其它大型框架不同的是,Vue 被设计为可以自底向上逐层应用。Vue 的核心库只关注视图层,不仅易于上手,还便于与第三方库或既有项目整合。另一方面,当与现代化的工具链以及各种支持类库结合使用时,Vue 也完全能够为复杂的单页应用提供驱动。
MVVM(Model-View-ViewModel)架构
- 『View』:视图层(UI 用户界面)
- 『ViewModel』:业务逻辑层(一切 js 可视为业务逻辑)
- 『Model』:数据层(存储数据及对数据的处理如增删改查)
官方文档地址
- 介绍 — Vue.js
- https://cn.vuejs.org/v2/guide/#Vue-js-是什么
新版地址文档快速开始 | Vue.js
2.回顾vue2 对比 vue3
- 我们看如下图
- 发现传统的vue2 逻辑比较分散 可读性差 可维护性差
- 对比vue3 逻辑分明 可维护性 高
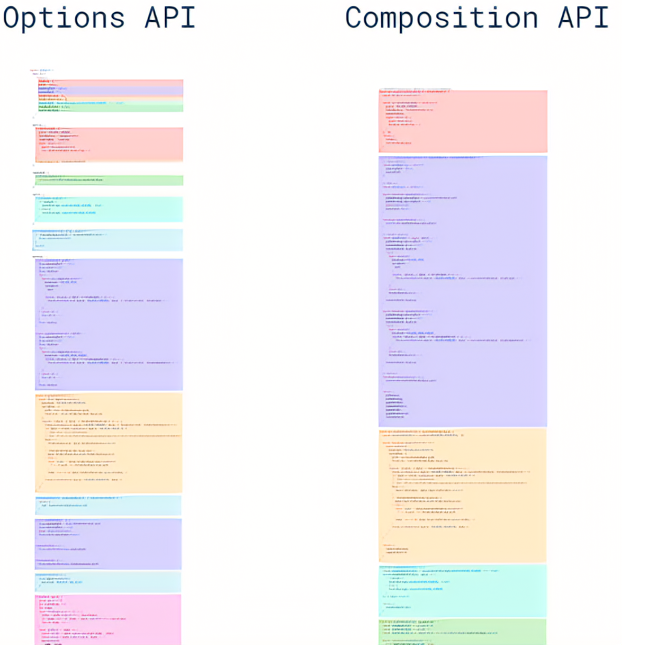
### 3.Vue3 新特性介绍 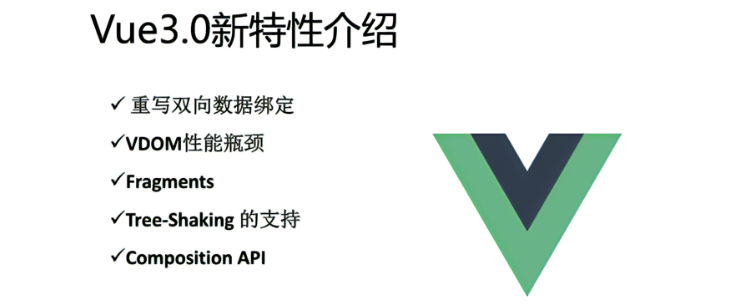
重写双向绑定
tsvue2 基于Object.defineProperty()实现 vue3 基于Proxy proxy与Object.defineProperty(obj, prop, desc)方式相比有以下优势: //丢掉麻烦的备份数据 //省去for in 循环 //可以监听数组变化 //代码更简化 //可以监听动态新增的属性; //可以监听删除的属性 ; //可以监听数组的索引和 length 属性; let proxyObj = new Proxy(obj,{ get : function (target,prop) { return prop in target ? target[prop] : 0 }, set : function (target,prop,value) { target[prop] = 888; } })Vue3 优化Vdom
- 在Vue2中,每次更新diff,都是全量对比,Vue3则只对比带有标记的,这样大大减少了非动态内容的对比消耗
- Vue Template Explorer 我们可以通过这个网站看到静态标记

patch flag 优化静态树
html<span>Hello world!</span> <span>Hello world!</span> <span>Hello world!</span> <span>Hello world!</span> <span>{{msg}}</span> <span>Hello world!</span> <span>Hello world! </span>- Vue3 编译后的 Vdom 是这个样子的ts
export function render(_ctx,_cache,$props,$setup,$data,$options){return (_openBlock(),_createBlock(_Fragment,null,[ _createvNode( "span", null,"Hello world ! "), _createvNode( "span",null,"Hello world! "), _createvNode( "span",null,"Hello world! "), _createvNode( "span", null,"Hello world! "), _createVNode("span", null,_toDisplaystring(_ctx.msg),1/* TEXT */), _createvNode( "span", null,"Hello world! "), _createvNode( "span", null,"Hello world! ")],64/*STABLE_FRAGMENT */)) - 新增了 patch flag 标记ts
TEXT = 1 // 动态文本节点 CLASS=1<<1,1 // 2//动态class STYLE=1<<2,// 4 //动态style PROPS=1<<3,// 8 //动态属性,但不包含类名和样式 FULLPR0PS=1<<4,// 16 //具有动态key属性,当key改变时,需要进行完整的diff比较。 HYDRATE_ EVENTS = 1 << 5,// 32 //带有监听事件的节点 STABLE FRAGMENT = 1 << 6, // 64 //一个不会改变子节点顺序的fragment KEYED_ FRAGMENT = 1 << 7, // 128 //带有key属性的fragment 或部分子字节有key UNKEYED FRAGMENT = 1<< 8, // 256 //子节点没有key 的fragment NEED PATCH = 1 << 9, // 512 //一个节点只会进行非props比较 DYNAMIC_SLOTS = 1 << 10 // 1024 // 动态slot HOISTED = -1 // 静态节点 BALL = -2- 我们发现创建动态 dom 元素的时候,Vdom 除了模拟出来了它的基本信息之外,还给它加了一个标记: 1 /* TEXT */
- 这个标记就叫做 patch flag(补丁标记)
- patch flag 的强大之处在于,当你的 diff 算法走到 _createBlock 函数的时候,会忽略所有的静态节点,只对有标记的动态节点进行对比,而且在多层的嵌套下依然有效。
- 尽管 JavaScript 做 Vdom 的对比已经非常的快,但是 patch flag 的出现还是让 Vue3 的 Vdom 的性能得到了很大的提升,尤其是在针对大组件的时候。
- Vue3 编译后的 Vdom 是这个样子的
Vue3 Fragment
- vue3 允许我们支持多个根节点vue
<template> <div>12</div> <div>23</div> </template> - 同时支持render JSX 写法jsx
render() { return ( <> {this.visable ? ( <div>{this.obj.name}</div> ) : ( <div>{this.obj.price}</div> )} <input v-model={this.val}></input> {[1, 2, 3].map((v) => { return <div>{v}-----</div>; })} </> ); }, - 同时新增了Suspense teleport 和 多 v-model 用法
- vue3 允许我们支持多个根节点
Vue3 Tree shaking
- 简单来讲,就是在保持代码运行结果不变的前提下,去除无用的代码
- 在Vue2中,无论我们使用什么功能,它们最终都会出现在生产代码中。主要原因是Vue实例在项目中是单例的,捆绑程序无法检测到该对象的哪些属性在代码中被使用到
- 而Vue3源码引入tree shaking特性,将全局 API 进行分块。如果你不使用其某些功能,它们将不会包含在你的基础包中
- 就是比如你要用watch 就是import {watch} from 'vue' 其他的computed 没用到就不会给你打包减少体积
Vue 3 Composition Api
- Setup 语法糖式编程
- 例如 ref reactive watch computed toRefs toRaws 我们会在下几个章节详解
Chapter2 配置环境
1.安装nodejs(建议装14,16,版本稳定)
- 下载 | Node.js 中文网
- 装完之后会有一个命令叫 npm
- 可以在终端输入npm -v 来检查是否安装成功

2.构建vite项目
官方文档开始 {#getting-started} | Vite中文网
vite 的优势
- 冷服务 默认的构建目标浏览器是能 在 script 标签上支持原生 ESM 和 原生 ESM 动态导入
- HMR 速度快到惊人的 模块热更新(HMR)
- Rollup打包 它使用 Rollup 打包你的代码,并且它是预配置的 并且支持大部分rollup插件
使用vite初始化一个项目
npm init vite@latest
npm create vite
npm init vue
npm create vue
- 运行之后
- 项目名称

- 构建的项目模板

- 切换目录
- npm install 安装依赖包
- npm run dev 启动
- package json 命令解析json
{ "scripts": { "dev": "vite", // 启动开发服务器,别名:`vite dev`,`vite serve` "build": "vite build", // 为生产环境构建产物 "preview": "vite preview" // 本地预览生产构建产物 } }json"scripts": { "dev": "vite --host 192.168.1.107", // 设置项目启动的ip "build": "vue-tsc --noEmit && vite build", "preview": "vite preview" }
3.安装Vue cli脚手架
- npm install @vue/cli -g
- 检查是否安装成功

- vue create
<project> - 构建我们的cli 项目可以去对比一下
Chapter3 Vite目录 & Vue单文件组件 & npm run dev 详解
Vite目录
- public 下面的不会被编译 可以存放静态资源
- assets 下面可以存放可编译的静态资源
- components 下面用来存放我们的组件
- App.vue 是全局组件
- main.ts 全局的ts文件
- index.html 非常重要的入口文件 (webpack,rollup 他们的入口文件都是enrty input 是一个js文件 而Vite 的入口文件是一个html文件,他刚开始不会编译这些js文件 只有当你用到的时候 如script src="xxxxx.js" 会发起一个请求被vite拦截这时候才会解析js文件)
- vite.config.ts 这是vite的配置文件具体配置项 后面会详解
- VsCode Vue3 插件推荐 Vue Language Features (Volar)
SFC 语法规范
*.vue 件都由三种类型的顶层语法块所组成:
<template>、<script>、<style><template>- 每个 *.vue 文件最多可同时包含一个顶层
<template>块。 - 其中的内容会被提取出来并传递给 @vue/compiler-dom,预编译为 JavaScript 的渲染函数,并附属到导出的组件上作为其 render 选项。
- 每个 *.vue 文件最多可同时包含一个顶层
<script>- 每一个 *.vue 文件可以有多个
<script>块 (不包括<script setup>)。 - 该脚本将作为 ES Module 来执行。
- 其默认导出的内容应该是 Vue 组件选项对象,它要么是一个普通的对象,要么是 defineComponent 的返回值。
- 每一个 *.vue 文件可以有多个
<script setup>- 每个 *.vue 文件最多只能有一个
<script setup>块 (不包括常规的<script>) - 该脚本会被预处理并作为组件的 setup() 函数使用,也就是说它会在每个组件实例中执行。
<script setup>的顶层绑定会自动暴露给模板。更多详情请查看<script setup>文档。
- 每个 *.vue 文件最多只能有一个
<style>- 一个 *.vue 文件可以包含多个
<style>标签。 <style>标签可以通过 scoped 或 module attribute (更多详情请查看 SFC 样式特性) 将样式封装在当前组件内。多个不同封装模式的<style>标签可以在同一个组件中混
- 一个 *.vue 文件可以包含多个
npm run dev 详解
- 在我们执行这个命令的时候会去找 package.json 的 scripts 然后执行对应的dev命令
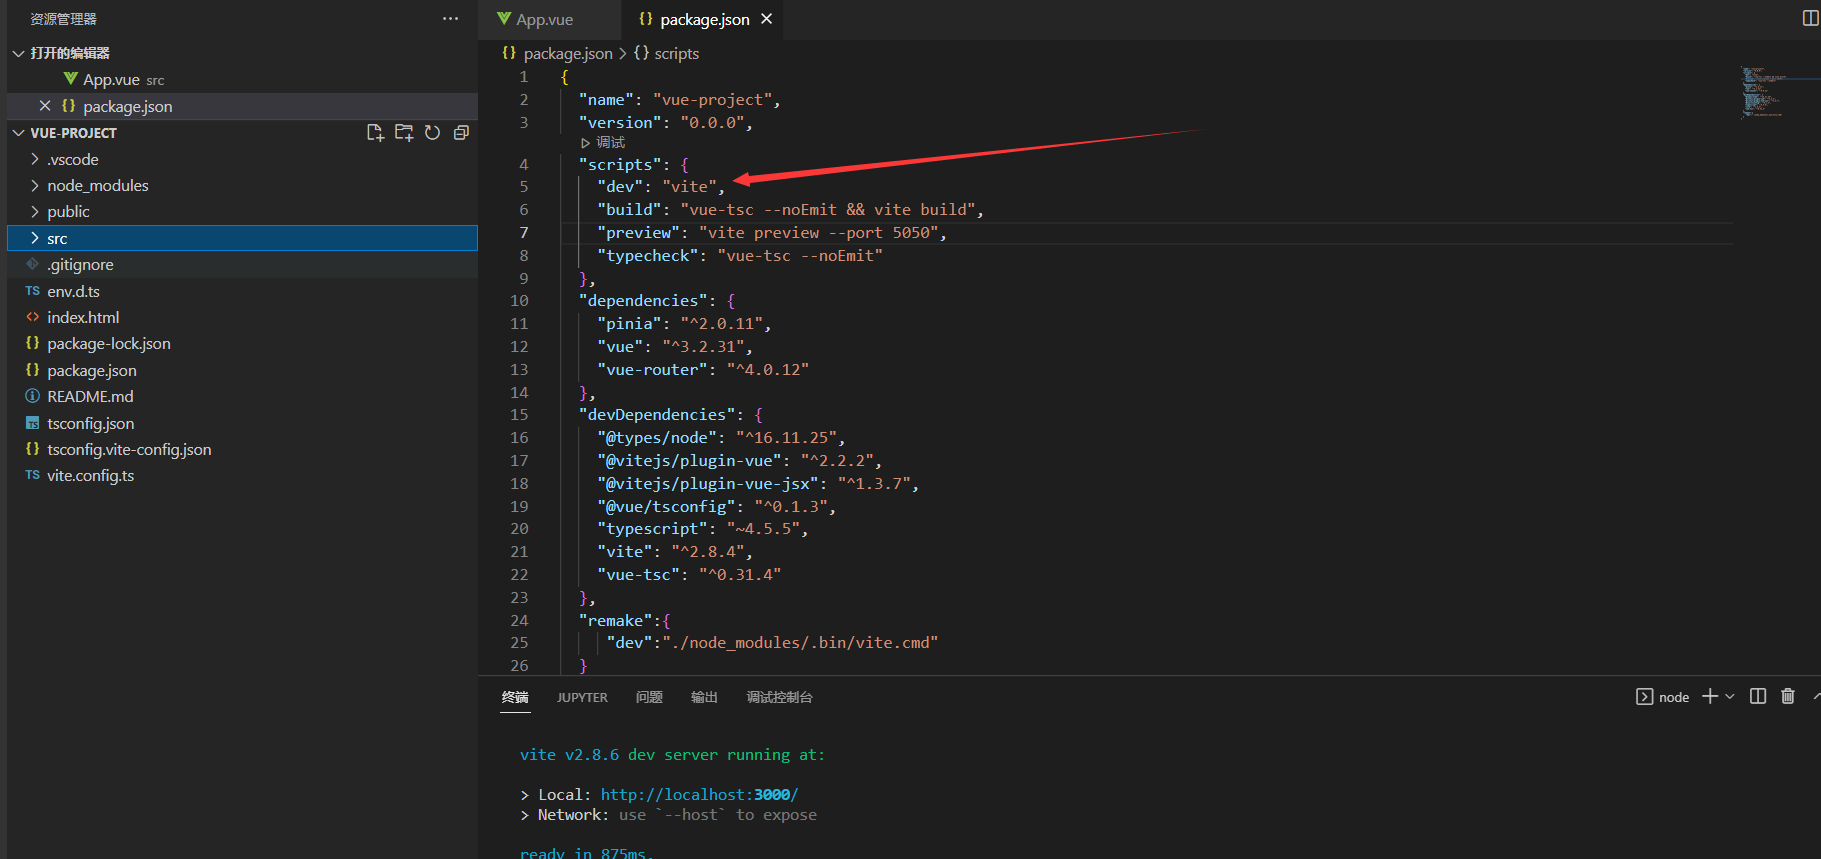
- 那为什么我们不直接执行vite 命令不是更方便吗

- 应为在我们的电脑上面并没有配置过相关命令 所以无法直接执行
- 其实在我们执行npm install 的时候(包含vite) 会在node_modules/.bin/ 创建好可执行文件
- .bin 目录,这个目录不是任何一个 npm 包。目录下的文件,表示这是一个个软链接,打开文件可以看到文件顶部写着 #!/bin/sh ,表示这是一个脚本
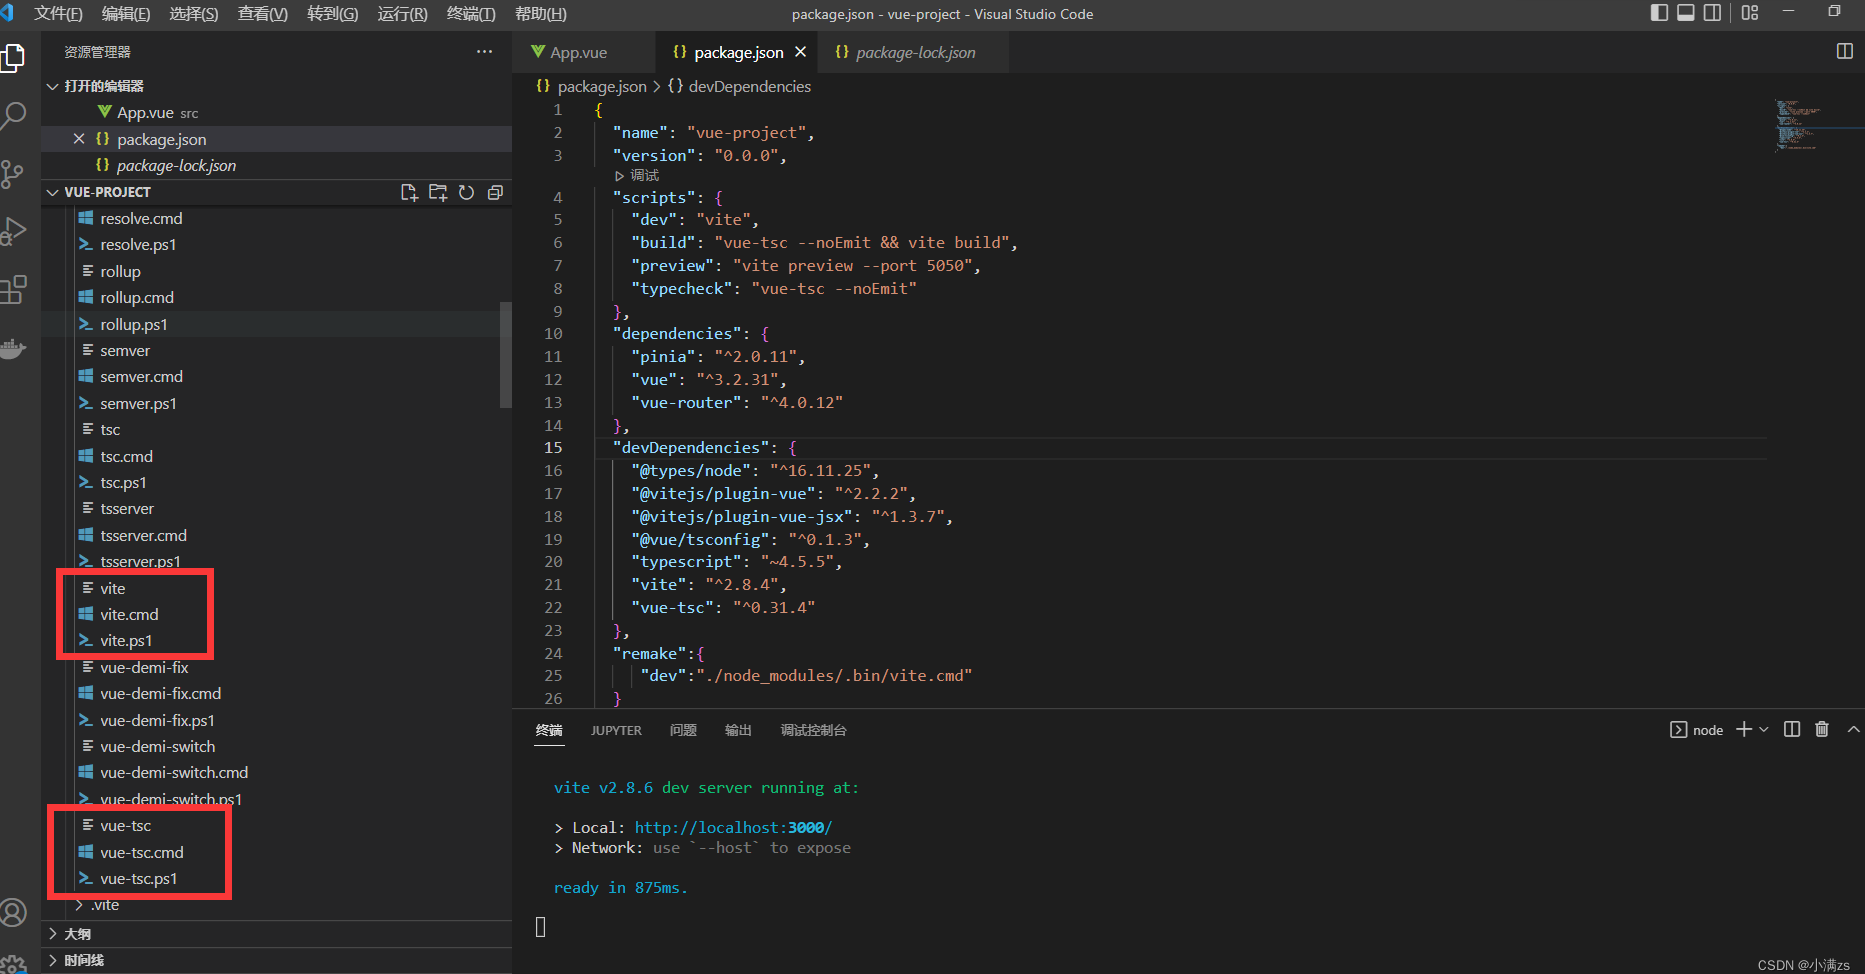
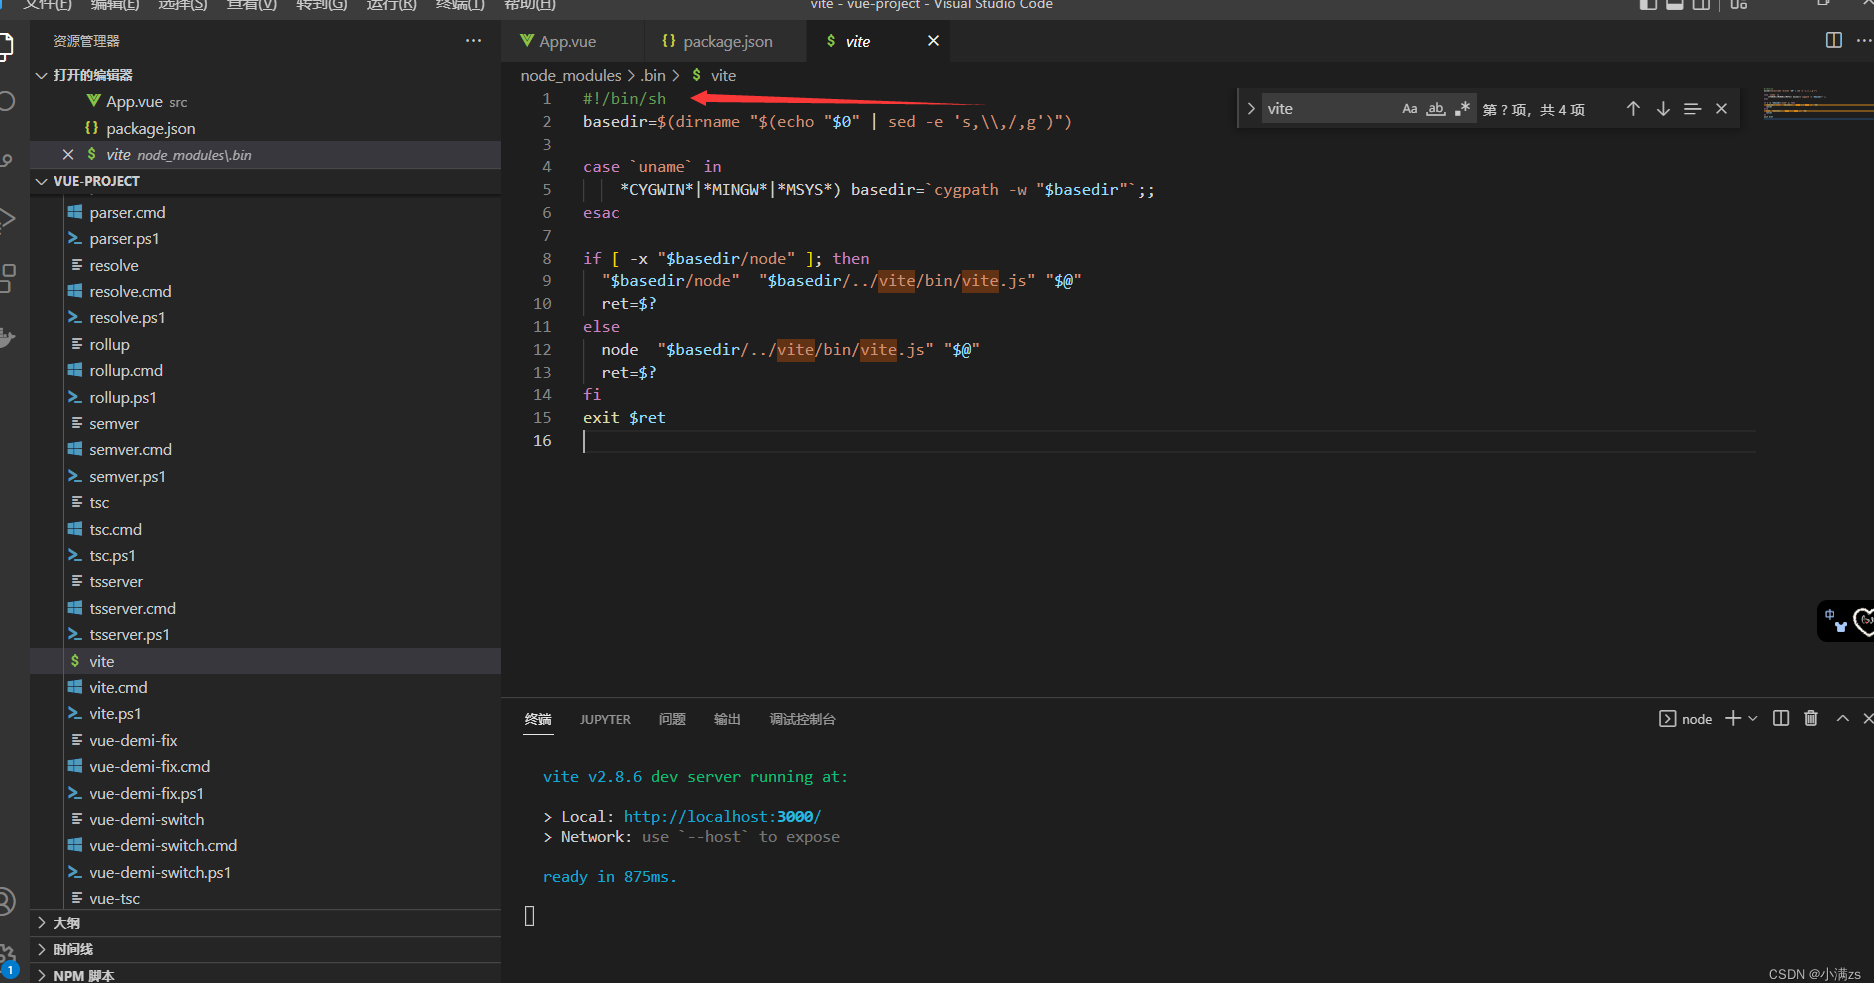
- 在我们执行npm run xxx npm 会通过软连接 查找这个软连接存在于源码目录node_modules/vite
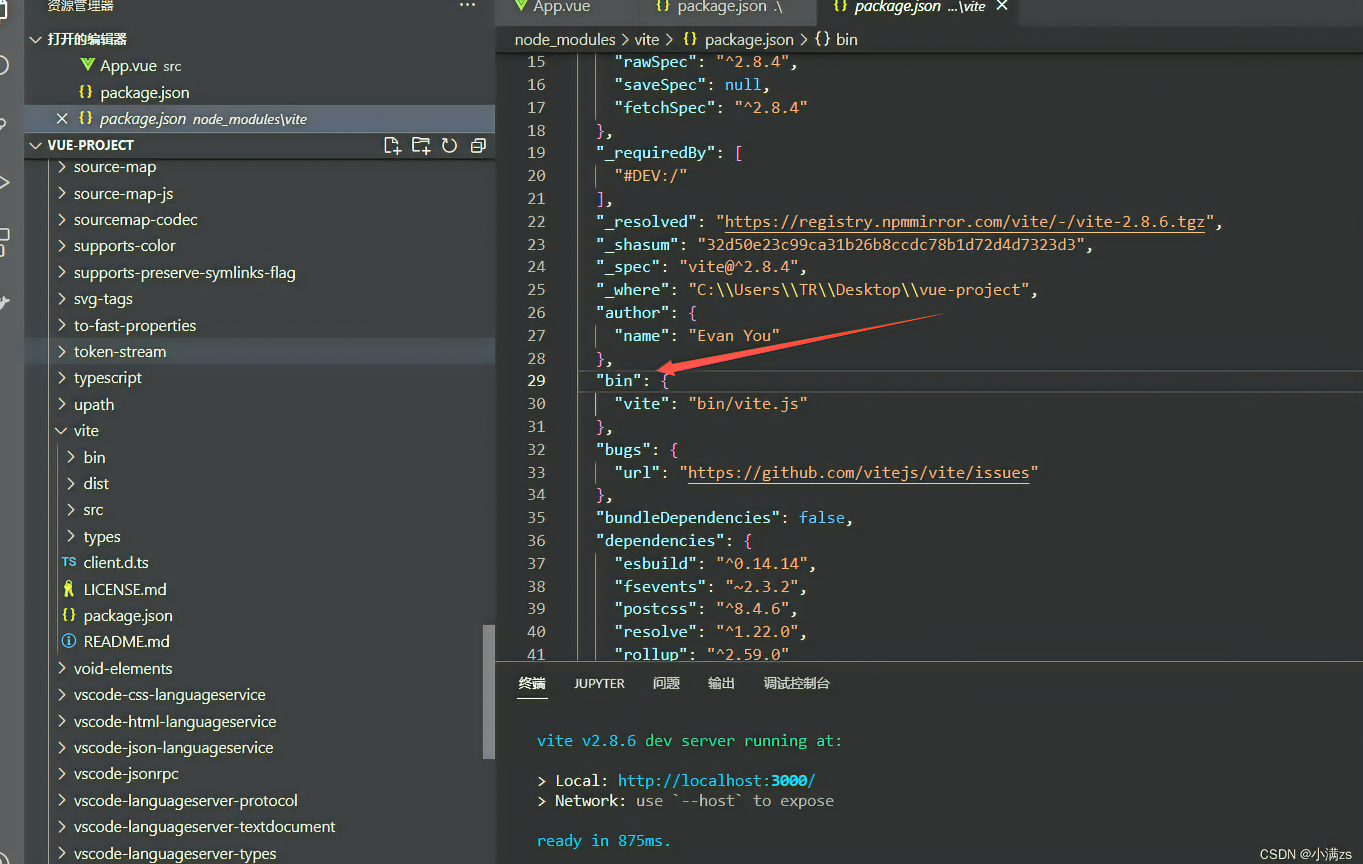
- 所以npm run xxx 的时候,就会到 node_modules/bin中找对应的映射文件,然后再找到相应的js文件来执行
- 1.查找规则是先从当前项目的node_modlue /bin去找,
- 2.找不到去全局的node_module/bin 去找
- 3.再找不到 去环境变量去找
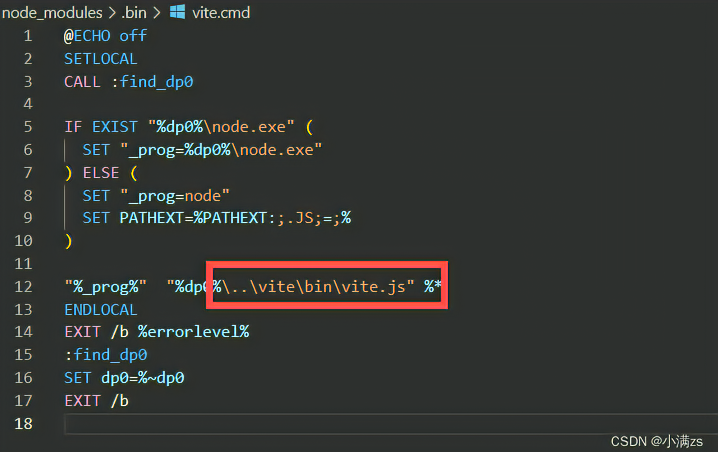
- 在我们执行这个命令的时候会去找 package.json 的 scripts 然后执行对应的dev命令
node_modules/bin中 有三个vite文件。为什么会有三个文件呢?
shell# unix Linux macOS 系默认的可执行文件,必须输入完整文件名 vite # windows cmd 中默认的可执行文件,当我们不添加后缀名时,自动根据 pathext 查找文件 vite # Windows PowerShell 中可执行文件,可以跨平台 vite- 我们使用windows 一般执行的是第二个
- MacOS Linux 一般是第一个
Chapter4 模板语法 & Vue指令
模板插值语法
在script 声明一个变量可以直接在template 使用用法为
vue<template> <div>{{ message }}</div> </template> <script setup lang="ts"> const message = "我是小满" </script> <style> </style>模板语法是可以编写条件运算的
vue<template> <div>{{ message == 0 ? '我是小满0' : '我不是小满other' }}</div> </template> <script setup lang="ts"> const message:number = 1 </script> <style> </style>运算也是支持的
vue<template> <div>{{ message + 1 }}</div> </template> <script setup lang="ts"> const message:number = 1 </script> <style> </style>操作 API 也是支持的
vue<template> <div>{{ message.split(',') }}</div> </template> <script setup lang="ts"> const message:string = "我,是,小,满" </script> <style> </style>
指令
v- 开头都是vue 的指令
v-text 用来显示文本
v-html 用来展示富文本
v-if 用来控制元素的显示隐藏(切换真假DOM)
v-else-if 表示 v-if 的“else if 块”。可以链式调用
v-else v-if条件收尾语句
v-show 用来控制元素的显示隐藏(display none block Css切换)
v-on 简写@ 用来给元素添加事件
v-bind 简写: 用来绑定元素的属性Attr
v-model 双向绑定
v-for 用来遍历元素
v-on修饰符 冒泡案例
vue<template> <div @click="parent"> <div @click.stop="child">child</div> </div> </template> <script setup lang="ts"> const child = () => { console.log('child'); } const parent = () => { console.log('parent'); } </script>阻止表单提交案例
vue<template> <form action="/"> <button @click.prevent="submit" type="submit">submit</button> </form> </template> <script setup lang="ts"> const submit = () => { console.log('child'); } </script> <style> </style>v-bind 绑定 class 案例 1
vue<template> <div :class="[flag ? 'active' : 'other', 'h']">12323</div> </template> <script setup lang="ts"> const flag: boolean = false; </script> <style> .active { color: red; } .other { color: blue; } .h { height: 300px; border: 1px solid #ccc; } </style>v-bind 绑定class 案例 2
vue<template> <div :class="flag">{{flag}}</div> </template> <script setup lang="ts"> type Cls = { other: boolean, h: boolean } const flag: Cls = { other: false, h: true }; </script> <style> .active { color: red; } .other { color: blue; } .h { height: 300px; border: 1px solid #ccc; } </style>v-bind 绑定style案例
vue<template> <div :style="style">2222</div> </template> <script setup lang="ts"> type Style = { height: string, color: string } const style: Style = { height: "300px", color: "blue" } </script> <style> </style>v-model 案例
vue<template> <input v-model="message" type="text" /> <div>{{ message }}</div> </template> <script setup lang="ts"> import { ref } from 'vue' const message = ref("v-model") </script> <style> .active { color: red; } .other { color: blue; } .h { height: 300px; border: 1px solid #ccc; } </style>
Chapter5 Vue核心虚拟Dom 和 Diff算法
为什么要学习源码
- 1.可以提升自己学习更优秀的API设计和代码逻辑
- 2.面试的时候也会经常问源码相关的东西
- 3.更快的掌握vue和遇到问题可以定位
介绍虚拟DOM
虚拟DOM就是通过JS来生成一个AST节点树

Vue Template Explorer
为什么要有虚拟DOM?
- 我们可以通过下面的例子ts
let div = document.createElement('div') let str = '' for (const key in div) { str += key + ',' } console.log(str) - 发现一个dom上面的属性是非常多的
align,title,lang,translate,dir,hidden,accessKey,draggable,spellcheck,textprediction,autocapitalize,contentEditable,enterKeyHint,isContentEditable,inputMode,virtualKeyboardPolicy,offsetParent,offsetTop,offsetLeft,offsetWidth,offsetHeight,innerText,outerText,onbeforexrselect,onabort,onbeforeinput,onblur,oncancel,oncanplay,oncanplaythrough,onchange,onclick,onclose,oncontextlost,oncontextmenu,oncontextrestored,oncuechange,ondblclick,ondrag,ondragend,ondragenter,ondragleave,ondragover,ondragstart,ondrop,ondurationchange,onemptied,onended,onerror,onfocus,onformdata,oninput,oninvalid,onkeydown,onkeypress,onkeyup,onload,onloadeddata,onloadedmetadata,onloadstart,onmousedown,onmouseenter,onmouseleave,onmousemove,onmouseout,onmouseover,onmouseup,onmousewheel,onpause,onplay,onplaying,onprogress,onratechange,onreset,onresize,onscroll,onsecuritypolicyviolation,onseeked,onseeking,onselect,onslotchange,onstalled,onsubmit,onsuspend,ontimeupdate,ontoggle,onvolumechange,onwaiting,onwebkitanimationend,onwebkitanimationiteration,onwebkitanimationstart,onwebkittransitionend,onwheel,onauxclick,ongotpointercapture,onlostpointercapture,onpointerdown,onpointermove,onpointerrawupdate,onpointerup,onpointercancel,onpointerover,onpointerout,onpointerenter,onpointerleave,onselectstart,onselectionchange,onanimationend,onanimationiteration,onanimationstart,ontransitionrun,ontransitionstart,ontransitionend,ontransitioncancel,oncopy,oncut,onpaste,dataset,nonce,autofocus,tabIndex,style,attributeStyleMap,attachInternals,blur,click,focus,inert,onbeforematch,namespaceURI,prefix,localName,tagName,id,className,classList,slot,attributes,shadowRoot,part,assignedSlot,innerHTML,outerHTML,scrollTop,scrollLeft,scrollWidth,scrollHeight,clientTop,clientLeft,clientWidth,clientHeight,onbeforecopy,onbeforecut,onbeforepaste,onsearch,elementTiming,onfullscreenchange,onfullscreenerror,onwebkitfullscreenchange,onwebkitfullscreenerror,role,ariaAtomic,ariaAutoComplete,ariaBusy,ariaChecked,ariaColCount,ariaColIndex,ariaColSpan,ariaCurrent,ariaDescription,ariaDisabled,ariaExpanded,ariaHasPopup,ariaHidden,ariaInvalid,ariaKeyShortcuts,ariaLabel,ariaLevel,ariaLive,ariaModal,ariaMultiLine,ariaMultiSelectable,ariaOrientation,ariaPlaceholder,ariaPosInSet,ariaPressed,ariaReadOnly,ariaRelevant,ariaRequired,ariaRoleDescription,ariaRowCount,ariaRowIndex,ariaRowSpan,ariaSelected,ariaSetSize,ariaSort,ariaValueMax,ariaValueMin,ariaValueNow,ariaValueText,children,firstElementChild,lastElementChild,childElementCount,previousElementSibling,nextElementSibling,after,animate,append,attachShadow,before,closest,computedStyleMap,getAttribute,getAttributeNS,getAttributeNames,getAttributeNode,getAttributeNodeNS,getBoundingClientRect,getClientRects,getElementsByClassName,getElementsByTagName,getElementsByTagNameNS,getInnerHTML,hasAttribute,hasAttributeNS,hasAttributes,hasPointerCapture,insertAdjacentElement,insertAdjacentHTML,insertAdjacentText,matches,prepend,querySelector,querySelectorAll,releasePointerCapture,remove,removeAttribute,removeAttributeNS,removeAttributeNode,replaceChildren,replaceWith,requestFullscreen,requestPointerLock,scroll,scrollBy,scrollIntoView,scrollIntoViewIfNeeded,scrollTo,setAttribute,setAttributeNS,setAttributeNode,setAttributeNodeNS,setPointerCapture,toggleAttribute,webkitMatchesSelector,webkitRequestFullScreen,webkitRequestFullscreen,checkVisibility,getAnimations,setHTML,nodeType,nodeName,baseURI,isConnected,ownerDocument,parentNode,parentElement,childNodes,firstChild,lastChild,previousSibling,nextSibling,nodeValue,textContent,ELEMENT_NODE,ATTRIBUTE_NODE,TEXT_NODE,CDATA_SECTION_NODE,ENTITY_REFERENCE_NODE,ENTITY_NODE,PROCESSING_INSTRUCTION_NODE,COMMENT_NODE,DOCUMENT_NODE,DOCUMENT_TYPE_NODE,DOCUMENT_FRAGMENT_NODE,NOTATION_NODE,DOCUMENT_POSITION_DISCONNECTED,DOCUMENT_POSITION_PRECEDING,DOCUMENT_POSITION_FOLLOWING,DOCUMENT_POSITION_CONTAINS,DOCUMENT_POSITION_CONTAINED_BY,DOCUMENT_POSITION_IMPLEMENTATION_SPECIFIC,appendChild,cloneNode,compareDocumentPosition,contains,getRootNode,hasChildNodes,insertBefore,isDefaultNamespace,isEqualNode,isSameNode,lookupNamespaceURI,lookupPrefix,normalize,removeChild,replaceChild,addEventListener,dispatchEvent,removeEventListener, - 所以直接操作DOM非常浪费性能
- 解决方案就是 我们可以用JS的计算性能来换取操作DOM所消耗的性能,既然我们逃不掉操作DOM这道坎,但是我们可以尽可能少的操作DOM
- 操作JS是非常快的
- 我们可以通过下面的例子
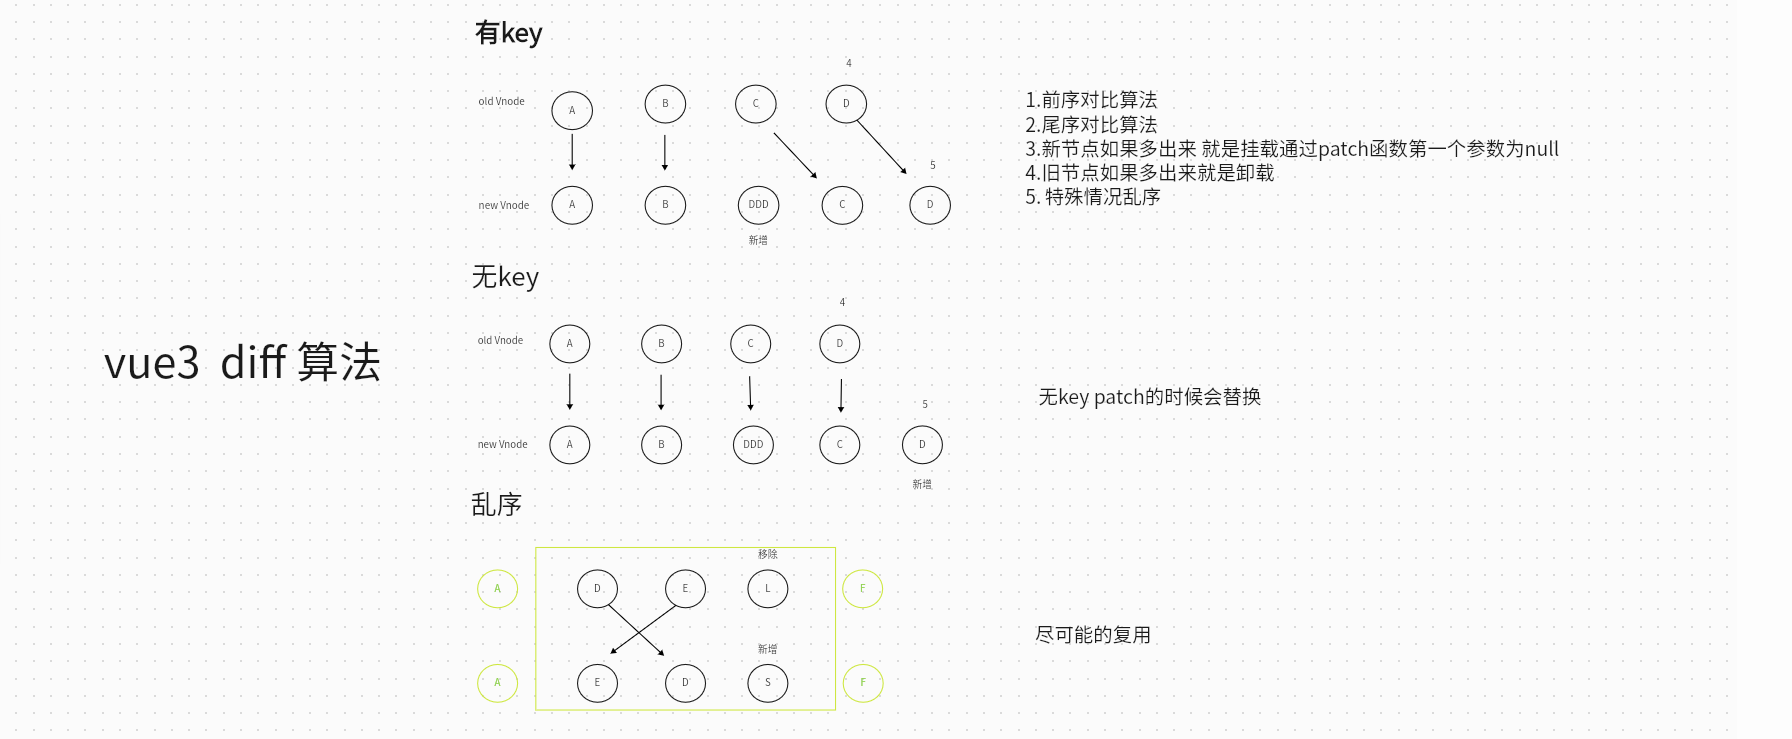
介绍Diff算法
Vue3 源码地址 https://github.com/vuejs/core
vue<template> <div> <div :key="item" v-for="(item) in Arr">{{ item }}</div> </div> </template> <script setup lang="ts"> const Arr: Array<string> = ['A', 'B', 'C', 'D'] Arr.splice(2,0,'DDD') </script> <style> </style>
splice 用法 太贴心了
Chapter6 认识Ref全家桶
ref
- 接受一个内部值并返回一个响应式且可变的 ref 对象。ref 对象仅有一个 .value property,指向该内部值。
- 案例
vue<template> <div> <button @click="changeMsg">change</button> <div>{{ message }}</div> </div> </template> <script setup lang="ts"> let message: string = "我是message" const changeMsg = () => { message = "change msg" } </script> <style> </style>- 我们这样操作是无法改变message 的值 应为message 不是响应式的无法被vue 跟踪要改成ref
- 改为ref
- Ref TS对应的接口ts
interface Ref<T> { value: T } - 注意被ref包装之后需要 .value 来进行赋值
isRef
- 判断是不是一个ref对象ts
import { ref, Ref,isRef } from 'vue'
let message: Ref<string | number> = ref("我是message")
let notRef:number = 123
const changeMsg = () => {
  message.value = "change msg"
  console.log(isRef(message)); //true
  console.log(isRef(notRef)); //false

}
- 判断是不是一个ref对象
ref 小妙招
- 我们console 输出
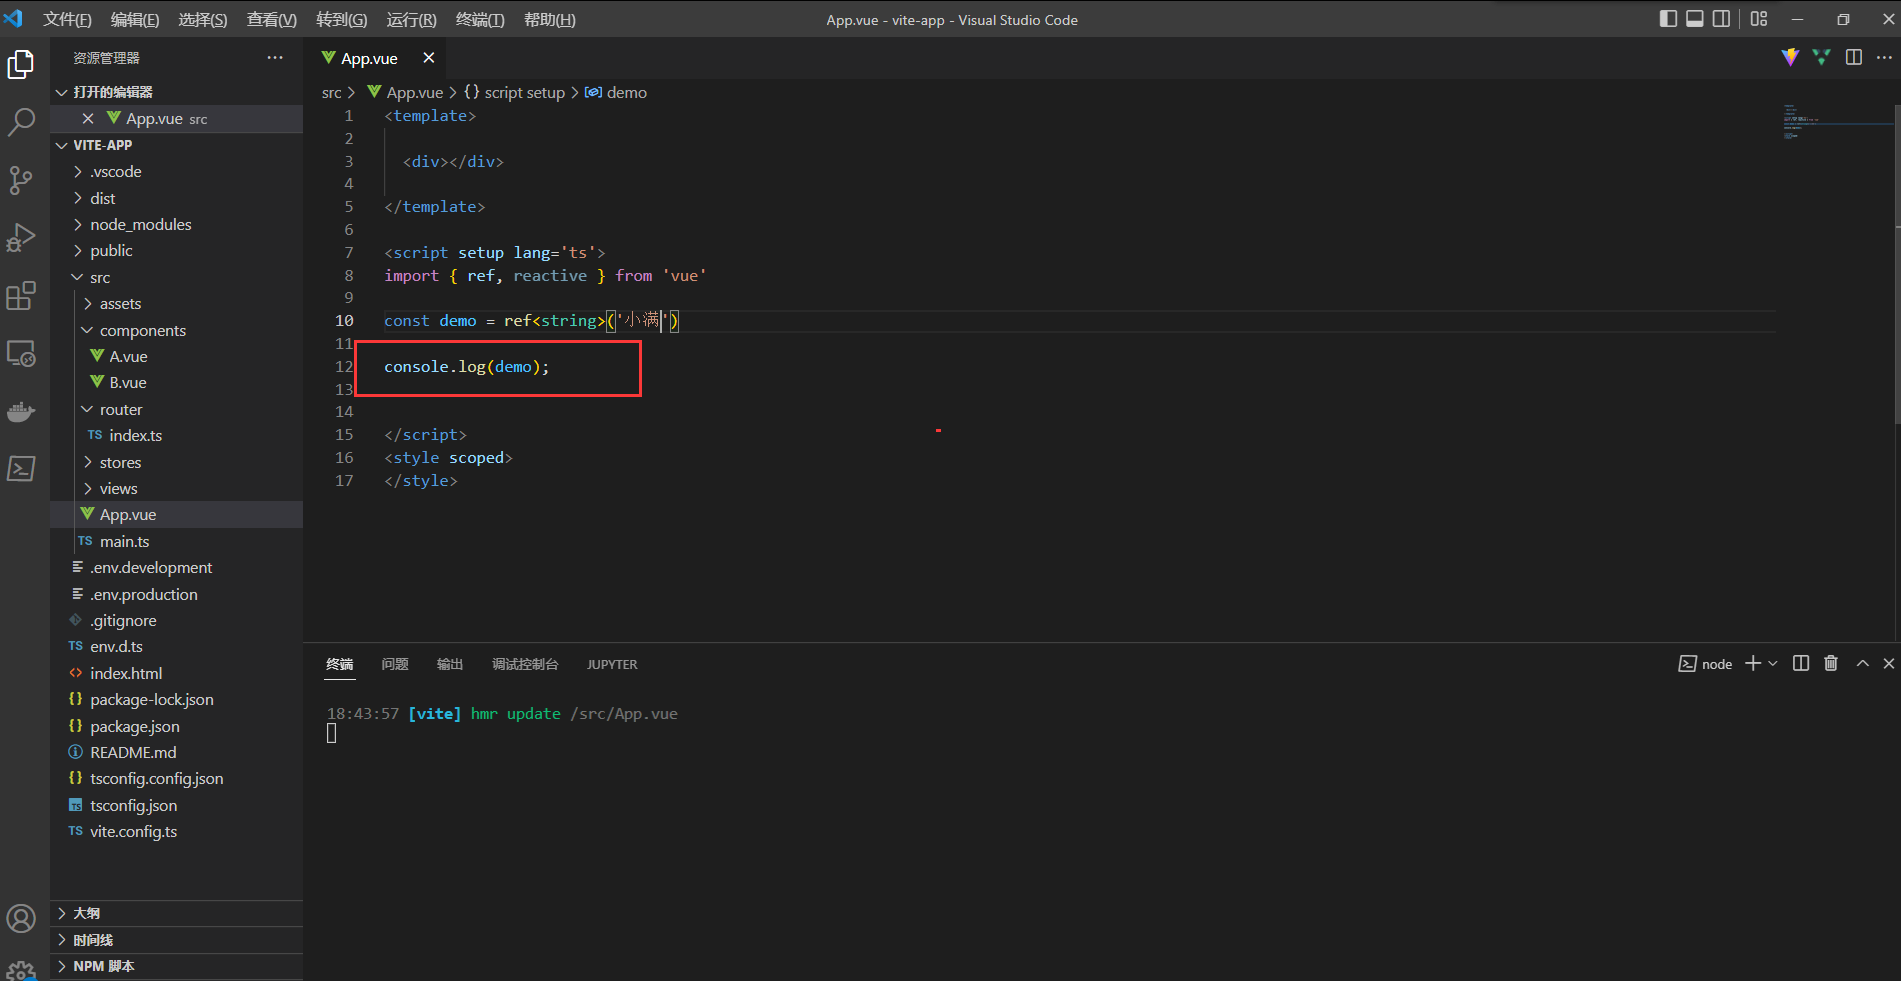
- 是个这玩意 查看起来很不方便 Vue 已经想到 了 帮我们做了格式化

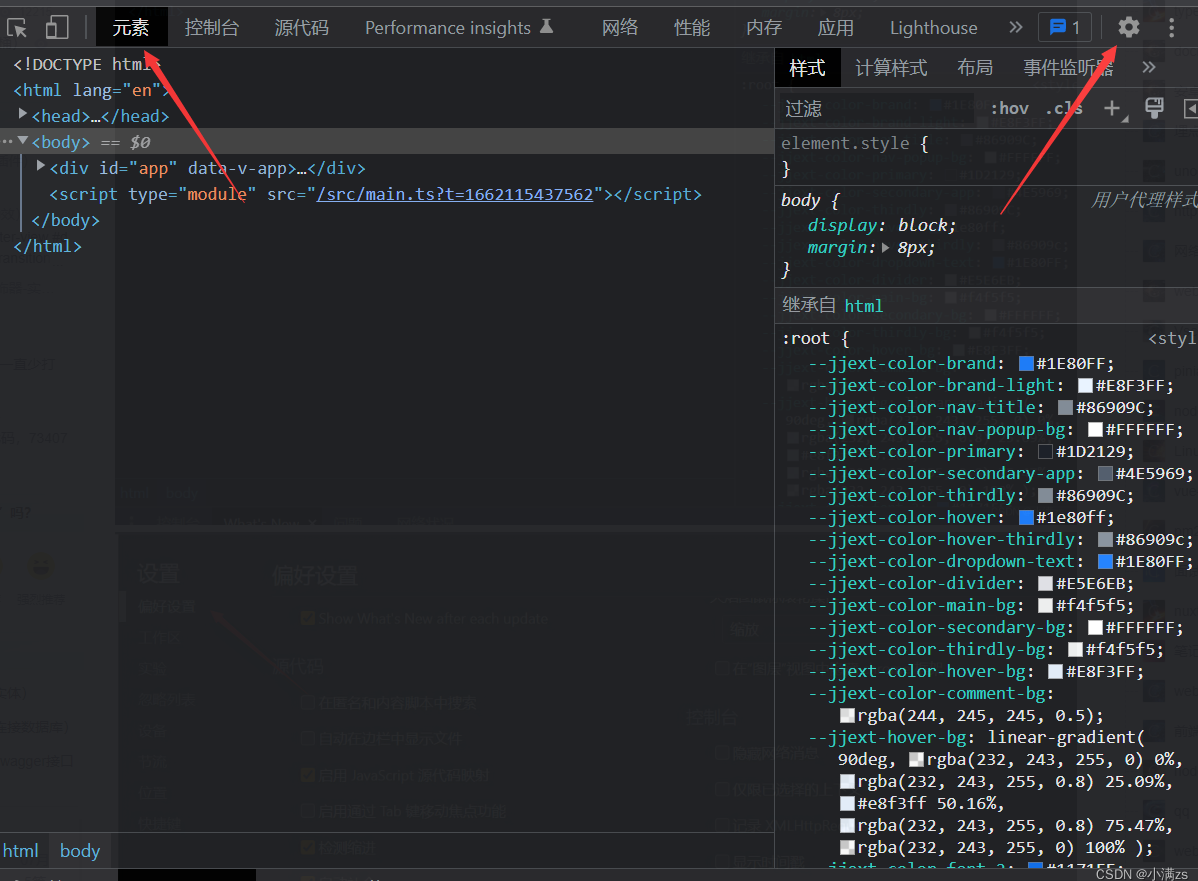
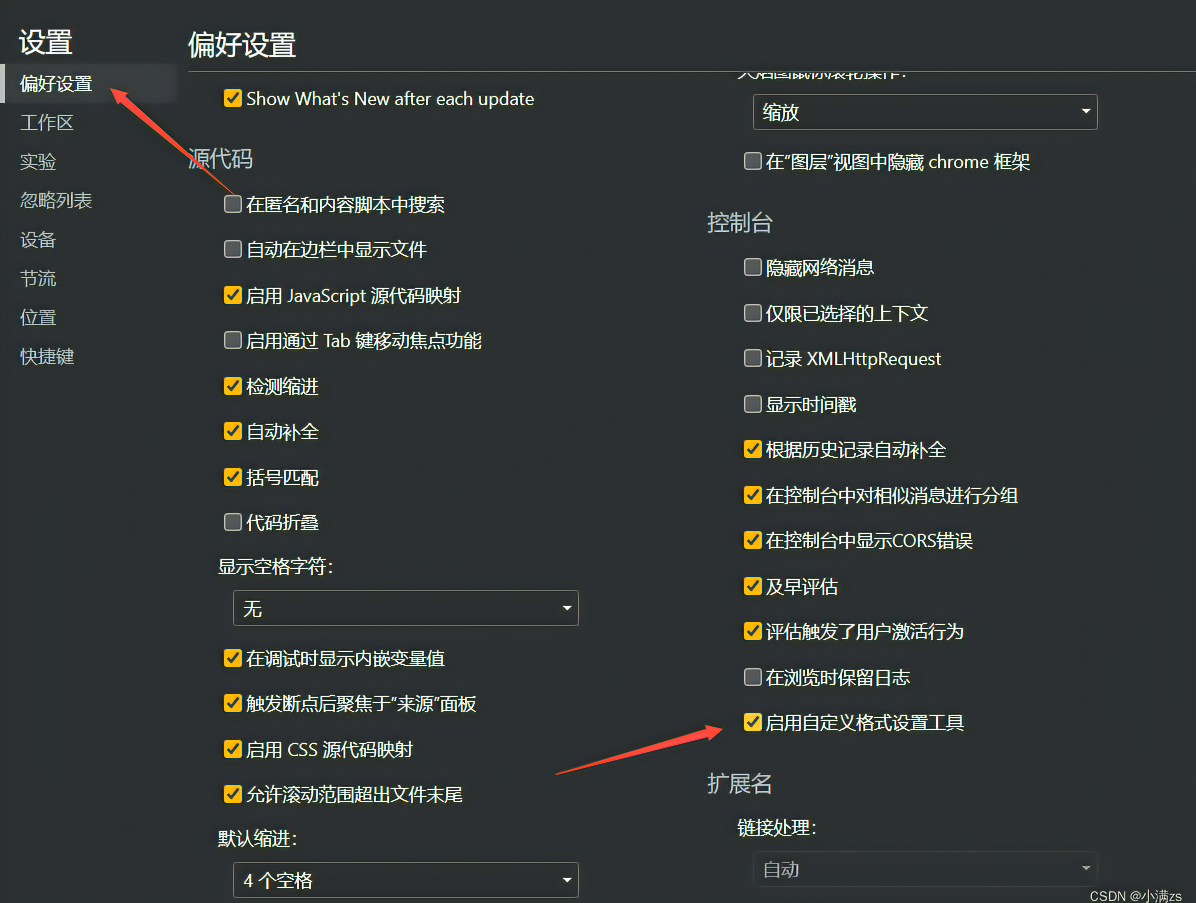
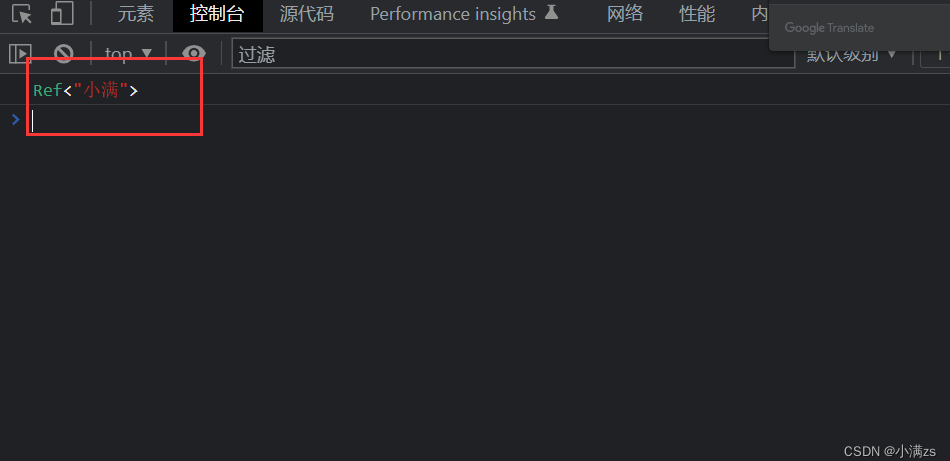
- 此时观看打印的值就很明了
- 我们console 输出
shallowRef
- 创建一个跟踪自身 .value 变化的 ref,但不会使其值也变成响应式的
- 例子1
- 修改其属性是非响应式的这样是不会改变的vue
<template> <div> <button @click="changeMsg">change</button> <div>{{ message }}</div> </div> </template> <script setup lang="ts"> import { Ref, shallowRef } from 'vue' type Obj = { name: string } let message: Ref<Obj> = shallowRef({ name: "小满" }) const changeMsg = () => { message.value.name = '大满' } </script> <style> </style> - 例子2
- 这样是可以被监听到的修改valuets
import { Ref, shallowRef } from 'vue'
type Obj = {
  name: string
}
let message: Ref<Obj> = shallowRef({
  name: "小满"
})

const changeMsg = () => {
  message.value = { name: "大满" }
}
- 这样是可以被监听到的修改value
triggerRef
- 强制更新页面DOM
- 这样也是可以改变值的vue
<template>
  <div>
    <button @click="changeMsg">change</button>
    <div>{{ message }}</div>
  </div>
</template>

<script setup lang="ts">
import { Ref, shallowRef,triggerRef } from 'vue'
type Obj = {
  name: string
}
let message: Ref<Obj> = shallowRef({
  name: "小满"
})

const changeMsg = () => {
  message.value.name = '大满'
triggerRef(message)
}
</script>

<style>
</style>
customRef
- 自定义ref
- customRef 是个工厂函数要求我们返回一个对象 并且实现 get 和 set 适合去做防抖之类的ts
<template>

  <div ref="div">小满Ref</div>
  <hr>
  <div>
    {{ name }}
  </div>
  <hr>
  <button @click="change">修改 customRef</button>

</template>

<script setup lang='ts'>
import { ref, reactive, onMounted, shallowRef, customRef } from 'vue'

function myRef<T = any>(value: T) {
  let timer:any;
  return customRef((track, trigger) => {
    return {
      get() {
        track()
        return value
      },
      set(newVal) {
        clearTimeout(timer)
        timer =  setTimeout(() => {
          console.log('触发了set')
          value = newVal
          trigger()
        },500)
      }
    }
  })
}

const name = myRef<string>('小满')

const change = () => {
  name.value = '大满'
}
</script>
<style scoped>
</style>
Chapter7 认识Reactive全家桶
reactive
用来绑定复杂的数据类型 例如 对象 数组
reactive 源码约束了我们的类型
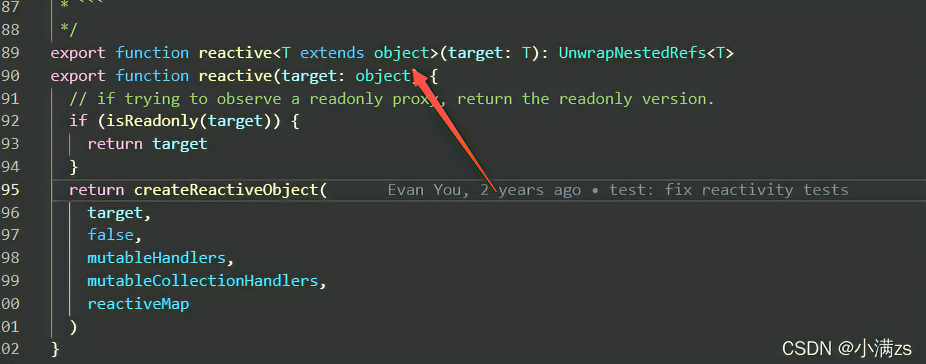
他是不可以绑定普通的数据类型这样是不允许 会给我们报错
tsimport { reactive} from 'vue' let person = reactive('sad')
绑定普通的数据类型 我们可以 使用昨天讲到ref
你如果用ref去绑定对象 或者 数组 等复杂的数据类型 我们看源码里面其实也是 去调用reactive
使用reactive 去修改值无须 .value
reactive 基础用法
tsimport { reactive } from 'vue' let person = reactive({ name:"小满" }) person.name = "大满"数组异步赋值问题
- 这样赋值页面是不会变化的因为会脱离响应式ts
let person = reactive<number[]>([]) setTimeout(() => { person = [1, 2, 3] console.log(person); },1000) - 解决方案1
- 使用pushts
import { reactive } from 'vue'
let person = reactive<number[]>([])
setTimeout(() => {
  const arr = [1, 2, 3]
  person.push(...arr)
  console.log(person);
},1000)
- 使用push
- 解决方案2
- 包裹一层对象ts
type Person = {
  list?:Array<number>
}
let person = reactive<Person>({
  list:[]
})
setTimeout(() => {
  const arr = [1, 2, 3]
  person.list = arr;
  console.log(person);

},1000)
- 包裹一层对象
- 这样赋值页面是不会变化的因为会脱离响应式
readonly
- 拷贝一份proxy对象将其设置为只读ts
import { reactive ,readonly} from 'vue'
const person = reactive({count:1})
const copy = readonly(person)

//person.count++

copy.count++
shallowReactive
- 只能对浅层的数据 如果是深层的数据只会改变值 不会改变视图
- 案例vue
<template>
  <div>
    <div>{{ state }}</div>
    <button @click="change1">test1</button>
    <button @click="change2">test2</button>
  </div>
</template>

<script setup lang="ts">
import { shallowReactive } from 'vue'

const obj = {
  a: 1,
  first: {
    b: 2,
    second: {
      c: 3
    }
  }
}

const state = shallowReactive(obj)

function change1() {
  state.a = 7
}
function change2() {
  state.first.b = 8
  state.first.second.c = 9
  console.log(state);
}

</script>

<style>
</style>
Chapter8 认识to系列全家桶
- toRef toRefs toRaw ### toRef
- 如果原始对象是非响应式的就不会更新视图 数据是会变的vue
<template> <div> <button @click="change">按钮</button> {{state}} </div> </template> <script setup lang="ts"> import { reactive, toRef } from 'vue' const obj = { foo: 1, bar: 1 } const state = toRef(obj, 'bar') // bar 转化为响应式对象 const change = () => { state.value++ console.log(obj, state); } </script> - 如果原始对象是响应式的是会更新视图并且改变数据的
toRefs
- 可以帮我们批量创建ref对象主要是方便我们解构使用ts
import { reactive, toRefs } from 'vue'
const obj = reactive({
  foo: 1,
  bar: 1
})

let { foo, bar } = toRefs(obj)

foo.value++
console.log(foo, bar);
toRaw
- 将响应式对象转化为普通对象ts
import { reactive, toRaw } from 'vue'

const obj = reactive({
  foo: 1,
  bar: 1
})

const state = toRaw(obj)
// 响应式对象转化为普通对象

const change = () => {
  console.log(obj, state);
}
Chapter9 认识computed计算属性
computed用法
- 计算属性就是当依赖的属性的值发生变化的时候,才会触发他的更改,如果依赖的值,不发生变化的时候,使用的是缓存中的属性值。
- 1 函数形式ts
import { computed, reactive, ref } from 'vue' let price = ref(0)//$0 let m = computed<string>(()=>{ return `$` + price.value }) price.value = 500 - 2 对象形式vue
<template>
  <div>{{ mul }}</div>
  <div @click="mul = 100">click</div>
</template>

<script setup lang="ts">
import { computed, ref } from 'vue'
let price = ref<number | string>(1)//$0
let mul = computed({
  get: () => {
      return price.value
  },
  set: (value) => {
      price.value = 'set' + value
  }
})
</script>

<style>
</style>
computed购物车案例
<template>
  <div>
      <table style="width:800px" border>
        <thead>
            <tr>
              <th>名称</th>
              <th>数量</th>
              <th>价格</th>
              <th>操作</th>
            </tr>
        </thead>
        <tbody>
            <tr :key="index" v-for="(item, index) in data">
              <td align="center">{{ item.name }}</td>
              <td align="center">
                  <button @click="AddAnbSub(item, false)">-</button>
                  {{ item.num }}
                  <button @click="AddAnbSub(item, true)">+</button>
              </td>
              <td align="center">{{ item.num * item.price }}</td>
              <td align="center">
                  <button @click="del(index)">删除</button>
              </td>
            </tr>
        </tbody>
        <tfoot>
            <tr>
              <td></td>
              <td></td>
              <td></td>
              <td align="center">总价:{{ $total }}</td>
            </tr>
        </tfoot>
      </table>
  </div>
</template>

<script setup lang="ts">
import { computed, reactive, ref } from 'vue'
type Shop = {
  name: string,
  num: number,
  price: number
}
let $total = ref<number>(0)
const data = reactive<Shop[]>([
  {
      name: "小满的袜子",
      num: 1,
      price: 100
  },
  {
      name: "小满的裤子",
      num: 1,
      price: 200
  },
  {
      name: "小满的衣服",
      num: 1,
      price: 300
  },
  {
      name: "小满的毛巾",
      num: 1,
      price: 400
  }
])

const AddAnbSub = (item: Shop, type: boolean = false): void => {
  if (item.num > 1 && !type) {
      item.num--
  }
  if (item.num <= 99 && type) {
      item.num++
  }
}
const del = (index: number) => {
  data.splice(index, 1)
}

$total = computed<number>(() => {
  return data.reduce((prev, next) => {
      return prev + (next.num * next.price)
  }, 0)
})

</script>

<style>
</style>
Chapter10 认识watch侦听器
watch 需要侦听特定的数据源,并在单独的回调函数中执行副作用
watch第一个参数监听源
watch第二个参数回调函数cb(newVal,oldVal)
watch第三个参数一个options配置项是一个对象
ts{ immediate:true //是否立即调用一次 deep:true //是否开启深度监听 }监听Ref 案例
tsimport { ref, watch } from 'vue' let message = ref({ nav:{ bar:{ name:"" } } }) watch(message, (newVal, oldVal) => { console.log('新的值----', newVal); console.log('旧的值----', oldVal); },{ immediate:true, deep:true })监听多个ref 注意变成数组啦
tsimport { ref, watch ,reactive} from 'vue' let message = ref('') let message2 = ref('') watch([message,message2], (newVal, oldVal) => { console.log('新的值----', newVal); console.log('旧的值----', oldVal); })监听Reactive
- 使用reactive监听深层对象开启和不开启deep 效果一样
tsimport { ref, watch ,reactive} from 'vue' let message = reactive({ nav:{ bar:{ name:"" } } }) watch(message, (newVal, oldVal) => { console.log('新的值----', newVal); console.log('旧的值----', oldVal); })案例2 监听reactive 单一值
tsimport { ref, watch ,reactive} from 'vue' let message = reactive({ name:"", name2:"" }) watch(()=>message.name, (newVal, oldVal) => { console.log('新的值----', newVal); console.log('旧的值----', oldVal); })
Chapter11 认识watchEffect高级侦听器
watchEffect
立即执行传入的一个函数,同时响应式追踪其依赖,并在其依赖变更时重新运行该函数。
如果用到message 就只会监听message 就是用到几个监听几个 而且是非惰性 会默认调用一次
tslet message = ref<string>('') let message2 = ref<string>('') watchEffect(() => { //console.log('message', message.value); console.log('message2', message2.value); })清除副作用
- 就是在触发监听之前会调用一个函数可以处理你的逻辑例如防抖ts
import { watchEffect, ref } from 'vue'
let message = ref<string>('')
let message2 = ref<string>('')
watchEffect((oninvalidate) => {
    //console.log('message', message.value);
    oninvalidate(()=>{

    })
    console.log('message2', message2.value);
})
- 就是在触发监听之前会调用一个函数可以处理你的逻辑例如防抖
停止跟踪 watchEffect 返回一个函数 调用之后将停止更新
tsconst stop = watchEffect((oninvalidate) => { //console.log('message', message.value); oninvalidate(()=>{ }) console.log('message2', message2.value); },{ flush:"post", onTrigger () { } }) stop()更多的配置项
- 副作用刷新时机 flush 一般使用post

- 副作用刷新时机 flush 一般使用post
onTrigger 可以帮助我们调试 watchEffect
tsimport { watchEffect, ref } from 'vue' let message = ref<string>('') let message2 = ref<string>('') watchEffect((oninvalidate) => { //console.log('message', message.value); oninvalidate(()=>{ }) console.log('message2', message2.value); },{ flush:"post", onTrigger () { } })
Chapter12 认识组件 & Vue3生命周期
组件基础
- 每一个.vue 文件呢都可以充当组件来使用
- 每一个组件都可以复用
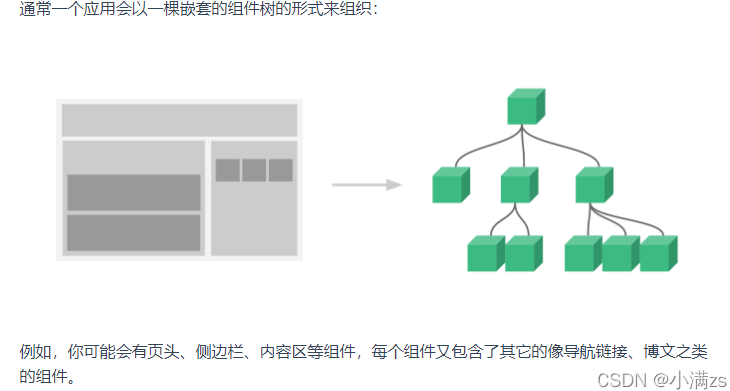
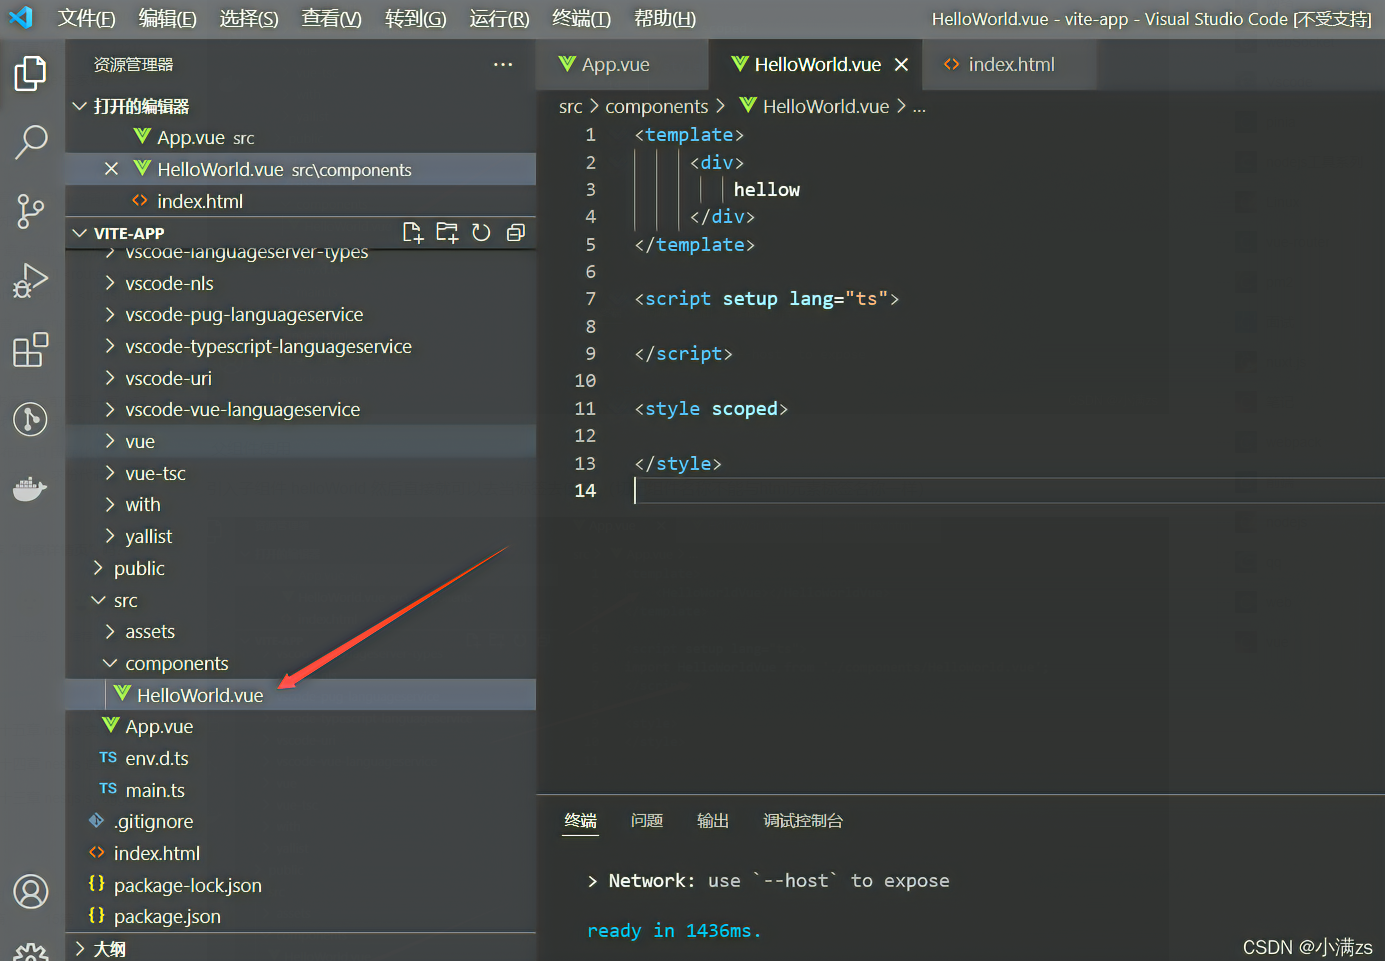
- 例如 helloWorld 充当子组件
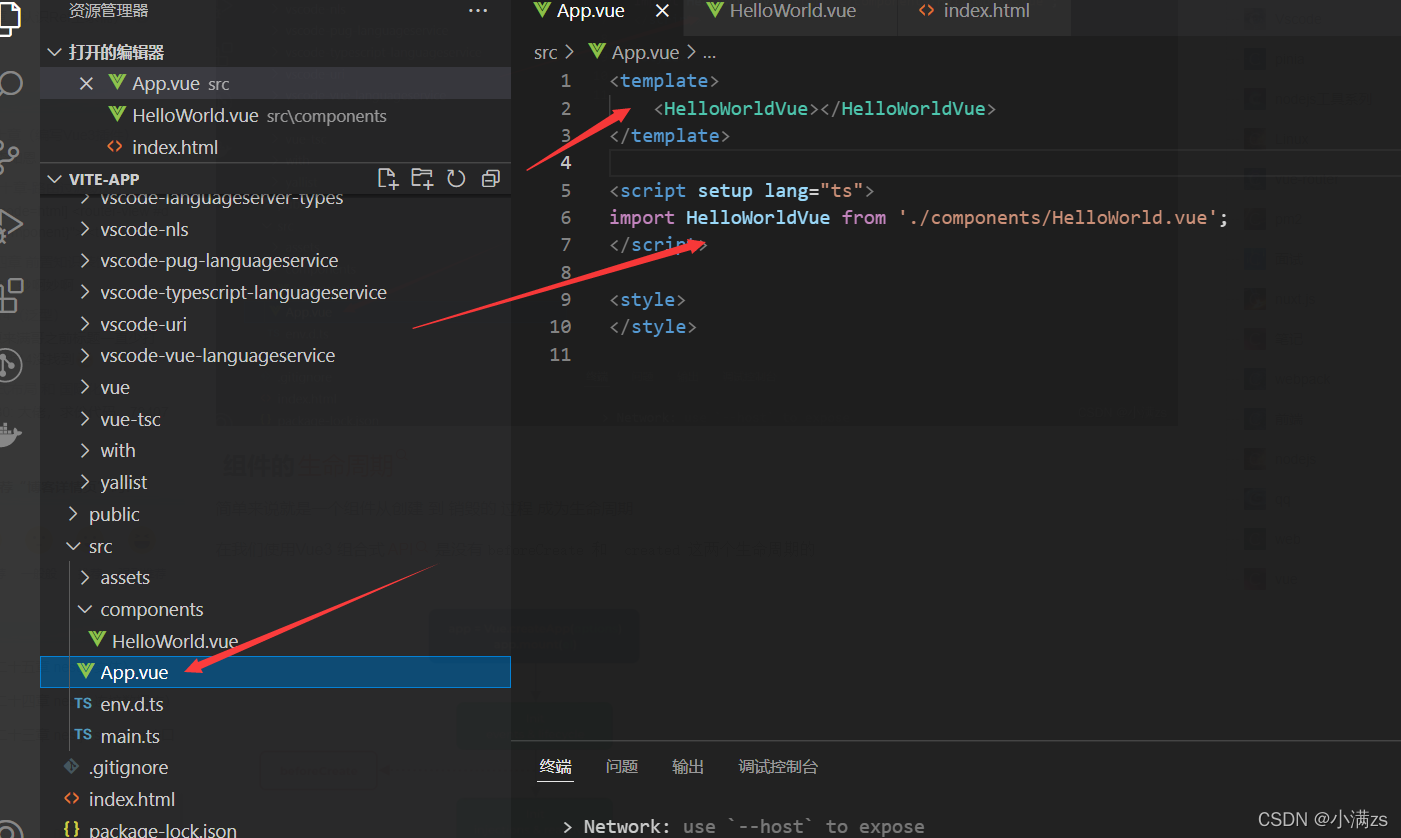
- 父组件使用
- 引入子组件 helloWorld 然后直接就可以去当标签去使用 (切记组件名称不能与html元素标签名称一样)
- 引入子组件 helloWorld 然后直接就可以去当标签去使用 (切记组件名称不能与html元素标签名称一样)
组件的生命周期
简单来说就是一个组件从创建 到 销毁的 过程 成为生命周期
在我们使用 Vue3 组合式API 是没有 beforeCreate 和 created 这两个生命周期的
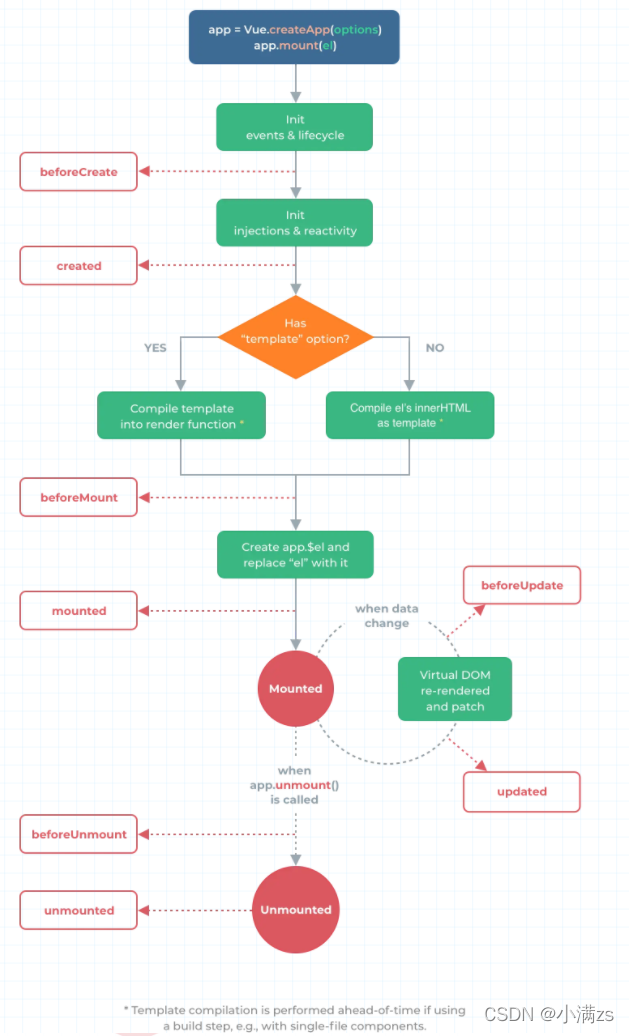
onBeforeMount()
- 在组件DOM实际渲染安装之前调用。在这一步中,根元素还不存在。
onMounted()
- 在组件的第一次渲染后调用,该元素现在可用,允许直接DOM访问
onBeforeUpdate()
- 数据更新时调用,发生在虚拟 DOM 打补丁之前。
onUpdated()
- DOM更新后,updated的方法即会调用。
onBeforeUnmount()
- 在卸载组件实例之前调用。在这个阶段,实例仍然是完全正常的。
onUnmounted()
- 卸载组件实例后调用。调用此钩子时,组件实例的所有指令都被解除绑定,所有事件侦听器都被移除,所有子组件实例被卸载。
| 选项式API | Hook inside setup |
|---|---|
| beforeCreate | Not needed* |
| created | Not needed* |
| beforeMount | onBeforeMount |
| mounted | onMounted |
| beforeUpdate | onBeforeUpdate |
| updated | onUpdated |
| beforeUnmount | onBeforeUnmount |
| unmounted | onUnmounted |
| errorCaptured | onErrorCaptured |
| renderTracked | onRenderTracked |
| renderTriggered | onRenderTriggered |
| activated | onActivated |
| deactivated | onDeactivated |
Chapter13 实操组件和认识less 和 scoped
什么是less
Less (Leaner Style Sheets 的缩写) 是一门向后兼容的 CSS 扩展语言。这里呈现的是 Less 的官方文档(中文版),包含了 Less 语言以及利用 JavaScript 开发的用于将 Less 样式转换成 CSS 样式的 Less.js 工具。
因为 Less 和 CSS 非常像,因此很容易学习。而且 Less 仅对 CSS 语言增加了少许方便的扩展,这就是 Less 如此易学的原因之一。
官方文档 Less 快速入门 | Less.js 中文文档 - Less 中文网
在vite中使用less
shellnpm install less less-loader -D 安装即可在style标签注明即可
vue<style lang="less"> </style>什么是scoped
- 实现组件的私有化, 当前style属性只属于当前模块.
- 在DOM结构中可以发现,vue通过在DOM结构以及css样式上加了唯一标记,达到样式私有化,不污染全局的作用,
- 样式穿透问题学到第三方组件精讲 ::v-deep >>> /deep/
Chapter14 父子组件传参
父组件通过v-bind绑定一个数据,然后子组件通过defineProps接受传过来的值,
如以下代码
给Menu组件 传递了一个title 字符串类型是不需要v-bind
vue<template> <div class="layout"> <Menu title="我是标题"></Menu> <div class="layout-right"> <Header></Header> <Content></Content> </div> </div> </template>传递非字符串类型需要加 v-bind 简写 冒号
vue<template> <div class="layout"> <Menu v-bind:data="data" title="我是标题"></Menu> <div class="layout-right"> <Header></Header> <Content></Content> </div> </div> </template> <script setup lang="ts"> import Menu from './Menu/index.vue' import Header from './Header/index.vue' import Content from './Content/index.vue' import { reactive } from 'vue'; const data = reactive<number[]>([1, 2, 3]) </script>子组件接受值
- 通过defineProps 来接受 defineProps是无须引入的直接使用即可
- 如果我们使用的TypeScript
- 可以使用传递字面量类型的纯类型语法做为参数
- 如 这是ts特有的ts
<template>
    <div class="menu">
        菜单区域 {{ title }}
        <div>{{ data }}</div>
    </div>
</template>

<script setup lang="ts">
defineProps<{
    title:string,
    data:number[]
}>()
</script>
如果你使用的不是TS
jsdefineProps({ title:{ default:"", type:string }, data:Array })TS 特有的默认值方式
- withDefaults是个函数也是无须引入开箱即用接受一个props函数第二个参数是一个对象设置默认值
tstype Props = { title?: string, data?: number[] } withDefaults(defineProps<Props>(), { title: "张三", data: () => [1, 2, 3] })子组件给父组件传参
是通过defineEmits派发一个事件
vue<template> <div class="menu"> <button @click="clickTap">派发给父组件</button> </div> </template> <script setup lang="ts"> import { reactive } from 'vue' const list = reactive<number[]>([4, 5, 6]) const emit = defineEmits(['on-click']) const clickTap = () => { emit('on-click', list) } </script>我们在子组件绑定了一个click 事件 然后通过defineEmits 注册了一个自定义事件
点击click 触发 emit 去调用我们注册的事件 然后传递参数
父组件接受子组件的事件
vue<template> <div class="layout"> <Menu @on-click="getList"></Menu> <div class="layout-right"> <Header></Header> <Content></Content> </div> </div> </template> <script setup lang="ts"> import Menu from './Menu/index.vue' import Header from './Header/index.vue' import Content from './Content/index.vue' import { reactive } from 'vue'; const data = reactive<number[]>([1, 2, 3]) const getList = (list: number[]) => { console.log(list,'父组件接受子组件'); } </script>我们从Menu 组件接受子组件派发的事件on-click 后面是我们自己定义的函数名称getList会把参数返回过来
子组件暴露给父组件内部属性
- 通过defineExpose
我们从父组件获取子组件实例通过ref
ts<Menu ref="menus"></Menu> const menus = ref(null)- 然后打印menus.value 发现没有任何属性
这时候父组件想要读到子组件的属性可以通过 defineExpose 暴露
tsconst list = reactive<number[]>([4, 5, 6]) defineExpose({ list })这样父组件就可以读到了
Chapter15 全局组件,局部组件,递归组件
配置全局组件
例如组件使用频率非常高(table,Input,button,等)这些组件 几乎每个页面都在使用便可以封装成全局组件
案例------我这儿封装一个Card组件想在任何地方去使用
vue<template> <div class="card"> <div class="card-header"> <div>标题</div> <div>副标题</div> </div> <div v-if='content' class="card-content"> {{content}} </div> </div> </template> <script setup lang="ts"> type Props = { content:string } defineProps<Props>() </script> <style scoped lang='less'> @border:#ccc; .card{ width: 300px; border: 1px solid @border; border-radius: 3px; &:hover{ box-shadow:0 0 10px @border; } &-content{ padding: 10px; } &-header{ display: flex; justify-content: space-between; padding: 10px; border-bottom: 1px solid @border; } } </style>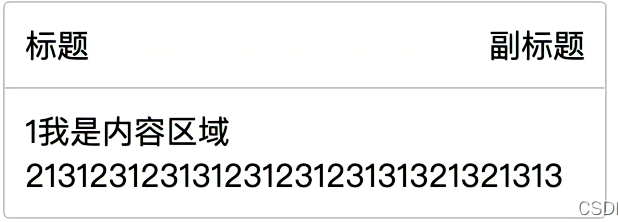
使用方法
- 在main.ts 引入我们的组件跟随在createApp(App) 后面 切记不能放到mount 后面这是一个链式调用用
- 其次调用 component 第一个参数组件名称 第二个参数组件实例ts
import { createApp } from 'vue' import App from './App.vue' import './assets/css/reset/index.less' import Card from './components/Card/index.vue'
createApp(App).component('Card',Card).mount('#app')使用方法
- 直接在其他vue页面 立即使用即可 无需引入vue
<template>
<Card></Card>
</template>
- 直接在其他vue页面 立即使用即可 无需引入
配置局部组件
vue<template> <div class="wraps"> <layout-menu :flag="flag" @on-click="getMenu" @on-toogle="getMenuItem" :data="menuList" class="wraps-left"></layout-menu> <div class="wraps-right"> <layout-header> </layout-header> <layout-main class="wraps-right-main"></layout-main> </div> </div> </template> <script setup lang="ts"> import { reactive,ref } from "vue"; import layoutHeader from "./Header.vue"; import layoutMenu from "./Menu.vue"; import layoutMain from "./Content.vue";- 就是在一个组件内(A) 通过import 去引入别的组件(B) 称之为局部组件
- 应为B组件只能在A组件内使用 所以是局部组件
- 如果C组件想用B组件 就需要C组件也手动import 引入 B 组件
配置递归组件
- 原理跟我们写js递归是一样的 自己调用自己 通过一个条件来结束递归 否则导致内存泄漏
- 案例递归树
- 在父组件配置数据结构 数组对象格式 传给子组件ts
type TreeList = { name: string; icon?: string; children?: TreeList[] | []; }; const data = reactive<TreeList[]>([ { name: "no.1", children: [ { name: "no.1-1", children: [ { name: "no.1-1-1", }, ], }, ], }, { name: "no.2", children: [ { name: "no.2-1", }, ], }, { name: "no.3", }, ]); - 子组件接收值 第一个scriptts
type TreeList = { name: string; icon?: string; children?: TreeList[] | []; }; type Props<T> = { data?: T[] | []; }; defineProps<Props<TreeList>>(); const clickItem = (item: TreeList) => { console.log(item) } - 子组件增加一个script 定义组件名称为了 递归用ts
<script lang="ts"> export default { name:"TreeItem" } </script> - template
- TreeItem 其实就是当前组件 通过import 把自身又引入了一遍 如果他没有children 了就结束html
<div style="margin-left:10px;" class="tree">
  <div :key="index" v-for="(item,index) in data">
    <div @click='clickItem(item)'>{{item.name}}
  </div>
  <TreeItem @on-click='clickItem' v-if='item?.children?.length' :data="item.children"></TreeItem>
</div>
</div>
- TreeItem 其实就是当前组件 通过import 把自身又引入了一遍 如果他没有children 了就结束
Chapter16 动态组件
什么是动态组件 就是:让多个组件使用同一个挂载点,并动态切换,这就是动态组件。
在挂载点使用component标签,然后使用
v-bind:is=”组件”用法如下
引入组件
tsimport A from './A.vue' import B from './B.vue'vue<component :is="A"></component>- 通过is 切换 A B 组件
使用场景
- tab切换 居多
注意事项
- 1.在Vue2 的时候is 是通过组件名称切换的 在Vue3 setup 是通过组件实例切换的
- 2.如果你把组件实例放到Reactive Vue会给你一个警告runtime-core.esm-bundler.js:38 [Vue warn]: Vue received a Component which was made a reactive object. This can lead to unnecessary performance overhead, and should be avoided by marking the component with
markRawor usingshallowRefinstead ofref. - Component that was made reactive:
- 这是因为reactive 会进行proxy 代理 而我们组件代理之后毫无用处 节省性能开销 推荐我们使用shallowRef 或者 markRaw 跳过proxy 代理
修改如下
tsconst tab = reactive<Com[]>([{ name: "A组件", comName: markRaw(A) }, { name: "B组件", comName: markRaw(B) }])
Chapter 插槽slot
- 插槽就是子组件中的提供给父组件使用的一个占位符,用
<slot></slot>表示,父组件可以在这个占位符中填充任何模板代码,如 HTML、组件等,填充的内容会替换子组件的<slot></slot>标签。
匿名插槽
- 在子组件放置一个插槽vue
<template> <div> <slot></slot> </div> </template> - 父组件使用插槽
- 在父组件给这个插槽填充内容vue
<Dialog>
    <template v-slot>
        <div>2132</div>
    </template>
</Dialog>
具名插槽
- 具名插槽其实就是给插槽取个名字。一个子组件可以放多个插槽,而且可以放在不同的地方,而父组件填充内容时,可以根据这个名字把内容填充到对应插槽中html
<div> <slot name="header"></slot> <slot></slot> <slot name="footer"></slot> </div> - 父组件使用需对应名称html
<Dialog> <template v-slot:header> <div>1</div> </template> <template v-slot> <div>2</div> </template> <template v-slot:footer> <div>3</div> </template> </Dialog> - 插槽简写html
<Dialog>
    <template #header>
        <div>1</div>
    </template>
    <template #default>
        <div>2</div>
    </template>
    <template #footer>
        <div>3</div>
    </template>
</Dialog>
作用域插槽
- 在子组件动态绑定参数 派发给父组件的slot去使用html
<div> <slot name="header"></slot> <div> <div v-for="item in 100"> <slot :data="item"></slot> </div> </div> <slot name="footer"></slot> </div> - 通过结构方式取值html
  <Dialog>
    <template #header>
        <div>1</div>
    </template>
    <template #default="{ data }">
        <div>{{ data }}</div>
    </template>
    <template #footer>
        <div>3</div>
    </template>
</Dialog>
动态插槽
- 插槽可以是一个变量名html
<Dialog> <template #[name]> <div> 23 </div> </template> </Dialog>tsconst name = ref('header')
Chapter18 异步组件 & 代码分包 & suspense
### 异步组件
- 在大型应用中,我们可能需要将应用分割成小一些的代码块 并且减少主包的体积
- 这时候就可以使用异步组件
### 顶层 await
- 在setup语法糖里面 使用方法
<script setup>中可以使用顶层 await。结果代码会被编译成 async setup()ts<script setup> const post = await fetch(`/api/post/1`).then(r => r.json()) </script>- 父组件引用子组件 通过defineAsyncComponent加载异步配合import 函数模式便可以分包ts
<script setup lang="ts">
import { reactive, ref, markRaw, toRaw, defineAsyncComponent } from 'vue'

const Dialog = defineAsyncComponent(() => import('../../components/Dialog/index.vue'))
suspense
<suspense>组件有两个插槽。它们都只接收一个直接子节点。default 插槽里的节点会尽可能展示出来。如果不能,则展示 fallback 插槽里的节点。ts<Suspense> <template #default> <Dialog> <template #default> <div>我在哪儿</div> </template> </Dialog> </template> <template #fallback> <div>loading...</div> </template> </Suspense>
Chapter19 Teleport传送组件
- Teleport Vue 3.0新特性之一。
- Teleport 是一种能够将我们的模板渲染至指定DOM节点,不受父级style、v-show等属性影响,但data、prop数据依旧能够共用的技术;类似于 React 的 Portal。
- 主要解决的问题 因为Teleport节点挂载在其他指定的DOM节点下,完全不受父级style样式影响
使用方法
通过to 属性 插入指定元素位置 to="body" 便可以将Teleport 内容传送到指定位置
vue<Teleport to="body"> <Loading></Loading> </Teleport>也可以自定义传送位置 支持 class id等 选择器
html<div id="app"></div> <div class="modal"></div>vue<template> <div class="dialog"> <header class="header"> <div>我是弹框</div> <el-icon> <CloseBold /> </el-icon> </header> <main class="main"> 我是内容12321321321 </main> <footer class="footer"> <el-button size="small">取消</el-button> <el-button size="small" type="primary">确定</el-button> </footer> </div> </template> <script setup lang='ts'> import { ref, reactive } from 'vue' </script> <style lang="less" scoped> .dialog { width: 400px; height: 400px; background: #141414; display: flex; flex-direction: column; position: absolute; left: 50%; top: 50%; margin-left: -200px; margin-top: -200px; .header { display: flex; color: #CFD3DC; border-bottom: 1px solid #636466; padding: 10px; justify-content: space-between; } .main { flex: 1; color: #CFD3DC; padding: 10px; } .footer { border-top: 1px solid #636466; padding: 10px; display: flex; justify-content: flex-end; } } </style>
多个使用场景
<Teleport to=".modal1">
    <Loading></Loading>
</Teleport>
<Teleport to=".modal2">
    <Loading></Loading>
</Teleport>动态控制teleport
- 使用disabled 设置为 true则 to属性不生效 false 则生效xml
<teleport :disabled="true" to='body'>
  <A></A>
</teleport>
Chapter20 keep-alive缓存组件
内置组件keep-alive
有时候我们不希望组件被重新渲染影响使用体验;或者处于性能考虑,避免多次重复渲染降低性能。而是希望组件可以缓存下来,维持当前的状态。这时候就需要用到keep-alive组件。
开启keep-alive 生命周期的变化
- 初次进入时: onMounted> onActivated
- 退出后触发 deactivated
- 再次进入:
- 只会触发 onActivated
- 事件挂载的方法等,只执行一次的放在 onMounted中;组件每次进去执行的方法放在 onActivated中
xml<!-- 基本 --> <keep-alive> <component :is="view"></component> </keep-alive> <!-- 多个条件判断的子组件 --> <keep-alive> <comp-a v-if="a > 1"></comp-a> <comp-b v-else></comp-b> </keep-alive> <!-- 和 `<transition>` 一起使用 --> <transition> <keep-alive> <component :is="view"></component> </keep-alive> </transition>include 和 exclude
vue<keep-alive :include="" :exclude="" :max=""></keep-alive>- include 和 exclude 允许组件有条件地缓存。二者都可以用逗号分隔字符串、正则表达式或一个数组来表示:
- maxxml
<keep-alive :max="10">
  <component :is="view"></component>
</keep-alive>
Chapter21 transition动画组件
- Vue 提供了 transition 的封装组件,在下列情形中,可以给任何元素和组件添加进入/离开过渡:
- 条件渲染 (使用 v-if)
- 条件展示 (使用 v-show)
- 动态组件
- 组件根节点
- 自定义 transition 过度效果,你需要对transition组件的name属性自定义。并在css中写入对应的样式
1. 过渡的类名
- 在进入/离开的过渡中,会有 6 个 class 切换。
- #过渡 class
- 在进入/离开的过渡中,会有 6 个 class 切换。
- v-enter-from:定义进入过渡的开始状态。在元素被插入之前生效,在元素被插入之后的下一帧移除。
- v-enter-active:定义进入过渡生效时的状态。在整个进入过渡的阶段中应用,在元素被插入之前生效,在过渡/动画完成之后移除。这个类可以被用来定义进入过渡的过程时间,延迟和曲线函数。
- v-enter-to:定义进入过渡的结束状态。在元素被插入之后下一帧生效 (与此同时 v-enter-from 被移除),在过渡/动画完成之后移除。
- v-leave-from:定义离开过渡的开始状态。在离开过渡被触发时立刻生效,下一帧被移除。
- v-leave-active:定义离开过渡生效时的状态。在整个离开过渡的阶段中应用,在离开过渡被触发时立刻生效,在过渡/动画完成之后移除。这个类可以被用来定义离开过渡的过程时间,延迟和曲线函数。
- v-leave-to:离开过渡的结束状态。在离开过渡被触发之后下一帧生效 (与此同时 v-leave-from 被移除),在过渡/动画完成之后移除。
- 如下xml
<button @click='flag = !flag'>切换</button> <transition name='fade'> <div v-if='flag' class="box"></div> </transition>css//开始过度 .fade-enter-from{ background:red; width:0px; height:0px; transform:rotate(360deg) } //开始过度了 .fade-enter-active{ transition: all 2.5s linear; } //过度完成 .fade-enter-to{ background:yellow; width:200px; height:200px; } //离开的过度 .fade-leave-from{ width:200px; height:200px; transform:rotate(360deg) } //离开中过度 .fade-leave-active{ transition: all 1s linear; } //离开完成 .fade-leave-to{ width:0px; height:0px; }
2.自定义过渡 class 类名
- trasnsition props
- enter-from-class
- enter-active-class
- enter-to-class
- leave-from-class
- leave-active-class
- leave-to-class
- 自定义过度时间 单位毫秒
- 你也可以分别指定进入和离开的持续时间:xml
<transition :duration="1000">...</transition> <transition :duration="{ enter: 500, leave: 800 }">...</transition> - 通过自定义class 结合css动画库animate css
- 安装库 npm install animate.css
- 引入 import 'animate.css'
- 使用方法
- 官方文档 Animate.css | A cross-browser library of CSS animations. xml
<transition
    leave-active-class="animate__animated animate__bounceInLeft"
    enter-active-class="animate__animated animate__bounceInRight"
>
    <div v-if="flag" class="box"></div>
</transition>
3. transition 生命周期8个
@before-enter="beforeEnter" //对应enter-from
@enter="enter"//对应enter-active
@after-enter="afterEnter"//对应enter-to
@enter-cancelled="enterCancelled"//显示过度打断
@before-leave="beforeLeave"//对应leave-from
@leave="leave"//对应enter-active
@after-leave="afterLeave"//对应leave-to
@leave-cancelled="leaveCancelled"//离开过度打断- 当只用 JavaScript 过渡的时候,在 enter 和 leave 钩子中必须使用 done 进行回调
- 结合gsap 动画库使用 GreenSockts
const beforeEnter = (el: Element) => {
    console.log('进入之前from', el);
}
const Enter = (el: Element,done:Function) => {
    console.log('过度曲线');
    setTimeout(()=>{
      done()
    },3000)
}
const AfterEnter = (el: Element) => {
    console.log('to');
}
### 4. appear
- 通过这个属性可以设置初始节点过度 就是页面加载完成就开始动画 对应三个状态xml
appear-active-class=""
appear-from-class=""
appear-to-class=""
appear
Chapter22 transition-group过度列表
- 单个节点
- 多个节点,每次只渲染一个
- 那么怎么同时渲染整个列表,比如使用 v-for?在这种场景下,我们会使用
<transition-group>组件。在我们深入例子之前,先了解关于这个组件的几个特点:- 默认情况下,它不会渲染一个包裹元素,但是你可以通过 tag attribute 指定渲染一个元素。
- 过渡模式不可用,因为我们不再相互切换特有的元素。
- 内部元素总是需要提供唯一的 key attribute 值。
- CSS 过渡的类将会应用在内部的元素中,而不是这个组/容器本身。xml
<transition-group> <div style="margin: 10px;" :key="item" v-for="item in list">{{ item }</div> </transition-group>tsconst list = reactive<number[]>([1, 2, 4, 5, 6, 7, 8, 9]) const Push = () => { list.push(123) } const Pop = () => { list.pop() }
2. 列表的移动过渡
<transition-group> 组件还有一个特殊之处。除了进入和离开,它还可以为定位的改变添加动画。只需了解新增的 v-move 类就可以使用这个新功能,它会应用在元素改变定位的过程中。像之前的类名一样,它的前缀可以通过 name attribute 来自定义,也可以通过 move-class attribute 手动设置
- 下面代码很酷炫vue
<template>
  <div>
    <button @click="shuffle">Shuffle</button>
    <transition-group class="wraps" name="mmm" tag="ul">
      <li class="cell" v-for="item in items" :key="item.id">{{ item.number }}</li>
    </transition-group>
  </div>
</template>

<script setup  lang='ts'>
import _ from 'lodash'
import { ref } from 'vue'
let items = ref(Array.apply(null, { length: 81 } as number[]).map((_, index) => {
  return {
    id: index,
    number: (index % 9) + 1
  }
}))
const shuffle = () => {
  items.value = _.shuffle(items.value)
}
</script>

<style scoped lang="less">
.wraps {
  display: flex;
  flex-wrap: wrap;
  width: calc(25px * 10 + 9px);
  .cell {
    width: 25px;
    height: 25px;
    border: 1px solid #ccc;
    list-style-type: none;
    display: flex;
    justify-content: center;
    align-items: center;
  }
}

.mmm-move {
  transition: transform 0.8s ease;
}
</style>
3. 状态过渡
- Vue 也同样可以给数字 Svg 背景颜色等添加过度动画 今天演示数字变化vue
<template>
    <div>
        <input step="20" v-model="num.current" type="number" />
        <div>{{ num.tweenedNumber.toFixed(0) }}</div>
    </div>
</template>

<script setup lang='ts'>
import { reactive, watch } from 'vue'
import gsap from 'gsap'
const num = reactive({
    tweenedNumber: 0,
    current:0
})

watch(()=>num.current, (newVal) => {
    gsap.to(num, {
        duration: 1,
        tweenedNumber: newVal
    })
})

</script>

<style>
</style>
Chapter23 依赖注入Provide / Inject
通常,当我们需要从父组件向子组件传递数据时,我们使用 props。想象一下这样的结构:有一些深度嵌套的组件,而深层的子组件只需要父组件的部分内容。在这种情况下,如果仍然将 prop 沿着组件链逐级传递下去,可能会很麻烦。
官网的解释很让人疑惑,那我翻译下这几句话:
provide 可以在祖先组件中指定我们想要提供给后代组件的数据或方法,而在任何后代组件中,我们都可以使用 inject 来接收 provide 提供的数据或方法。
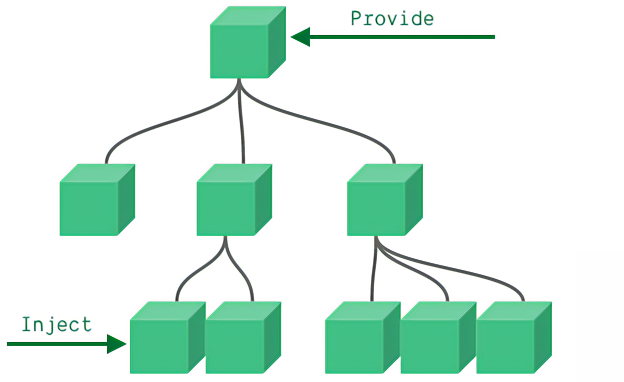
看一个例子
父组件传递数据
vue<template> <div class="App"> <button>我是App</button> <A></A> </div> </template> <script setup lang='ts'> import { provide, ref } from 'vue' import A from './components/A.vue' let flag = ref<number>(1) provide('flag', flag) </script> <style> .App { background: blue; color: #fff; } </style>子组件接受
vue<template> <div style="background-color: green;"> 我是B <button @click="change">change falg</button> <div>{{ flag }}</div> </div> </template> <script setup lang='ts'> import { inject, Ref, ref } from 'vue' const flag = inject<Ref<number>>('flag', ref(1)) const change = () => { flag!.value = 2 } </script> <style> </style>TIPS 你如果传递普通的值 是不具有响应式的 需要通过ref reactive 添加响应式
使用场景
- 当父组件有很多数据需要分发给其子代组件的时候, 就可以使用provide和inject。
Chapter24 兄弟组件传参 & Bus & Mitt
- 两种方案
1. 借助父组件传参
- 例如父组件为App 子组件为A 和 B他两个是同级的vue
<template> <div> <A @on-click="getFalg"></A> <B :flag="Flag"></B> </div> </template> <script setup lang='ts'> import A from './components/A.vue' import B from './components/B.vue' import { ref } from 'vue' let Flag = ref<boolean>(false) const getFalg = (flag: boolean) => { Flag.value = flag; } </script> <style> </style> - A 组件派发事件通过App.vue 接受A组件派发的事件然后在Props 传给B组件 也是可以实现的
- 缺点就是比较麻烦 ,无法直接通信,只能充当桥梁
2. Event Bus
- 我们在Vue2 可以使用$emit 传递 $on监听 emit传递过来的事件
- 这个原理其实是运用了JS设计模式之发布订阅模式
- 我写了一个简易版ts
type BusClass<T> = { emit: (name: T) => void on: (name: T, callback: Function) => void } type BusParams = string | number | symbol type List = { [key: BusParams]: Array<Function> } class Bus<T extends BusParams> implements BusClass<T> { list: List constructor() { this.list = {} } emit(name: T, ...args: Array<any>) { let eventName: Array<Function> = this.list[name] eventName.forEach(ev => { ev.apply(this, args) }) } on(name: T, callback: Function) { let fn: Array<Function> = this.list[name] || []; fn.push(callback) this.list[name] = fn } } export default new Bus<number>()- 然后挂载到Vue config 全局就可以使用啦
Mitt
- 在vue3中$on,$off 和 $once 实例方法已被移除,组件实例不再实现事件触发接口,因此大家熟悉的EventBus便无法使用了。然而我们习惯了使用EventBus,对于这种情况我们可以使用Mitt库(其实就是我们视频中讲的发布订阅模式的设计)
1. 安装
npm install mitt -S2. main.ts 初始化
- 全局总线,vue 入口文件 main.js 中挂载全局属性ts
import { createApp } from 'vue'
import App from './App.vue'
import mitt from 'mitt'

const Mit = mitt()

//TypeScript注册
// 由于必须要拓展ComponentCustomProperties类型才能获得类型提示
declare module "vue" {
    export interface ComponentCustomProperties {
        $Bus: typeof Mit
    }
}

const app = createApp(App)

//Vue3挂载全局API
app.config.globalProperties.$Bus = Mit

app.mount('#app')
3. 使用方法通过emit派发, on 方法添加事件,off 方法移除,clear 清空所有
- A组件派发(emit)vue
<template> <div> <h1>我是A</h1> <button @click="emit1">emit1</button> <button @click="emit2">emit2</button> </div> </template> <script setup lang='ts'> import { getCurrentInstance } from 'vue' const instance = getCurrentInstance(); const emit1 = () => { instance?.proxy?.$Bus.emit('on-num', 100) } const emit2 = () => { instance?.proxy?.$Bus.emit('*****', 500) } </script> <style> </style> - B组件监听(on)vue
<template> <div> <h1>我是B</h1> </div> </template> <script setup lang='ts'> import { getCurrentInstance } from 'vue' const instance = getCurrentInstance() instance?.proxy?.$Bus.on('on-num', (num) => { console.log(num,'===========>B') }) </script> <style> </style> - 监听所有事件( on("*") )ts
instance?.proxy?.$Bus.on('*',(type,num)=>{ console.log(type,num,'===========>B') }) - 移除监听事件(off)ts
const Fn = (num: any) => { console.log(num, '===========>B') } instance?.proxy?.$Bus.on('on-num',Fn)//listen instance?.proxy?.$Bus.off('on-num',Fn)//unListen - 清空所有监听(clear)ts
instance?.proxy?.$Bus.all.clear()
Chapter25 TSX
- 我们之前呢是使用Template去写我们模板。现在可以扩展另一种风格TSX风格
- vue2 的时候就已经支持jsx写法,只不过不是很友好,随着vue3对typescript的支持度,tsx写法越来越被接受 ### 1. 安装插件
- npm install @vitejs/plugin-vue-jsx -D
- vite.config.ts 配置
 ts
tsimport { defineConfig } from 'vite' import vue from '@vitejs/plugin-vue' import vueJsx from '@vitejs/plugin-vue-jsx'; // https://vitejs.dev/config/ export default defineConfig({ plugins: [vue(),vueJsx()] })
2. 修改tsconfig.json 配置文件
"jsx": "preserve",
"jsxFactory": "h",
"jsxFragmentFactory": "Fragment",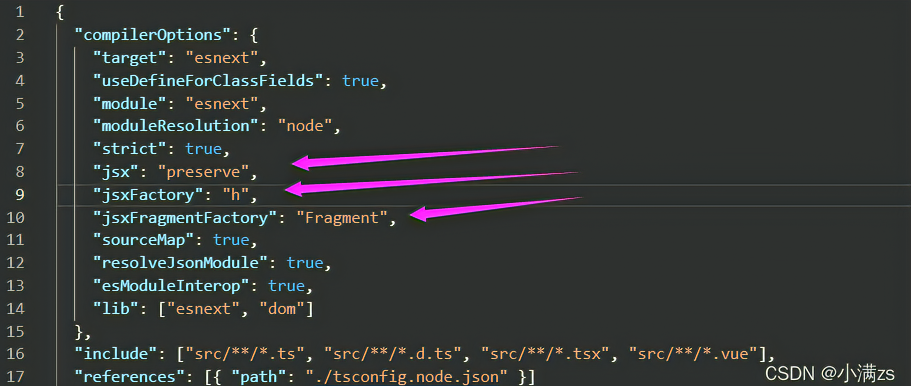
- 配置完成就可以使用啦
- 在目录新建一个xxxxxx.tsx文件
3. 使用TSX
TIPS tsx不会自动解包使用ref加.vlaue ! ! !
tsx支持 v-model 的使用
tsimport { ref } from 'vue' let v = ref<string>('') const renderDom = () => { return ( <> <input v-model={v.value} type="text" /> <div> {v.value} </div> </> ) } export default renderDomv-show
tsimport { ref } from 'vue' let flag = ref(false) const renderDom = () => { return ( <> <div v-show={flag.value}>景天</div> <div v-show={!flag.value}>雪见</div> </> ) } export default renderDomv-if是不支持的
- 所以需要改变风格
tsimport { ref } from 'vue' let flag = ref(false) const renderDom = () => { return ( <> { flag.value ? <div>景天</div> : <div>雪见</div> } </> ) } export default renderDomv-for也是不支持的
- 需要使用Map
tsimport { ref } from 'vue' let arr = [1,2,3,4,5] const renderDom = () => { return ( <> { arr.map(v=>{ return <div>${v}</div> }) } </> ) } export default renderDomv-bind使用
- 直接赋值就可以
tsimport { ref } from 'vue' let arr = [1, 2, 3, 4, 5] const renderDom = () => { return ( <> <div data-arr={arr}>1</div> </> ) } export default renderDomv-on绑定事件 所有的事件都按照react风格来
- 所有事件有on开头
- 所有事件名称首字母大写
tsconst renderDom = () => { return ( <> <button onClick={clickTap}>点击</button> </> ) } const clickTap = () => { console.log('click'); } export default renderDomProps 接受值
tsimport { ref } from 'vue' type Props = { title:string } const renderDom = (props:Props) => { return ( <> <div>{props.title}</div> <button onClick={clickTap}>点击</button> </> ) } const clickTap = () => { console.log('click'); } export default renderDomEmit派发
tstype Props = { title: string } const renderDom = (props: Props,content:any) => { return ( <> <div>{props.title}</div> <button onClick={clickTap.bind(this,content)}>点击</button> </> ) } const clickTap = (ctx:any) => { ctx.emit('on-click',1) }
Chapter26 深入v-model
小彩蛋Vue3自动引入插件
unplugin-auto-import/vite
vite配置
tsimport { defineConfig } from 'vite' import vue from '@vitejs/plugin-vue' import VueJsx from '@vitejs/plugin-vue-jsx' import AutoImport from 'unplugin-auto-import/vite' // https://vitejs.dev/config/ export default defineConfig({ plugins: [vue(),VueJsx(),AutoImport({ imports:['vue'], dts:"src/auto-import.d.ts" })] })配置完成之后使用ref reactive watch 等 无须import 导入 可以直接使用
GitHub - antfu/unplugin-auto-import: Auto import APIs on-demand for Vite, Webpack and Rollup
v-model

- TIps 在Vue3 v-model 是破坏性更新的
- v-model在组件里面也是很重要的
- v-model 其实是一个语法糖 通过props 和 emit组合而成的
- 默认值的改变
- prop:value -> modelValue;
- 事件:input -> update:modelValue;
- v-bind 的 .sync 修饰符和组件的 model 选项已移除
- 新增 支持多个v-model
- 新增 支持自定义 修饰符 Modifiers
- 案例 子组件vue
<template> <div v-if='propData.modelValue ' class="dialog"> <div class="dialog-header"> <div>标题</div><div @click="close">x</div> </div> <div class="dialog-content"> 内容 </div> </div> </template> <script setup lang='ts'> type Props = { modelValue:boolean } const propData = defineProps<Props>() const emit = defineEmits(['update:modelValue']) const close = () => { emit('update:modelValue',false) } </script> <style lang='less'> .dialog{ width: 300px; height: 300px; border: 1px solid #ccc; position: fixed; left:50%; top:50%; transform: translate(-50%,-50%); &-header{ border-bottom: 1px solid #ccc; display: flex; justify-content: space-between; padding: 10px; } &-content{ padding: 10px; } } </style> - 父组件vue
<template> <button @click="show = !show">开关{{show}}</button> <Dialog v-model="show"></Dialog> </template> <script setup lang='ts'> import Dialog from "./components/Dialog/index.vue"; import {ref} from 'vue' const show = ref(false) </script> <style> </style> - 绑定多个案例
- 子组件vue
<template> <div v-if='modelValue ' class="dialog"> <div class="dialog-header"> <div>标题---{{title}}</div><div @click="close">x</div> </div> <div class="dialog-content"> 内容 </div> </div> </template> <script setup lang='ts'> type Props = { modelValue:boolean, title:string } const propData = defineProps<Props>() const emit = defineEmits(['update:modelValue','update:title']) const close = () => { emit('update:modelValue',false) emit('update:title','我要改变') } </script> <style lang='less'> .dialog{ width: 300px; height: 300px; border: 1px solid #ccc; position: fixed; left:50%; top:50%; transform: translate(-50%,-50%); &-header{ border-bottom: 1px solid #ccc; display: flex; justify-content: space-between; padding: 10px; } &-content{ padding: 10px; } } </style> - 父组件vue
<template>
  <button @click="show = !show">开关{{show}} ----- {{title}}</button>
  <Dialog v-model:title='title' v-model="show"></Dialog>
</template>

<script setup lang='ts'>
import Dialog from "./components/Dialog/index.vue";
import {ref} from 'vue'
const show = ref(false)
const title = ref('我是标题')
</script>

<style>
</style>
- 子组件
- 自定义修饰符
- 添加到组件 v-model 的修饰符将通过 modelModifiers prop 提供给组件。在下面的示例中,我们创建了一个组件,其中包含默认为空对象的 modelModifiers prop
ts<script setup lang='ts'> type Props = { modelValue: boolean, title?: string, modelModifiers?: { default: () => {} } titleModifiers?: { default: () => {} } } const propData = defineProps<Props>() const emit = defineEmits(['update:modelValue', 'update:title']) const close = () => { console.log(propData.modelModifiers); emit('update:modelValue', false) emit('update:title', '我要改变') }
Chapter29 Vue3定义全局函数和变量
### globalProperties
- 由于Vue3 没有Prototype 属性 使用 app.config.globalProperties 代替 然后去定义变量和函数
- Vue2ts
// 之前 (Vue 2.x) Vue.prototype.$http = () => {} - Vue3ts
// 之后 (Vue 3.x)
const app = createApp({})
app.config.globalProperties.$http = () => {}
- Vue2
过滤器
- 在Vue3 移除了
- 我们正好可以使用全局函数代替Filters
- 案例ts
app.config.globalProperties.$filters = { format<T extends any>(str: T): string { return `$${str}` } } - 声明文件 不然TS无法正确类型 推导ts
type Filter = { format: <T extends any>(str: T) => T } // 声明要扩充@vue/runtime-core包的声明. // 这里扩充"ComponentCustomProperties"接口, 因为他是vue3中实例的属性的类型. declare module '@vue/runtime-core' { export interface ComponentCustomProperties { $filters: Filter } } - setup 读取值ts
import { getCurrentInstance, ComponentInternalInstance } from 'vue';

const { appContext } = <ComponentInternalInstance>getCurrentInstance()

console.log(appContext.config.globalProperties.$env);
Chapter30 编写Vue3插件
插件
- 插件是自包含的代码,通常向 Vue 添加全局级功能。你如果是一个对象需要有install方法Vue会帮你自动注入到install 方法 你如果是function 就直接当install 方法去使用 ### 使用插件
- 在使用 createApp() 初始化 Vue 应用程序后,你可以通过调用 use() 方法将插件添加到你的应用程序中。
- 实现一个Loading ### Loading.Vuevue
<template>
    <div v-if="isShow" class="loading">
        <div class="loading-content">Loading...</div>
    </div>
</template>

<script setup lang='ts'>
import { ref } from 'vue';
const isShow = ref(false)//定位loading 的开关

const show = () => {
    isShow.value = true
}
const hide = () => {
    isShow.value = false
}
//对外暴露 当前组件的属性和方法
defineExpose({
    isShow,
    show,
    hide
})
</script>

<style scoped lang="less">
.loading {
    position: fixed;
    inset: 0;
    background: rgba(0, 0, 0, 0.8);
    display: flex;
    justify-content: center;
    align-items: center;
    &-content {
        font-size: 30px;
        color: #fff;
    }
}
</style>
Loading.ts
import type {App,VNode} from 'vue'
import {  createVNode, render, VNode, App } from 'vue';
import Loading from './index.vue'

export default {
    install(app: App) {
        //createVNode vue提供的底层方法 可以给我们组件创建一个虚拟DOM 也就是Vnode
        const vnode: VNode = createVNode(Loading)
        //render 把我们的Vnode 生成真实DOM 并且挂载到指定节点
        render(vnode, document.body)
        // Vue 提供的全局配置 可以自定义
        app.config.globalProperties.$loading = {
            show: () => vnode.component?.exposed?.show(),
            hide: () => vnode.component?.exposed?.hide()
        }

    }
}Main.ts
import Loading from './components/loading'

let app = createApp(App)

app.use(Loading)

type Lod = {
    show: () => void,
    hide: () => void
}
//编写ts loading 声明文件放置报错 和 智能提示
declare module '@vue/runtime-core' {
    export interface ComponentCustomProperties {
        $loading: Lod
    }
}

app.mount('#app')使用方法
<template>

  <div></div>

</template>

<script setup lang='ts'>
import { ref,reactive,getCurrentInstance} from 'vue'
const  instance = getCurrentInstance()
instance?.proxy?.$Loading.show()
setTimeout(()=>{
  instance?.proxy?.$Loading.hide()
},5000)


// console.log(instance)
</script>
<style>
*{
  padding: 0;
  margin: 0;
}
</style>Vue use 源码手写
import type { App } from 'vue'
import { app } from './main'

interface Use {
    install: (app: App, ...options: any[]) => void
}

const installedList = new Set()

export function MyUse<T extends Use>(plugin: T, ...options: any[]) {
    if(installedList.has(plugin)){
      return console.warn('重复添加插件',plugin)
    }else{
        plugin.install(app, ...options)
        installedList.add(plugin)
    }
}Chapter31 了解UI库ElementUI,AntDesigin等
- vue作为一款深受广大群众以及尤大崇拜者的喜欢,特此列出在github上开源的vue优秀的UI组件库供大家参考
- 这几套框架主要用于后台管理系统和移动端的制作,方便开发者快速开发
1. Element UI Plus
一个 Vue 3 UI 框架 | Element Plus
安装方法
shell# NPM $ npm install element-plus --save # Yarn $ yarn add element-plus # pnpm $ pnpm install element-plusmain ts引入
tsimport { createApp } from 'vue' import ElementPlus from 'element-plus' import 'element-plus/dist/index.css' import App from './App.vue' const app = createApp(App) app.use(ElementPlus) app.mount('#app')volar插件支持
json{ "compilerOptions": { // ... "types": ["element-plus/global"] } }
2. Ant Design Vue
- https://next.antdv.com/docs/vue/introduce-cn
- 安装shell
$ npm install ant-design-vue@next --save $ yarn add ant-design-vue@next - 使用ts
import { createApp } from 'vue';
import Antd from 'ant-design-vue';
import App from './App';
import 'ant-design-vue/dist/antd.css';

const app = createApp(App);

app.use(Antd).mount('#app');
3. Iview
iView / View Design 一套企业级 UI 组件库和前端解决方案
安装
shellnpm install view-ui-plus --save使用
tsimport { createApp } from 'vue' import ViewUIPlus from 'view-ui-plus' import App from './App.vue' import router from './router' import store from './store' import 'view-ui-plus/dist/styles/viewuiplus.css' const app = createApp(App) app.use(store) .use(router) .use(ViewUIPlus) .mount('#app')
4. Vant 移动端
Vant 3 - Lightweight Mobile UI Components built on Vue
安装
shellnpm i vant -S使用
tsimport Vant from 'vant' import 'vant/lib/index.css'; createApp(App).use(vant).$mount('#app)
Chapter32 详解Scoped和样式穿透
- 主要是用于修改很多vue常用的组件库(element, vant, AntDesigin),虽然配好了样式但是还是需要更改其他的样式
- 就需要用到样式穿透
- scoped的原理
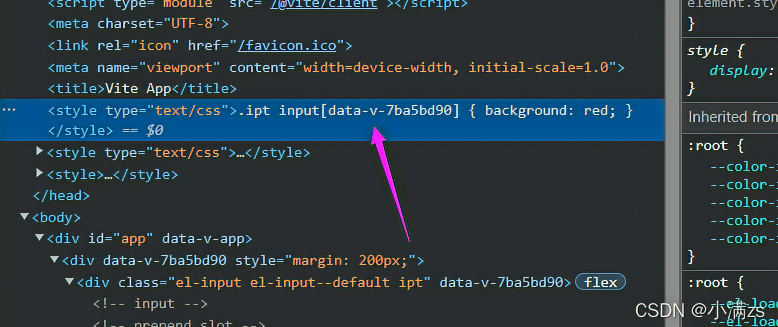
- vue中的scoped 通过在DOM结构以及css样式上加唯一不重复的标记:data-v-hash的方式,以保证唯一(而这个工作是由过PostCSS转译实现的),达到样式私有化模块化的目的。
- 总结一下scoped三条渲染规则:
- 给HTML的DOM节点加一个不重复data属性(形如:data-v-123)来表示他的唯一性
- 在每句css选择器的末尾(编译后的生成的css语句)加一个当前组件的data属性选择器(如
[data-v-123])来私有化样式 - 如果组件内部包含有其他组件,只会给其他组件的最外层标签加上当前组件的data属性
- PostCSS会给一个组件中的所有dom添加了一个独一无二的动态属性data-v-xxxx,然后,给CSS选择器额外添加一个对应的属性选择器来选择该组件中dom,这种做法使得样式只作用于含有该属性的dom——组件内部dom, 从而达到了'样式模块化'的效果.
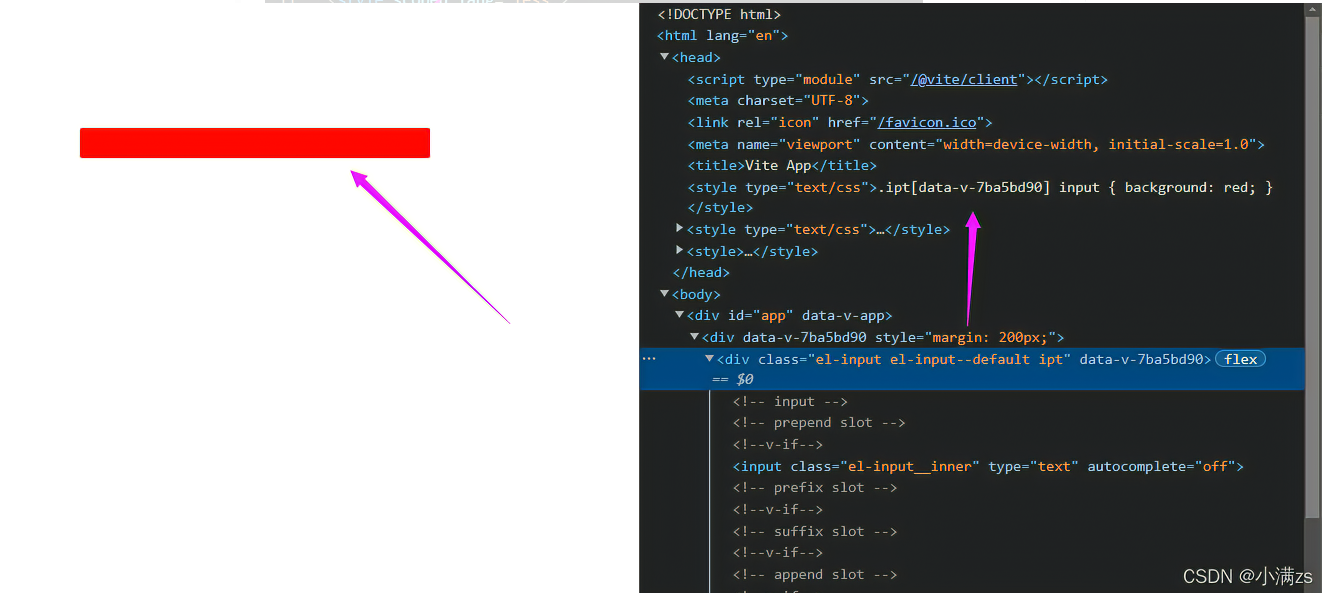
- 案例修改Element ui Input样式
- 发现没有生效
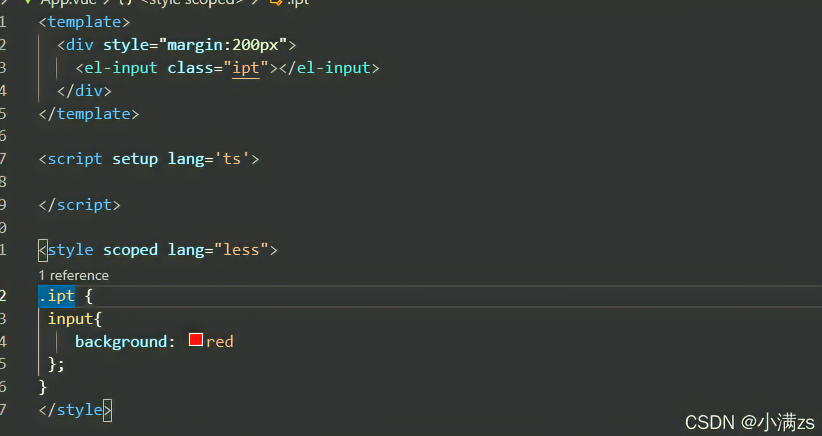
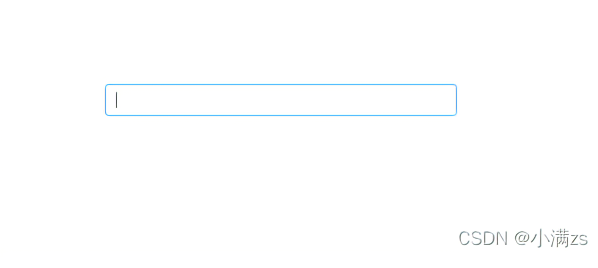
- 如果不写Scoped 就没问题
- 原因就是Scoped 搞的鬼 他在进行PostCss转化的时候把元素选择器默认放在了最后
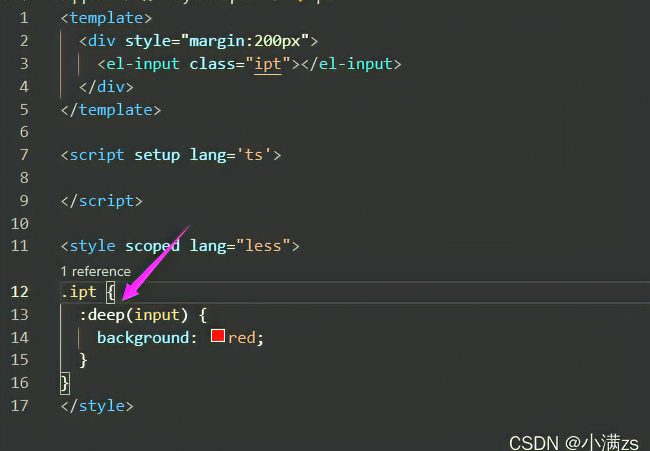
- Vue 提供了样式穿透:deep() 他的作用就是用来改变 属性选择器的位置
Chapter33 cssStyle完整新特性
1. 插槽选择器
A 组件定义一个插槽
vue<template> <div> 我是插槽 <slot></slot> </div> </template> <script> export default {} </script> <style scoped> </style>在App.vue 引入
vue<template> <div> <A> <div class="a">私人定制div</div> </A> </div> </template> <script setup> import A from "@/components/A.vue" </script> <style lang="less" scoped> </style>在A组件修改class a 的颜色
css<style scoped> .a{ color:red } </style>- 无效果
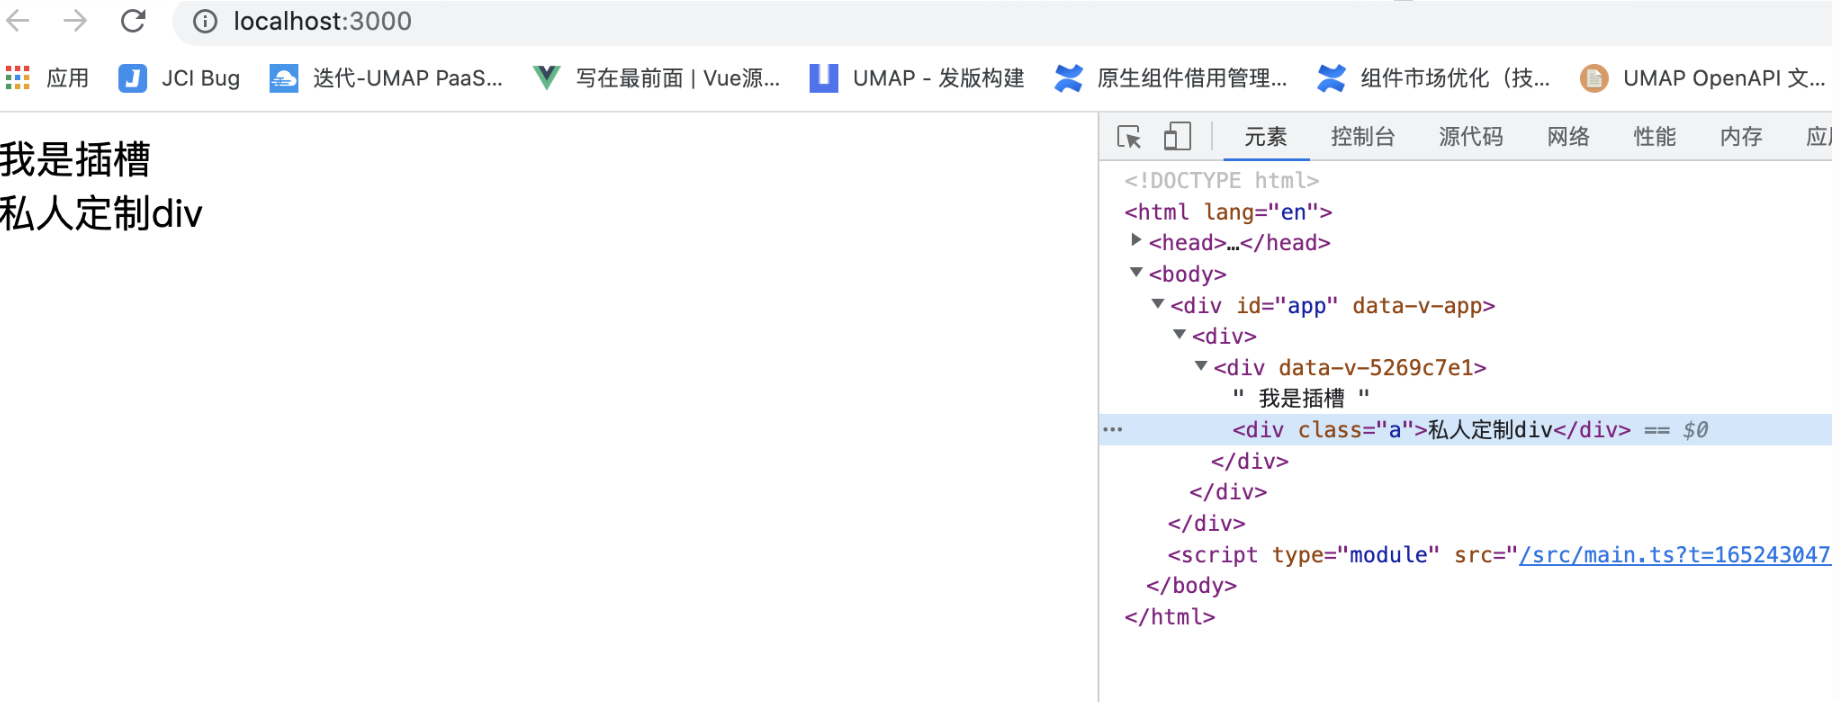
- 无效果
默认情况下,作用域样式不会影响到
<slot/>渲染出来的内容,因为它们被认为是父组件所持有并传递进来的。解决方案 slotted
css<style scoped> :slotted(.a) { color:red } </style>
2. 全局选择器
- 在之前我们想加入全局 样式 通常都是新建一个style 标签 不加scoped 现在有更优雅的解决方案css
<style> div{ color:red } </style> <style lang="less" scoped> </style> - 效果等同于上面css
<style lang="less" scoped>
:global(div){
    color:red
}
</style>
3. 动态 CSS
- 单文件组件的
<style>标签可以通过 v-bind 这一 CSS 函数将 CSS 的值关联到动态的组件状态上:vue<template> <div class="div"> 小满是个弟弟 </div> </template> <script lang="ts" setup> import { ref } from 'vue' const red = ref<string>('red') </script> <style lang="less" scoped> .div{ color:v-bind(red) } </style> - 如果是对象 v-bind 请加引号vue
<template>
    <div class="div">
        小满是个弟弟
    </div>
</template>

<script lang="ts" setup>
import { ref } from "vue"
const red = ref({
    color:'pink'
})
</script>

    <style lang="less" scoped>
.div {
    color: v-bind('red.color');
}
</style>
4. css module
<style module>标签会被编译为 CSS Modules 并且将生成的 CSS 类作为 $style 对象的键暴露给组件vue<template> <div :class="$style.red"> 小满是个弟弟 </div> </template> <style module> .red { color: red; font-size: 20px; } </style>自定义注入名称(多个可以用数组)
你可以通过给 module attribute 一个值来自定义注入的类对象的 property 键
vue<template> <div :class="[zs.red,zs.border]"> 小满是个弟弟 </div> </template> <style module="zs"> .red { color: red; font-size: 20px; } .border{ border: 1px solid #ccc; } </style>与组合式 API 一同使用
注入的类可以通过 useCssModule API 在 setup() 和
<script setup>中使用。对于使用了自定义注入名称的<style module>模块,useCssModule 接收一个对应的 module attribute 值作为第一个参数vue<template> <div :class="[zs.red,zs.border]"> 小满是个弟弟 </div> </template> <script setup lang="ts"> import { useCssModule } from 'vue' const css = useCssModule('zs') </script> <style module="zs"> .red { color: red; font-size: 20px; } .border{ border: 1px solid #ccc; } </style>使用场景
- 一般用于TSX 和 render 函数 居多
Chapter34 Vue3集成Taiwind CSS
Tailwind CSS 是一个由js编写的CSS 框架 他是基于postCss 去解析的
对于PostCSS的插件使用,我们再使用的过程中一般都需要如下步骤:
- PostCSS 配置文件 postcss.config.js,新增 tailwindcss 插件。
- TaiWindCss插件需要一份配置文件,比如:tailwind.config.js。
PostCSS
- 是一个用 JavaScript 工具和插件来转换 CSS 代码的工具 | PostCSS 中文网
postCss 功能介绍
- 增强代码的可读性 (利用从 Can I Use 网站获取的数据为 CSS 规则添加特定厂商的前缀。 Autoprefixer 自动获取浏览器的流行度和能够支持的属性,并根据这些数据帮你自动为 CSS 规则添加前缀。)
- 将未来的 CSS 特性带到今天!(PostCSS Preset Env 帮你将最新的 CSS 语法转换成大多数浏览器都能理解的语法,并根据你的目标浏览器或运行时环境来确定你需要的 polyfills,此功能基于 cssdb 实现。)
- 终结全局 CSS(CSS 模块 能让你你永远不用担心命名太大众化而造成冲突,只要用最有意义的名字就行了。)
- 避免 CSS 代码中的错误(通过使用 stylelint 强化一致性约束并避免样式表中的错误。stylelint 是一个现代化 CSS 代码检查工具。它支持最新的 CSS 语法,也包括类似 CSS 的语法,例如 SCSS 。)
postCss 处理 tailWind Css 大致流程
- 将CSS解析成抽象语法树(AST树)
- 读取插件配置,根据配置文件,生成新的抽象语法树
- 将AST树”传递”给一系列数据转换操作处理(变量数据循环生成,切套类名循环等)
- 清除一系列操作留下的数据痕迹
- 将处理完毕的AST树重新转换成字符串
安装
1.初始化项目
shellnpm init vue@latest- 安装 Tailwind 以及其它依赖项
shellnpm install -D tailwindcss@latest postcss@latest autoprefixer@latest- 生成配置文件
shellnpx tailwindcss init -p- 配置 - Tailwind CSS 中文文档
- 修改配置文件 tailwind.config.js
- 2.6版本ts
module.exports = { purge: ['./index.html', './src/**/*.{vue,js,ts,jsx,tsx}'], theme: { extend: {}, }, plugins: [], } - 3.0版本ts
module.exports = {
  content: ['./index.html', './src/**/*.{vue,js,ts,jsx,tsx}'],
  theme: {
    extend: {},
  },
  plugins: [],
}
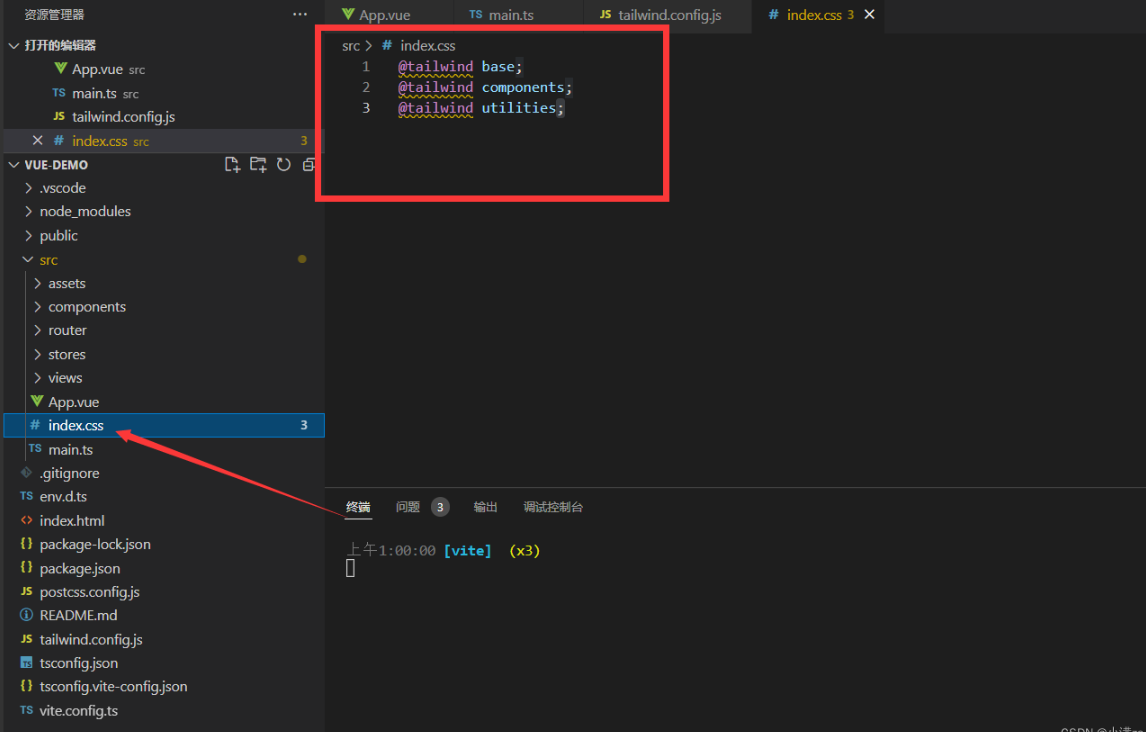
- 创建一个index.css
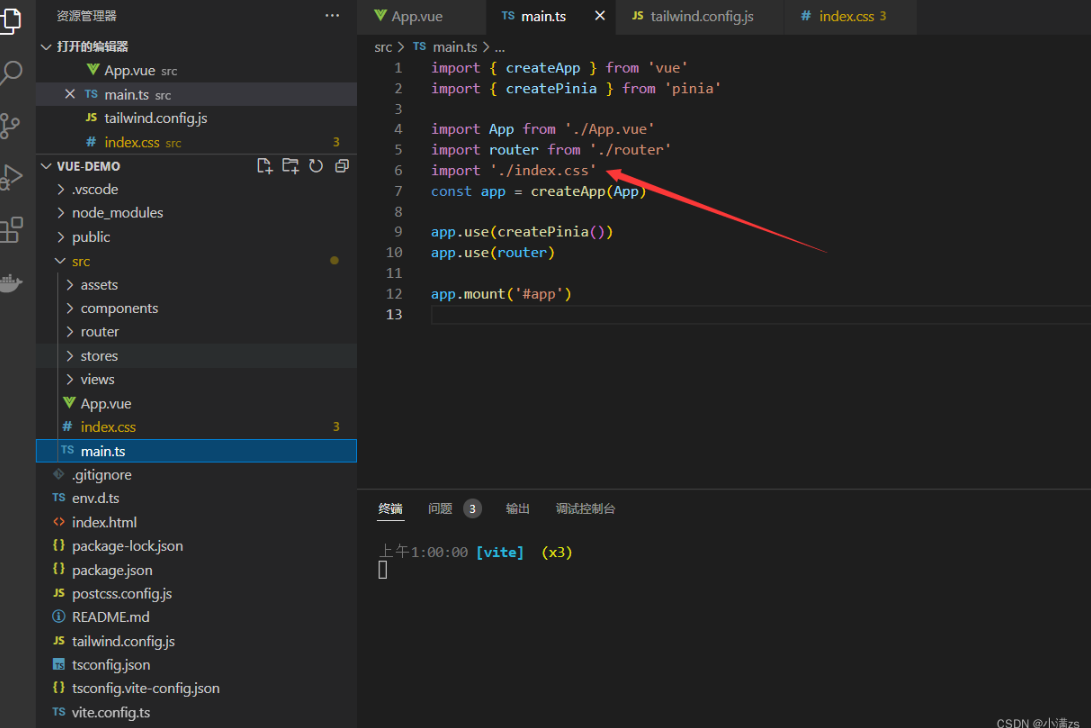
ts@tailwind base; @tailwind components; @tailwind utilities;在main.ts 引入
最后npm run dev 就可以使用啦
html<div class="max-w-md mx-auto bg-white rounded-xl shadow-md overflow-hidden md:max-w-2xl"> <div class="md:flex"> <div class="md:flex-shrink-0"> <img class="h-48 w-full object-cover md:w-48" src="http://n.sinaimg.cn/translate/20170815/OoVn-fyixtym5144510.jpg" alt="Man looking at item at a store"> </div> <div class="p-8"> <div class="uppercase tracking-wide text-sm text-indigo-500 font-semibold">Case study</div> <a href="#" class="block mt-1 text-lg leading-tight font-medium text-black hover:underline">Finding customers for your new business</a> <p class="mt-2 text-gray-500">Getting a new business off the ground is a lot of hard work. Here are five ideas you can use to find your first customers.</p> </div> </div> </div>
Chapter35 EventLoop 和 nextTick
- 在我们学习nextTick 之前需要先了解Event Loop 事件循环机制
JS 执行机制
- 在我们学js 的时候都知道js 是单线程的如果是多线程的话会引发一个问题在同一时间同时操作DOM 一个增加一个删除JS就不知道到底要干嘛了,所以这个语言是单线程的但是随着HTML5到来js也支持了多线程webWorker 但是也是不允许操作DOM
- 单线程就意味着所有的任务都需要排队,后面的任务需要等前面的任务执行完才能执行,如果前面的任务耗时过长,后面的任务就需要一直等,一些从用户角度上不需要等待的任务就会一直等待,这个从体验角度上来讲是不可接受的,所以JS中就出现了异步的概念。 ### 同步任务 - 代码从上到下按顺序执行
异步任务
- 宏任务
- script(整体代码)、setTimeout、setInterval、UI交互事件、postMessage、Ajax
- 微任务
- Promise.then catch finally、MutaionObserver、process.nextTick(Node.js 环境)
- 运行机制
- 所有的同步任务都是在主进程执行的形成一个执行栈,主线程之外,还存在一个"任务队列",异步任务执行队列中先执行宏任务,然后清空当次宏任务中的所有微任务,然后进行下一个tick如此形成循环。
- nextTick 就是创建一个异步任务,那么它自然要等到同步任务执行完成后才执行。
vue<template> <div ref="xiaoman"> {{ text }} </div> <button @click="change">change div</button> </template> <script setup lang='ts'> import { ref,nextTick } from 'vue'; const text = ref('小满开飞机') const xiaoman = ref<HTMLElement>() const change = async () => { text.value = '小满不开飞机' console.log(xiaoman.value?.innerText) //小满开飞机 await nextTick(); console.log(xiaoman.value?.innerText) //小满不开飞机 } </script> <style scoped> </style>
Chapter37 unocss原子化
### 什么是css原子化?
- 重新构想原子化CSS - 知乎
- CSS原子化的优缺点
- 1.减少了css体积,提高了css复用
- 2.减少起名的复杂度
- 3.增加了记忆成本 将css拆分为原子之后,你势必要记住一些class才能书写,哪怕tailwindcss提供了完善的工具链,你写background,也要记住开头是bg
接入unocss
tips:最好用于vite webpack属于阉割版功能很少
安装
shellnpm i -D unocssvite.config.ts
tsimport unocss from 'unocss/vite' plugins: [vue(), vueJsx(),unocss({ rules:[ ] })],main.ts 引入
tsimport 'uno.css'配置静态css
jsrules: [ ['flex', { display: "flex" }] ]
配置动态css(使用正则表达式)
- m-参数*10 例如 m-10 就是 margin:100px
jsrules: [ [/^m-(\d+)$/, ([, d]) => ({ margin: `${Number(d) * 10}px` })], ['flex', { display: "flex" }] ]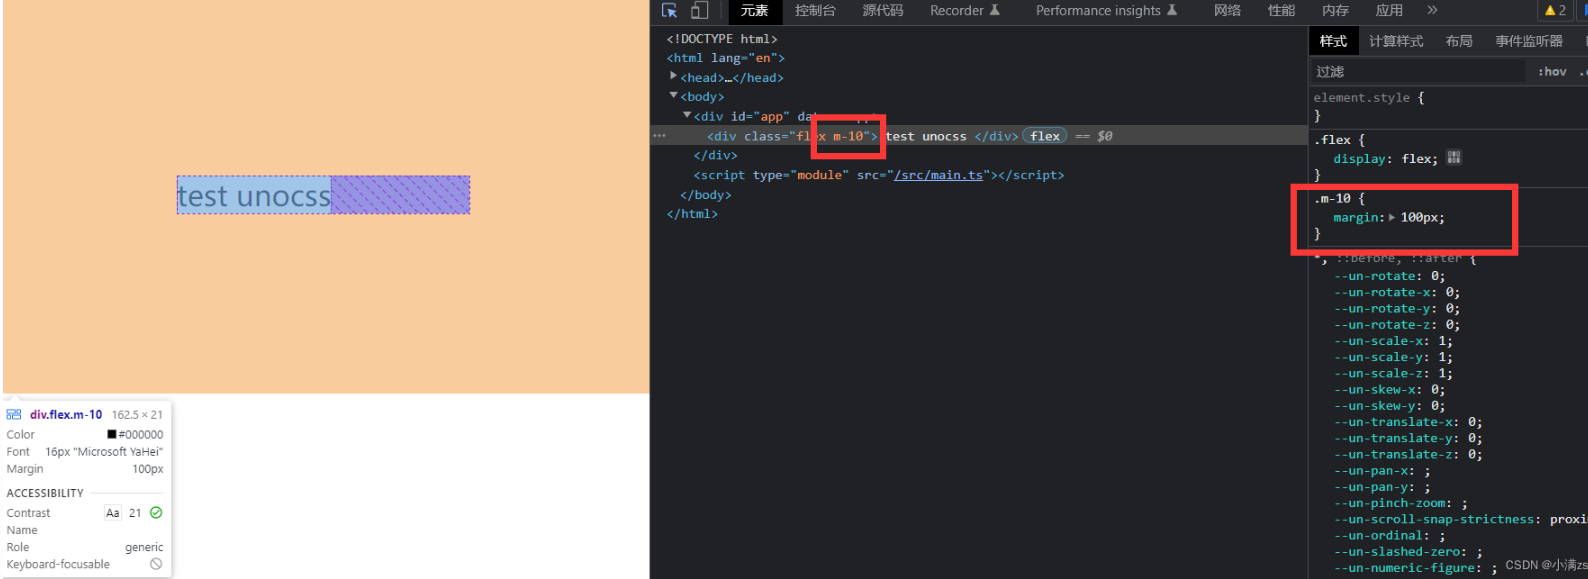
shortcuts 可以自定义组合样式
jsplugins: [vue(), vueJsx(), unocss({ rules: [ [/^m-(\d+)$/, ([, d]) => ({ margin: `${Number(d) * 10}px` })], ['flex', { display: "flex" }], ['pink', { color: 'pink' }] ], shortcuts: { btn: "pink flex" } })],unocss 预设
jspresets:[presetIcons(),presetAttributify(),presetUno()]- presetIcons Icon图标预设
- 图标集合安装shell
npm i -D @iconify-json/ic - 首先我们去icones官网(方便浏览和使用iconify)浏览我们需要的icon,比如这里我用到了Google Material Icons图标集里面的baseline-add-circle图标html
<div class="i-ic-baseline-backspace text-3xl bg-green-500" />
- presetAttributify 属性化模式支持
- 属性语义化 无须classhtml
<div font="black">
    btn
</div>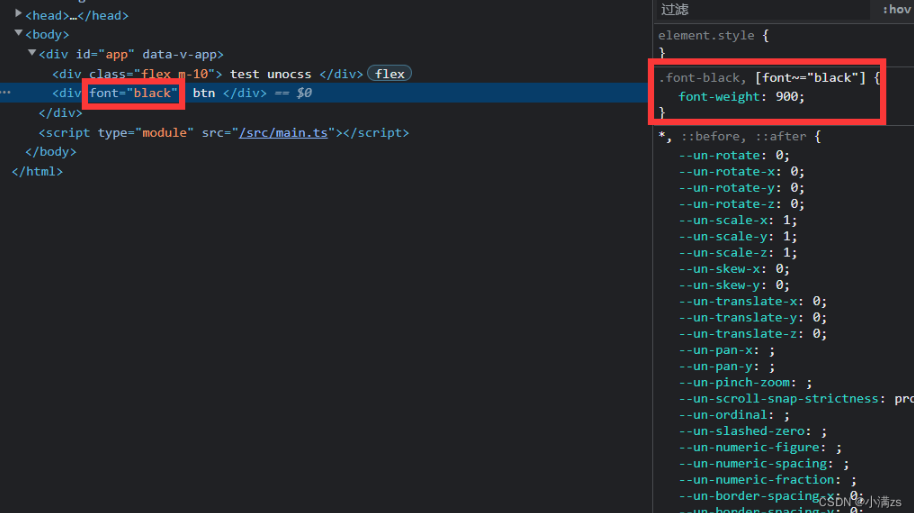
- presetUno 工具类预设
- 默认的 @unocss/preset-uno 预设(实验阶段)是一系列流行的原子化框架的 通用超集,包括了 Tailwind CSS,Windi CSS,Bootstrap,Tachyons 等。
- 例如,ml-3(Tailwind),ms-2(Bootstrap),ma4(Tachyons),mt-10px(Windi CSS)均会生效。
Chapter42 环境变量
环境变量:他的主要作用就是让开发者区分不同的运行环境,来实现 兼容开发和生产
例如 npm run dev 就是开发环境 npm run build 就是生产环境等等
Vite 在一个特殊的 import.meta.env 对象上暴露环境变量。这里有一些在所有情况下都可以使用的内建变量
json{ "BASE_URL":"/", //部署时的URL前缀 "MODE":"development", //运行模式 "DEV":true," //是否在dev环境 PROD":false, //是否是build 环境 "SSR":false //是否是SSR 服务端渲染模式 }需要注意的一点就是这个环境变量不能使用动态赋值
import.meta.env[key]应为这些环境变量在打包的时候是会被硬编码的通过JSON.stringify注入浏览器的配置额外的环境变量
在根目录新建 env 文件 可以创建多个
如下
env.[name]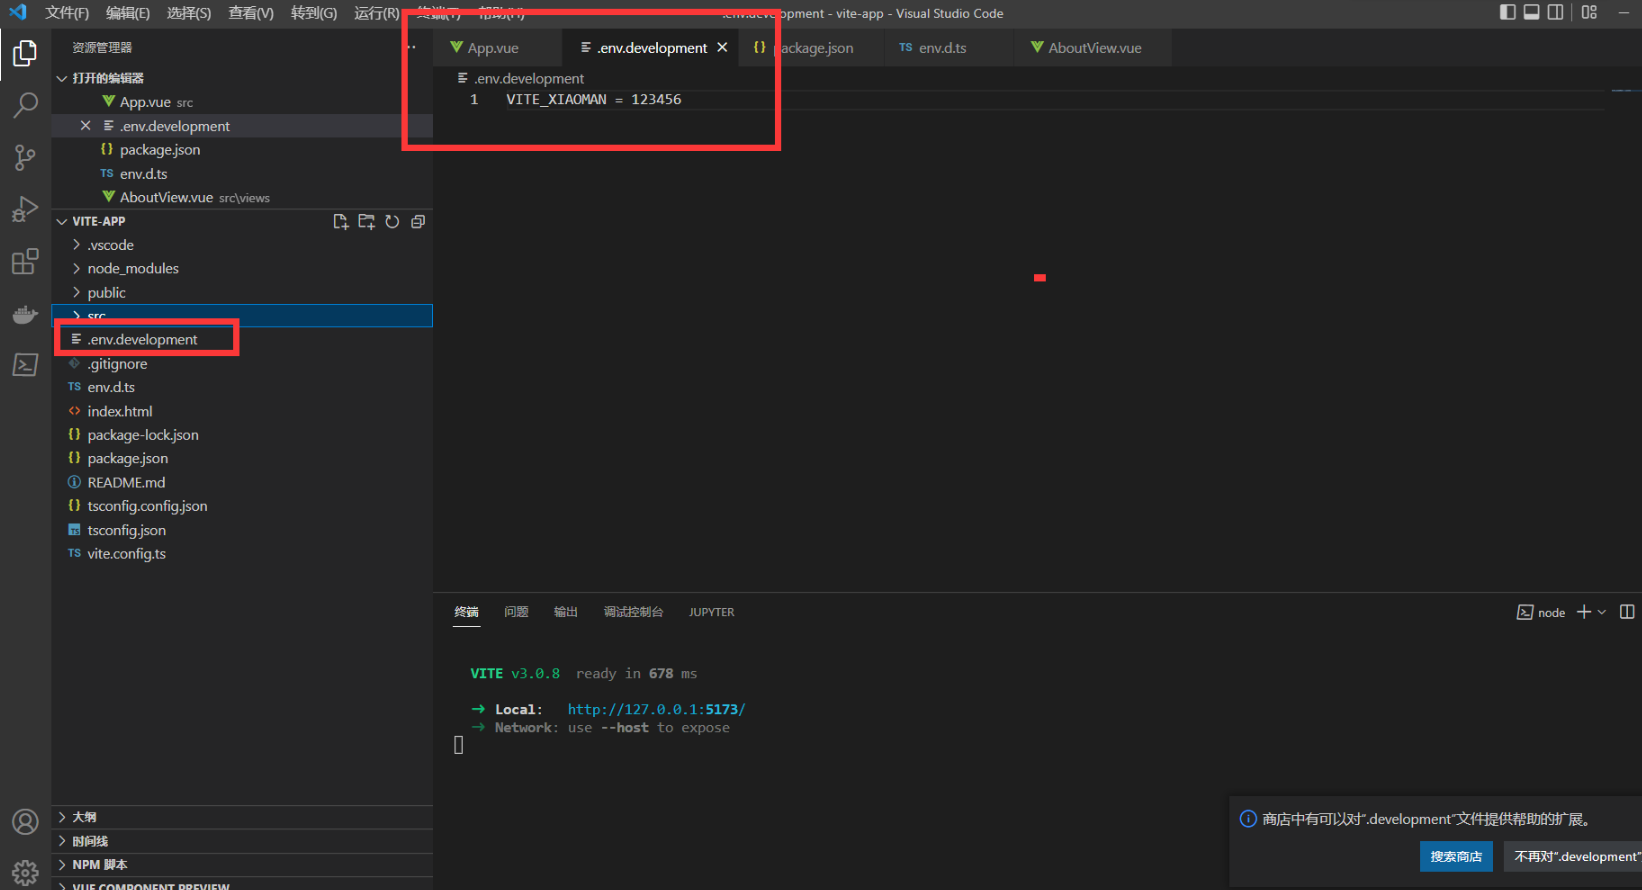
修改启动命令
在 package.json 配置 --mode env文件名称
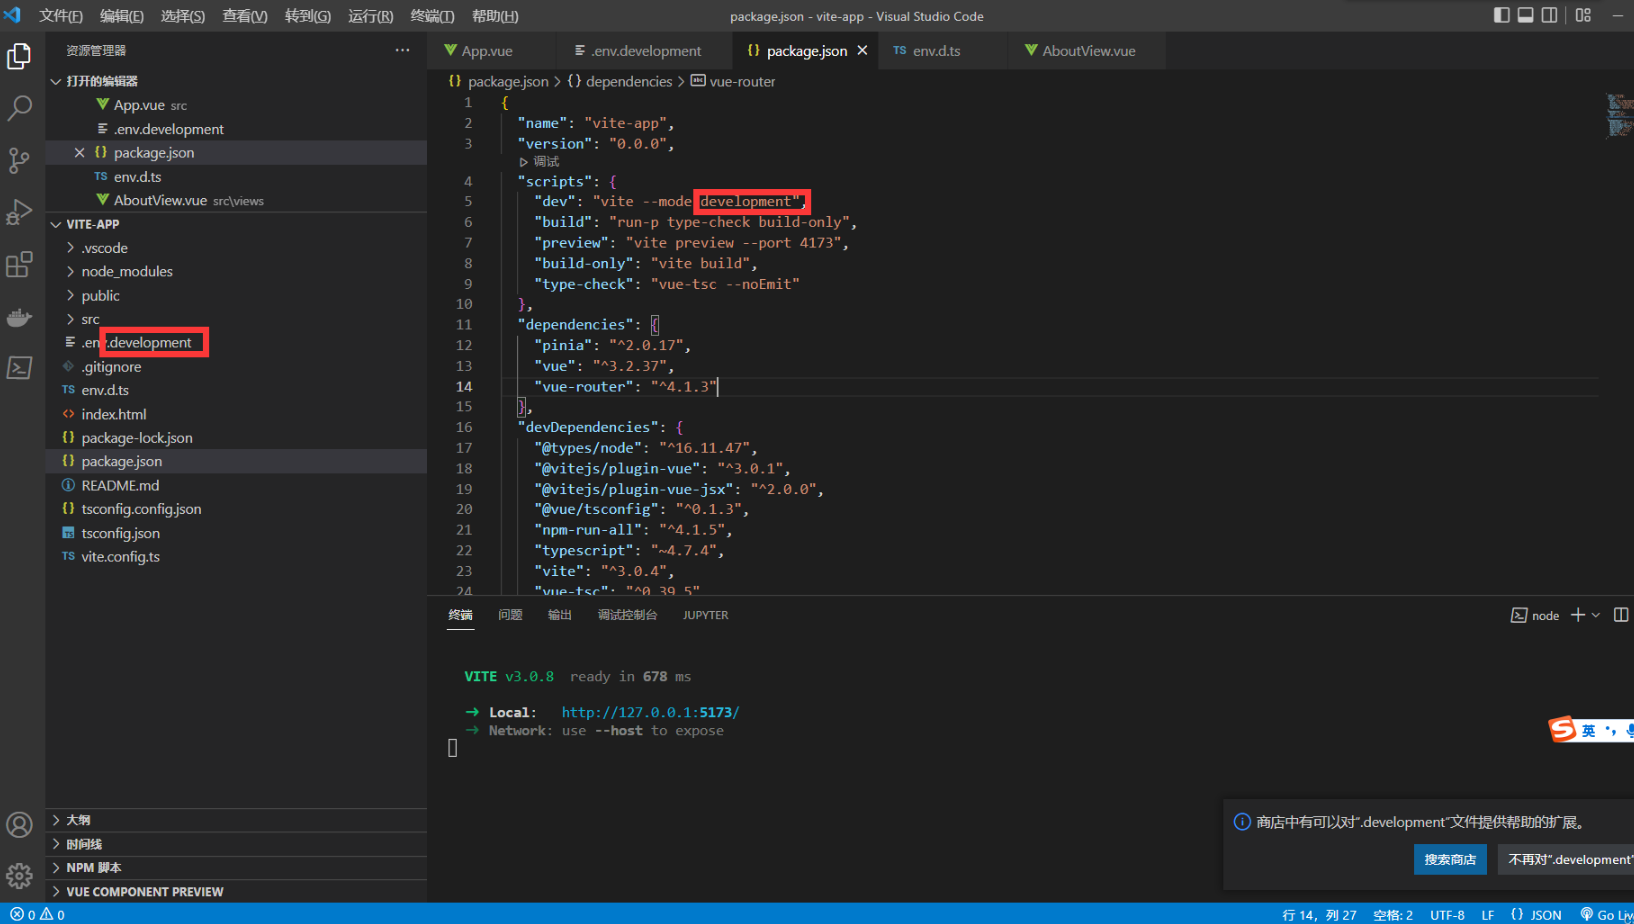
配置智能提示
tsinterface ImportMetaEnv { VITE_XIAOMAN:string }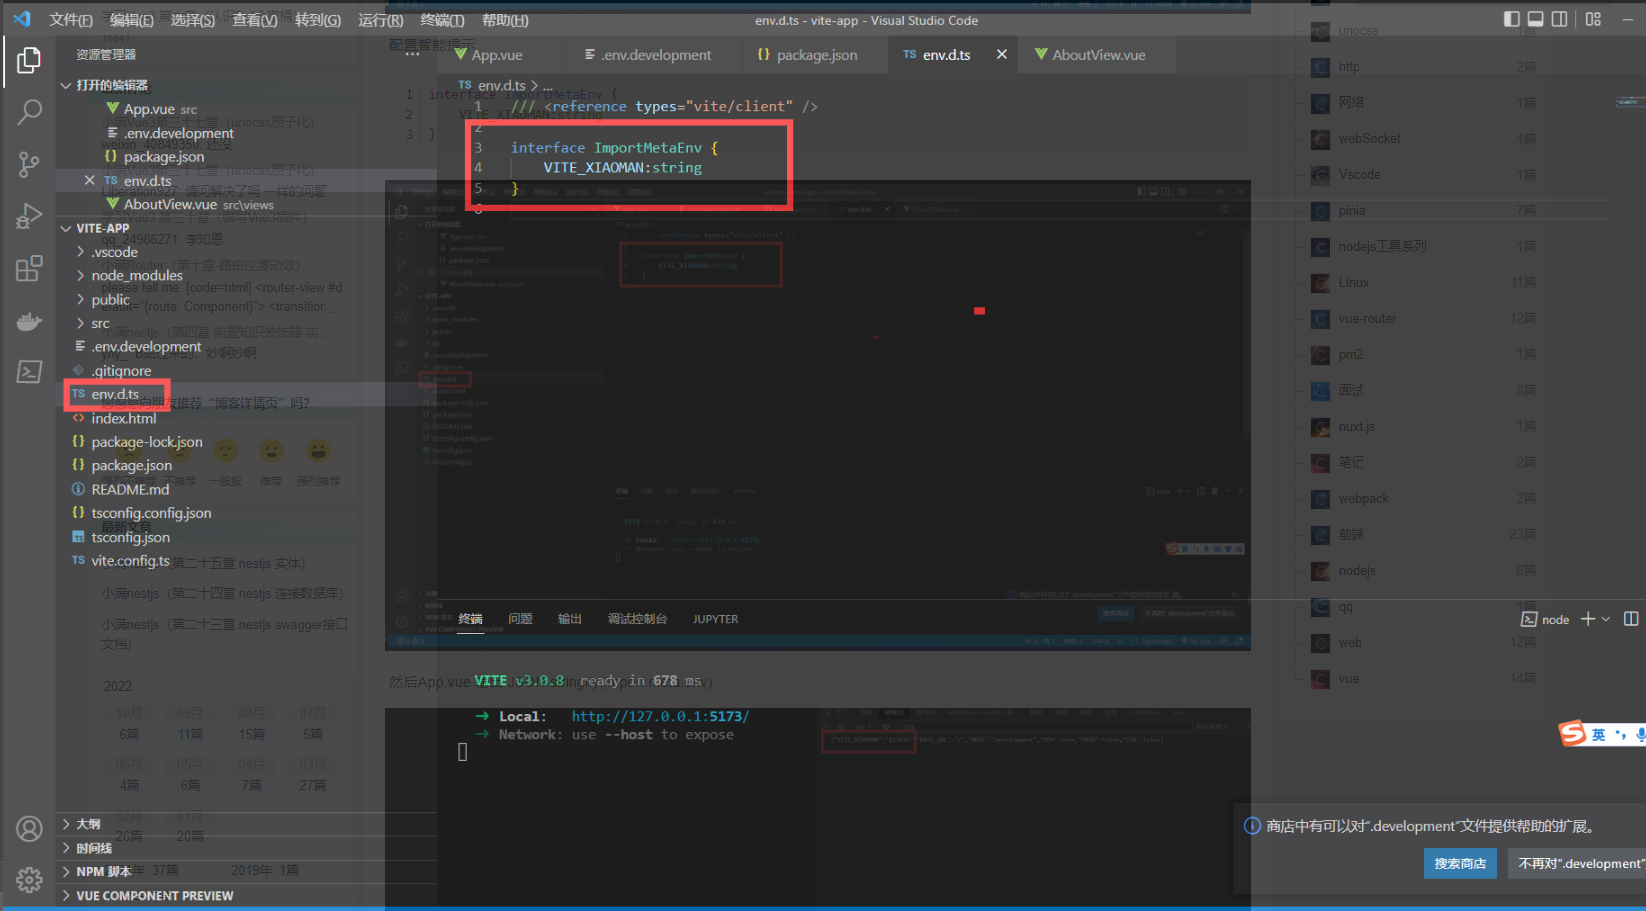
然后App.vue 输出 JSON.stringify(import.meta.env)
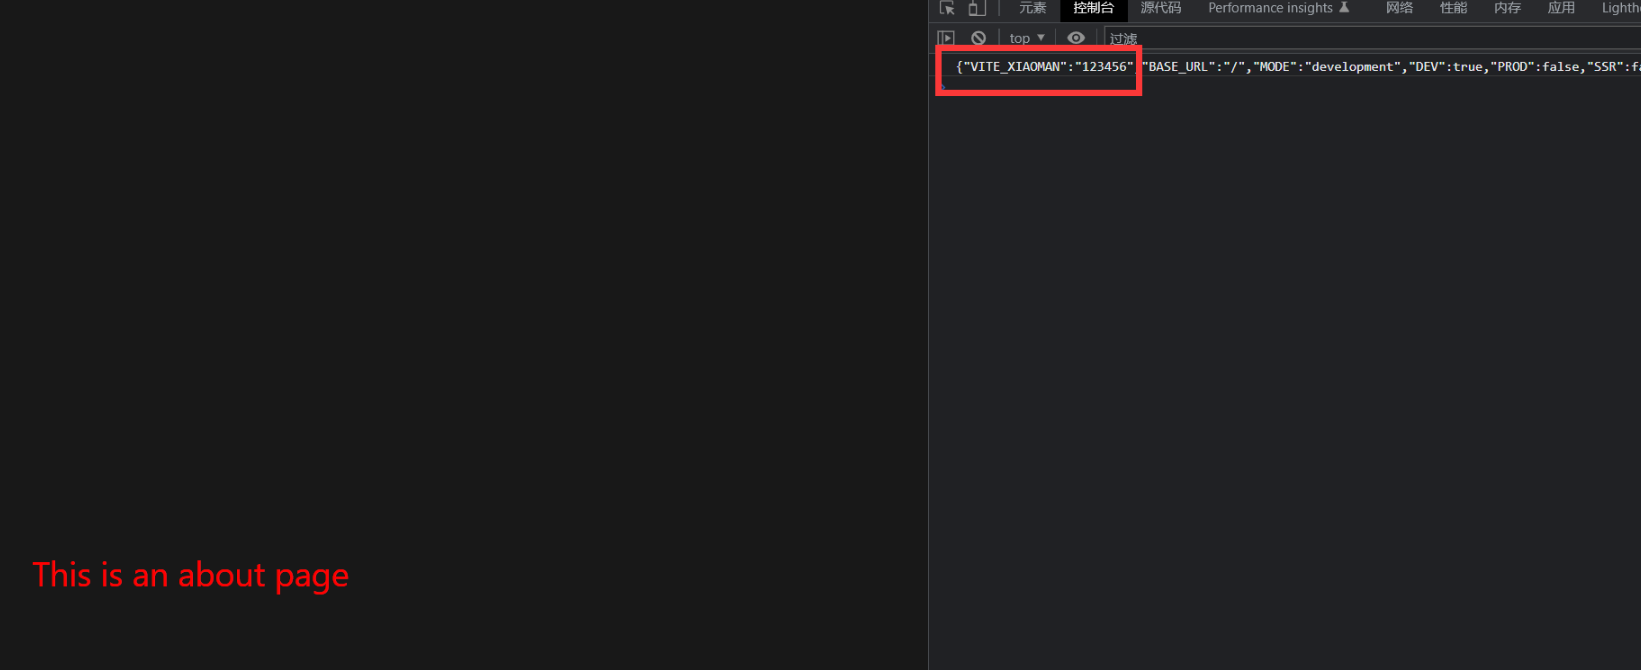
- 就已经添加进去了
生产环境使用
- 创建 .env.production 在执行npm run build 的时候他会自己加载这个文件
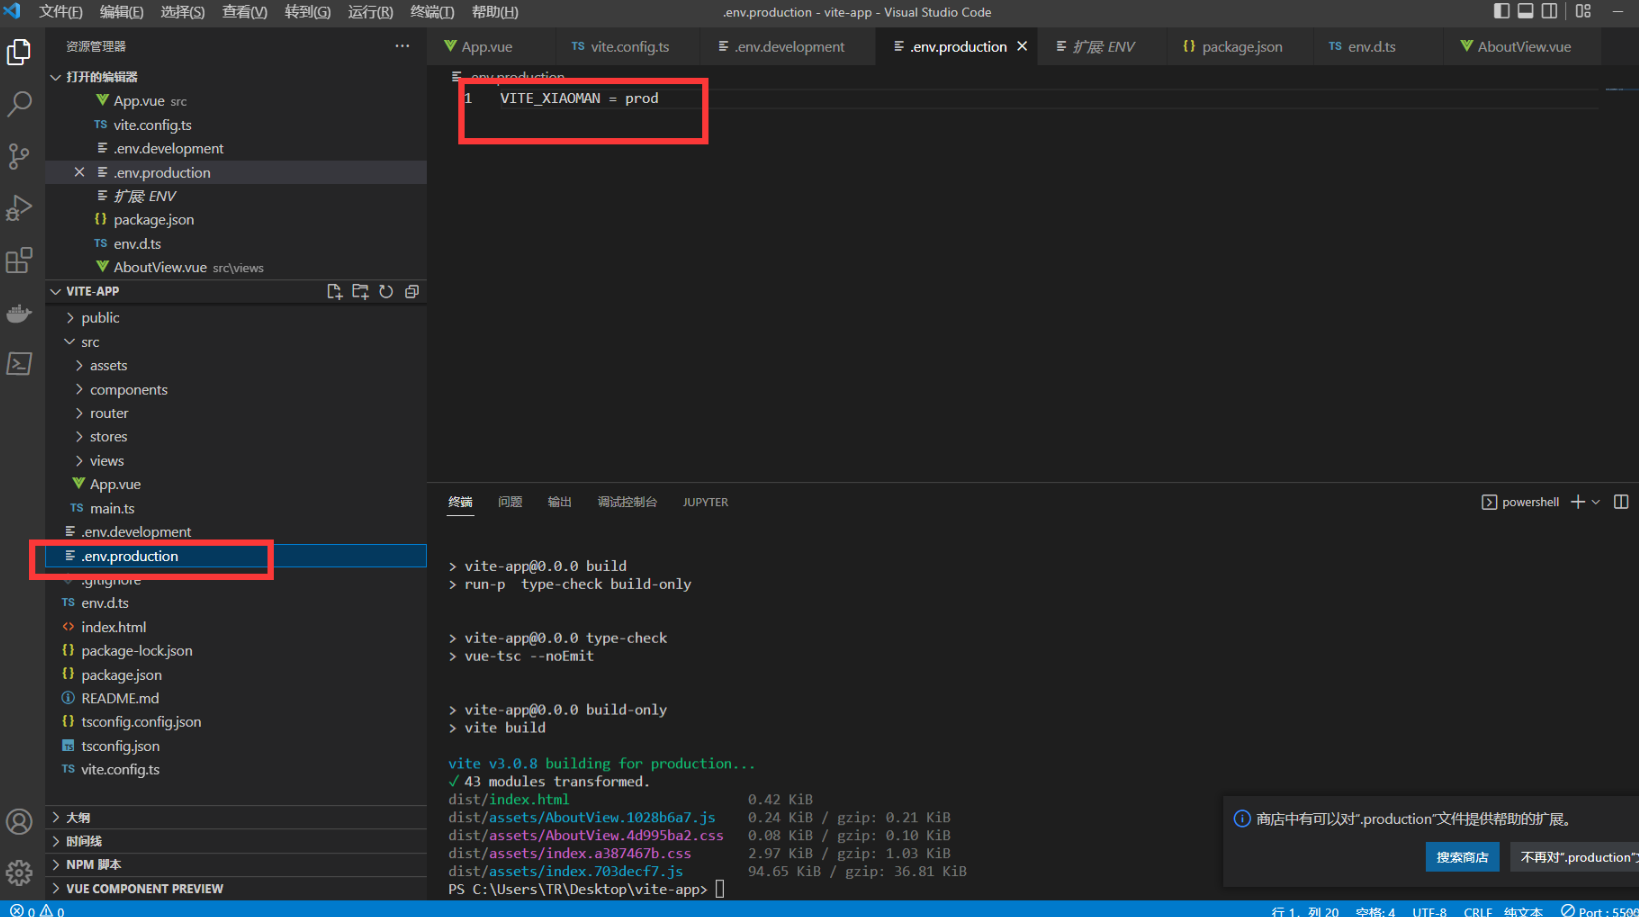
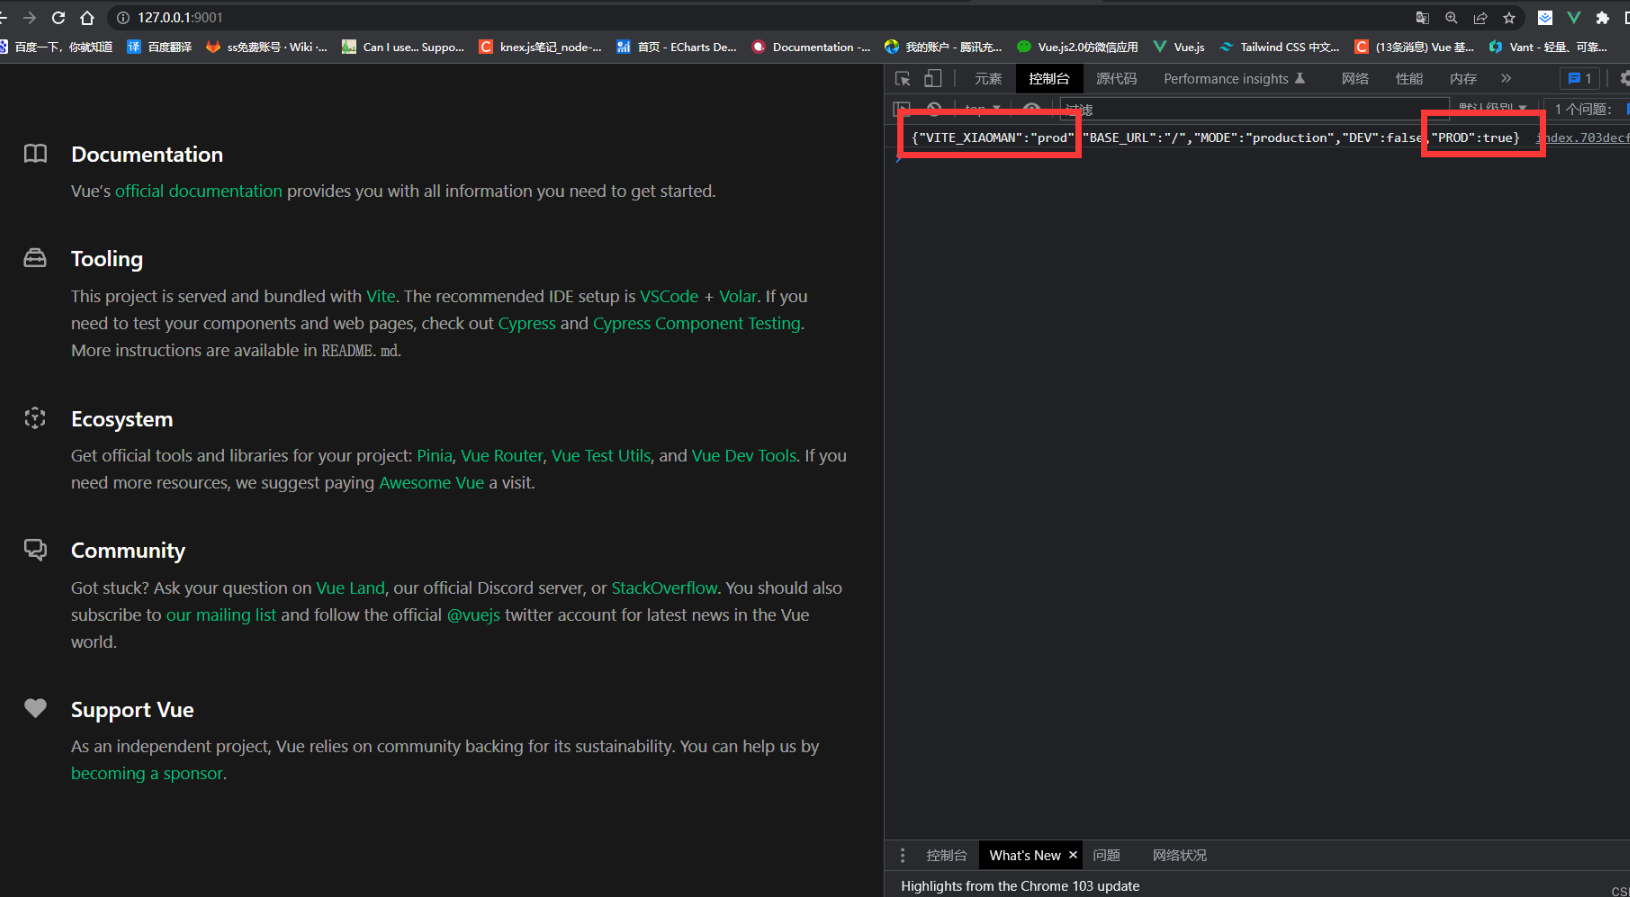
- 创建 .env.production 在执行npm run build 的时候他会自己加载这个文件
如果想在vite.config.ts 使用环境变量
tsimport { fileURLToPath, URL } from 'node:url' import { defineConfig, loadEnv } from 'vite' import vue from '@vitejs/plugin-vue' import vueJsx from '@vitejs/plugin-vue-jsx' // https://vitejs.dev/config/ export default ({mode}:any) => { console.log(loadEnv(mode,process.cwd())) return defineConfig({ plugins: [vue(), vueJsx()], resolve: { alias: { '@': fileURLToPath(new URL('./src', import.meta.url)) } } }) }我们就可以通过环境变量这个值 做一些事情比如 切换接口url 等
Chapter44 Vue3性能优化
### 性能优化
- 我们可以使用谷歌浏览器自带的DevTools 进行性能分析 LightHouse
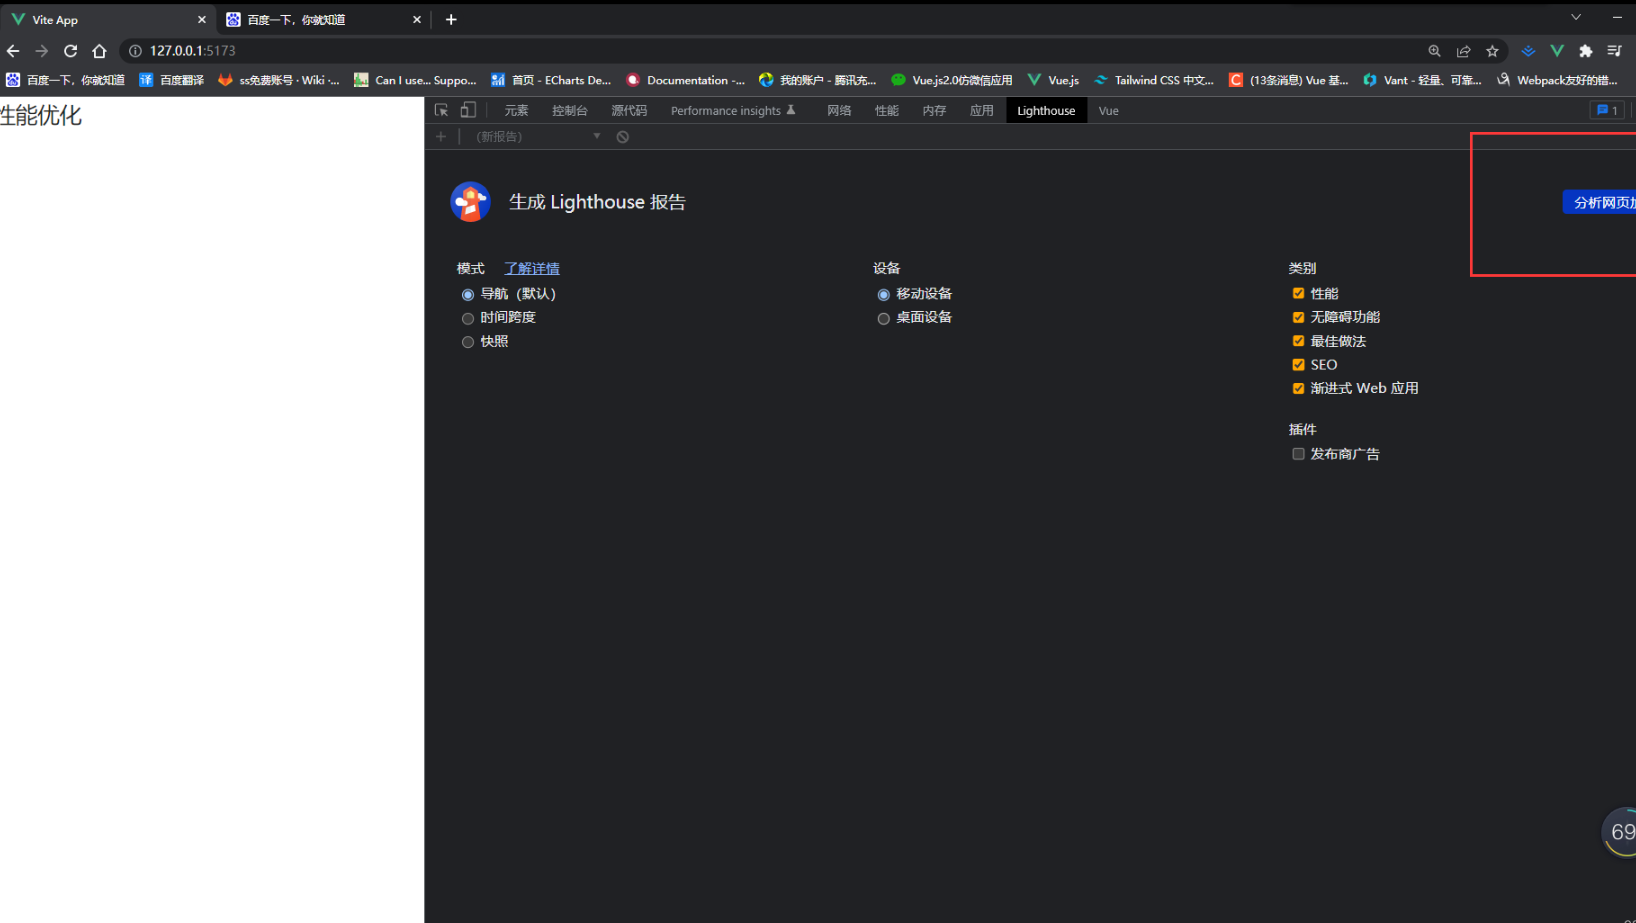
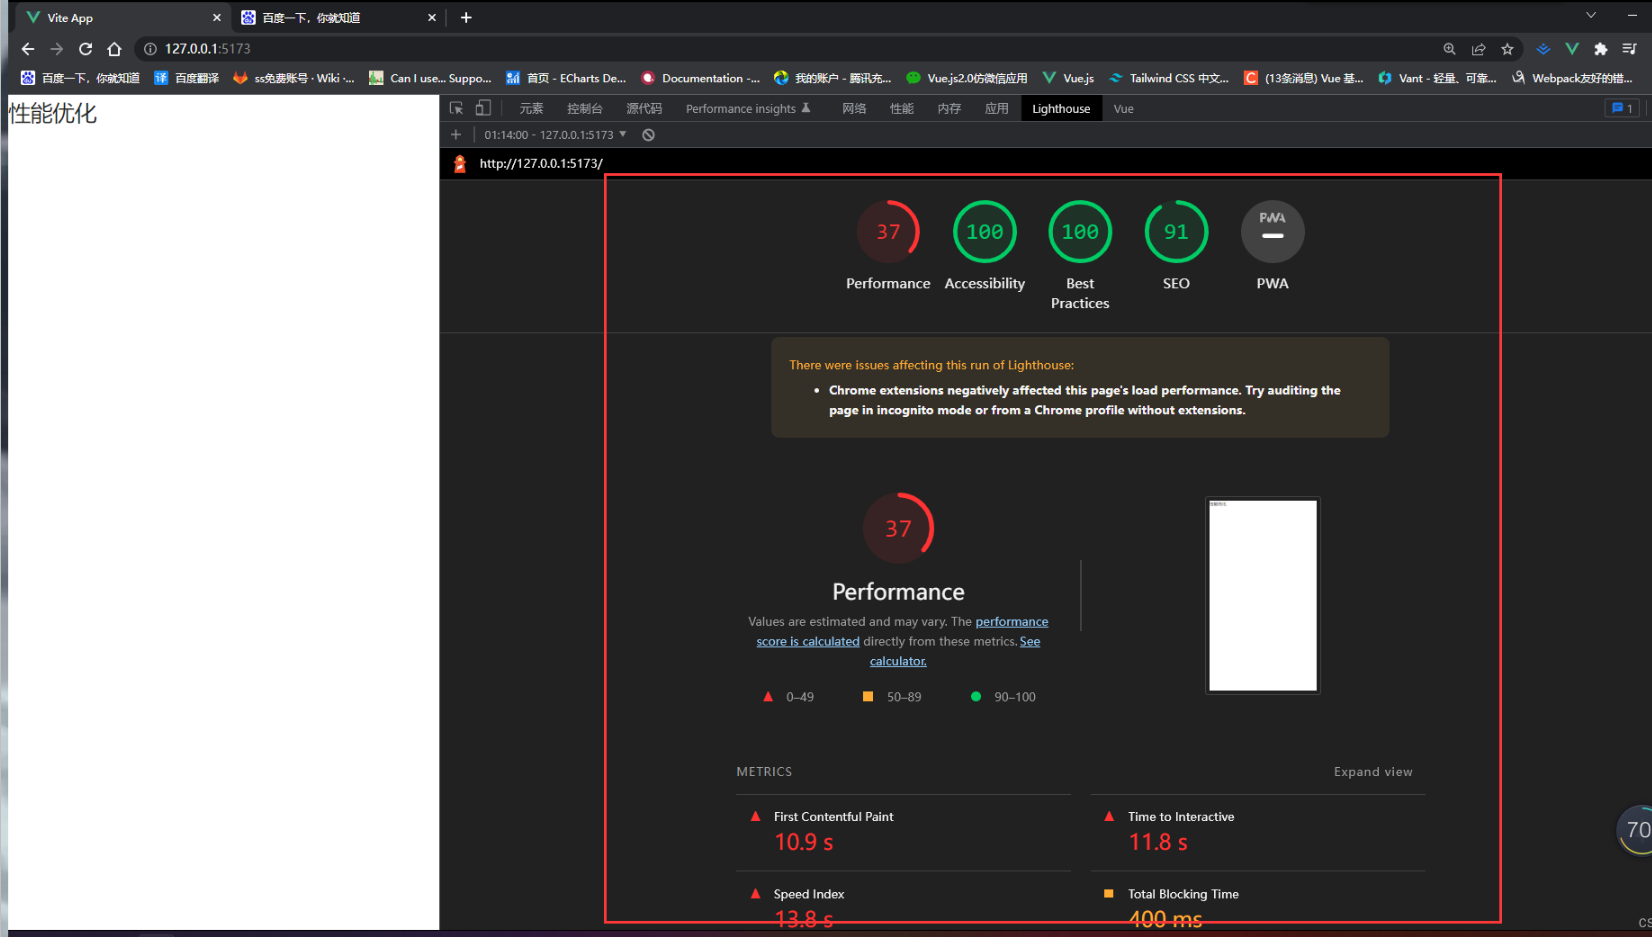
参数介绍
- 从Performance页的表现结果来看,得分37分,并提供了很多的时间信息,我们来解释下这些选项代表的意思:
- FCP (First Contentful Paint):首次内容绘制的时间,浏览器第一次绘制DOM相关的内容,也是用户第一次看到页面内容的时间。
- Speed Index: 页面各个可见部分的显示平均时间,当我们的页面上存在轮播图或者需要从后端获取内容加载时,这个数据会被影响到。
- LCP (Largest Contentful Paint):最大内容绘制时间,页面最大的元素绘制完成的时间。
- TTI(Time to Interactive):从页面开始渲染到用户可以与页面进行交互的时间,内容必须渲染完毕,交互元素绑定的事件已经注册完成。
- TBT(Total Blocking Time):记录了首次内容绘制到用户可交互之间的时间,这段时间内,主进程被阻塞,会阻碍用户的交互,页面点击无反应。
- CLS(Cumulative Layout Shift):计算布局偏移值得分,会比较两次渲染帧的内容偏移情况,可能导致用户想点击A按钮,但下一帧中,A按钮被挤到旁边,导致用户实际点击了B按钮。
代码分析
- 由于我们使用的是vite vite打包是基于rollup 的我们可以使用 rollup 的插件
npm install rollup-plugin-visualizer - vite.config.ts 配置 记得设置 open 不然无效ts
import { visualizer } from 'rollup-plugin-visualizer'; plugins: [vue(), vueJsx(),visualizer({ open:true })], - 然后进行npm run build打包
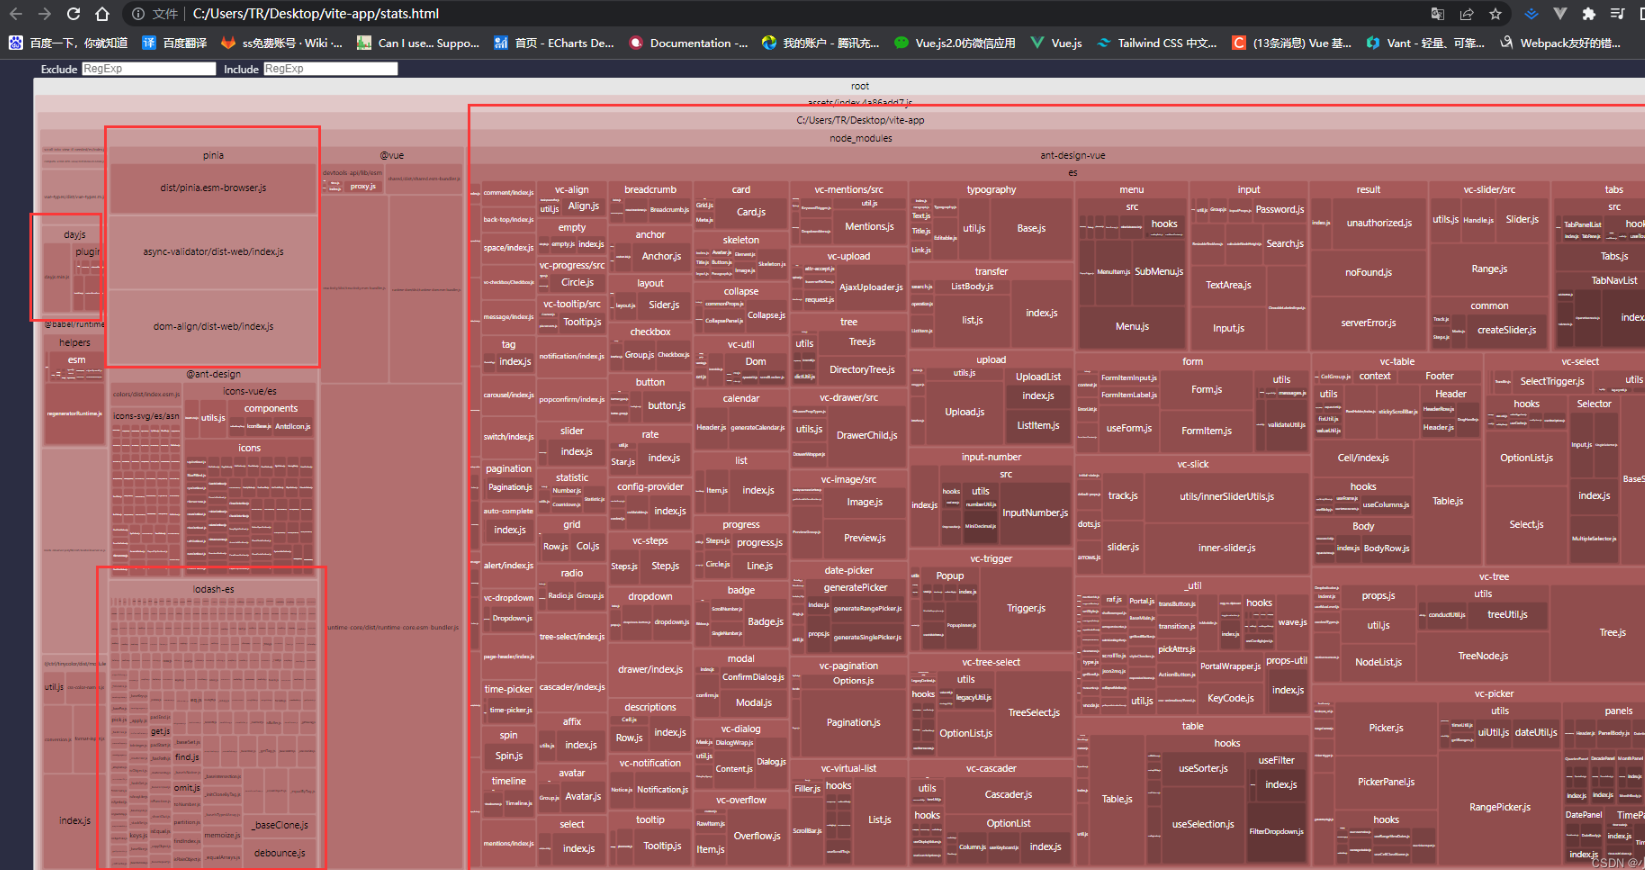
- 我在项目中使用了 Ant Design 发现 这个UI 库非常庞大 这时候 就可以使用 Ant Design 的按需引入减少 包大小
Vite 配置优化
build:{
      chunkSizeWarningLimit:2000,
      cssCodeSplit:true, //css 拆分
      sourcemap:false, //不生成sourcemap
      minify:false, //是否禁用最小化混淆,esbuild打包速度最快,terser打包体积最小。
      assetsInlineLimit:5000 //小于该值 图片将打包成Base64
},### PWA离线存储技术 npm install vite-plugin-pwa -D
import { VitePWA } from 'vite-plugin-pwa'
plugins: [vue(),VitePWA(), vueJsx(),visualizer({
      open:true
})],- PWA 技术的出现就是让web网页无限接近于Native 应用
- 可以添加到主屏幕,利用manifest实现
- 可以实现离线缓存,利用service worker实现
- 可以发送通知,利用service worker实现
tsVitePWA({ workbox:{ cacheId:"XIaoman",//缓存名称 runtimeCaching:[ { urlPattern:/.*\.js.*/, //缓存文件 handler:"StaleWhileRevalidate", //重新验证时失效 options:{ cacheName:"XiaoMan-js", //缓存js,名称 expiration:{ maxEntries:30, //缓存文件数量 LRU算法 maxAgeSeconds:30 * 24 * 60 * 60 //缓存有效期 } } } ] }, }) - 进行 npm run build 打包会生成 sw.js
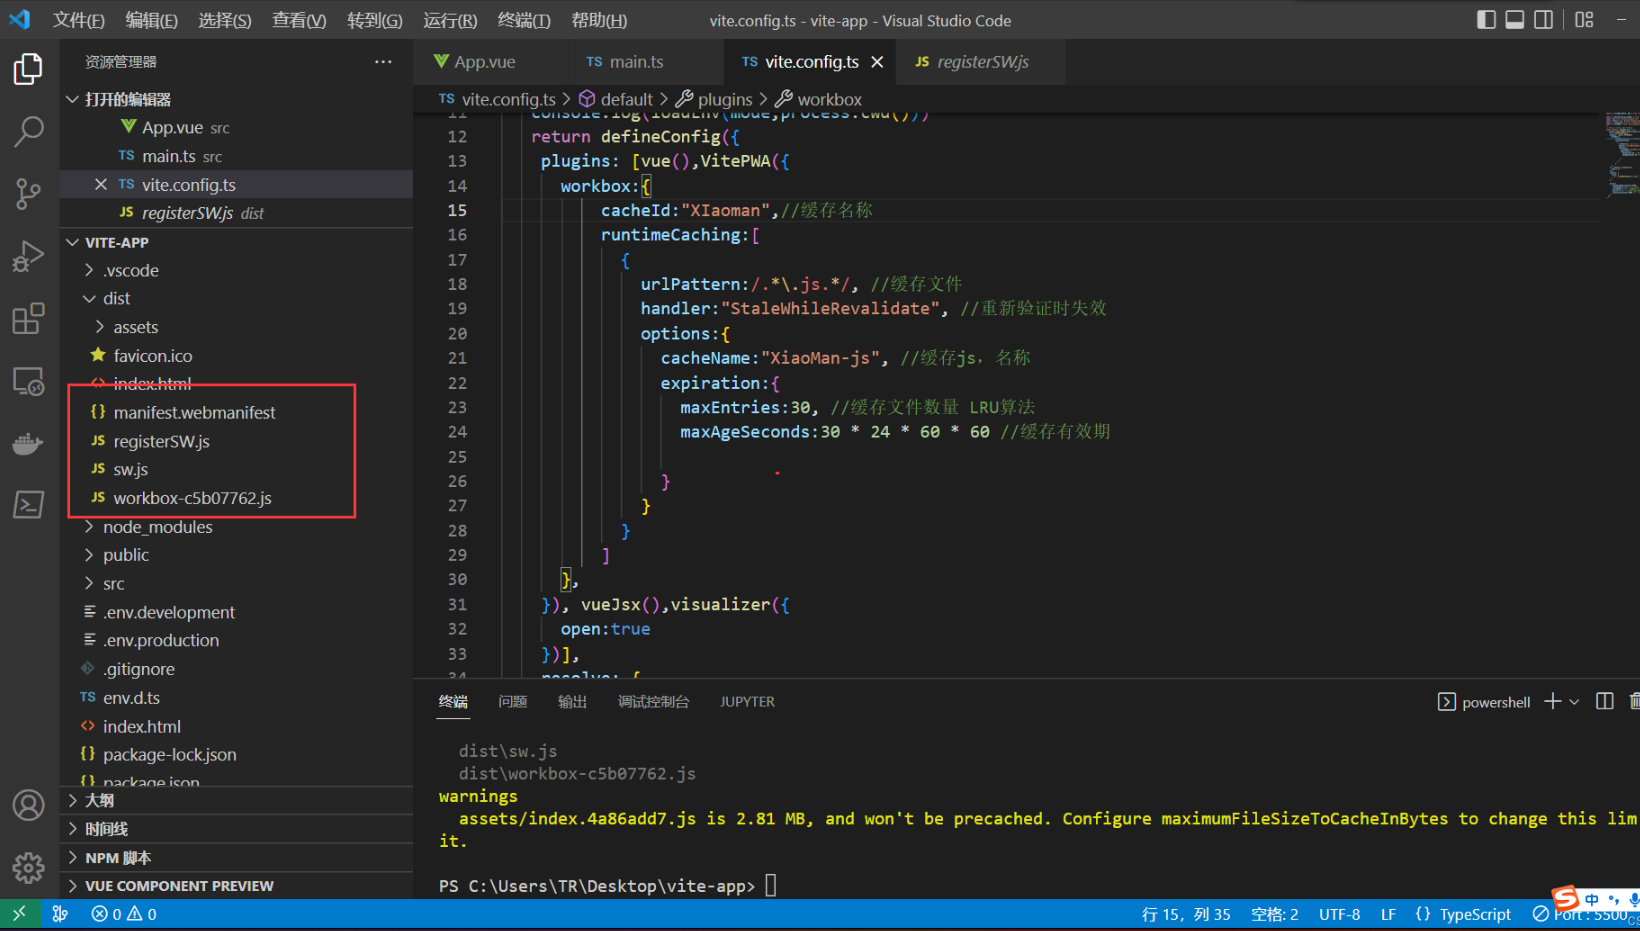
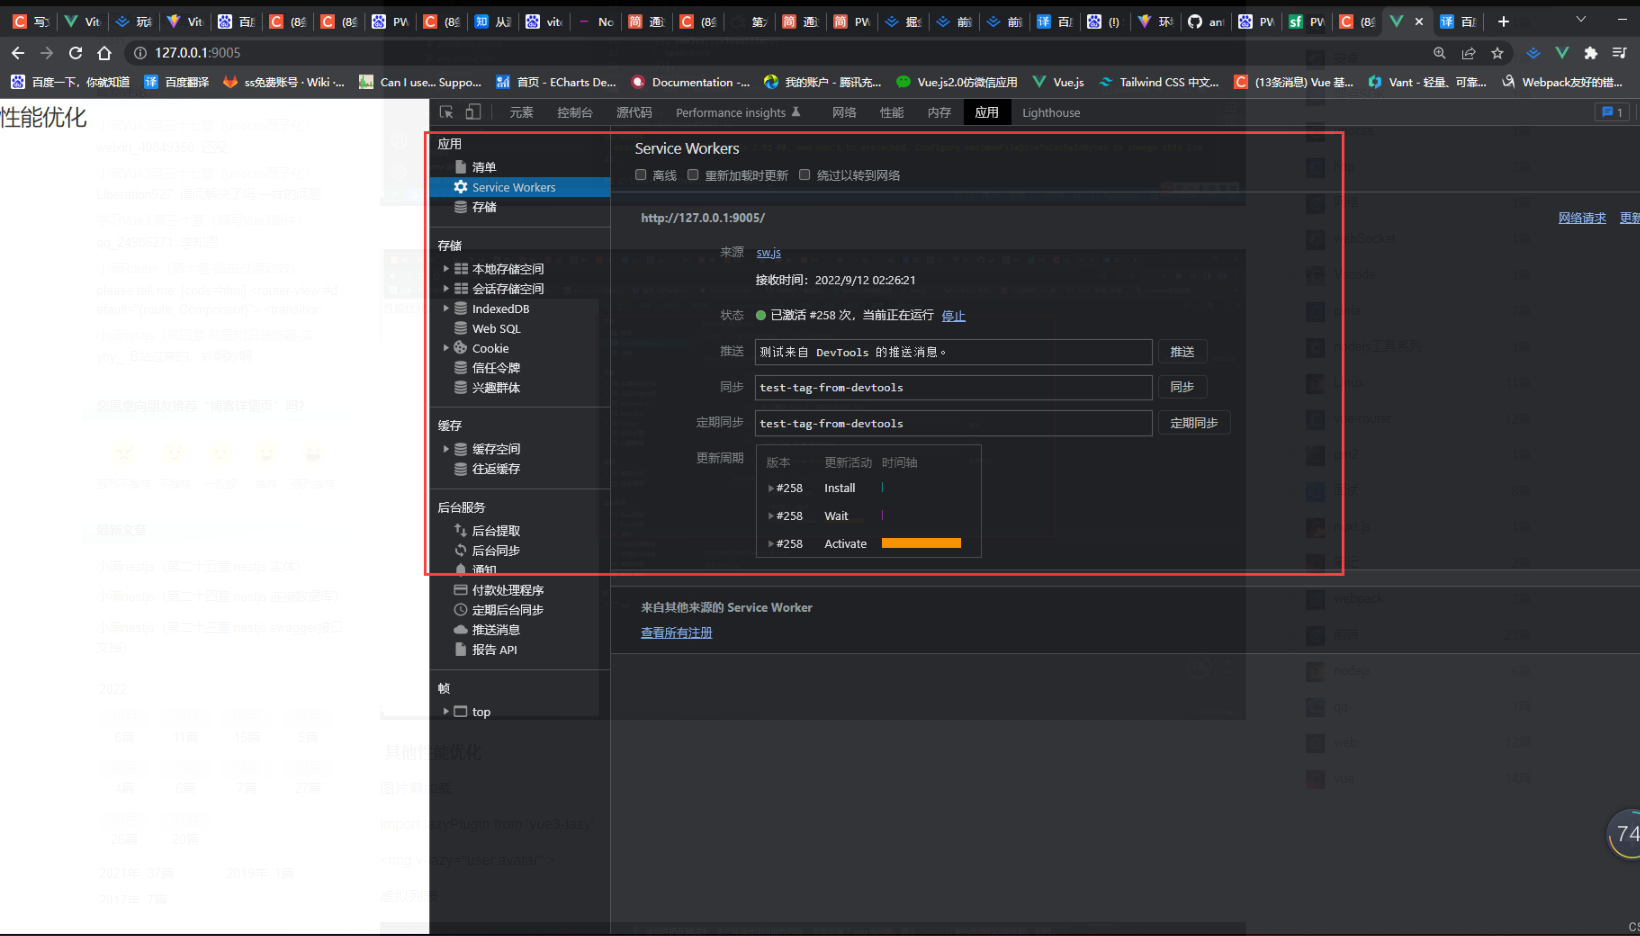
其他性能优化
图片懒加载
tsimport lazyPlugin from 'vue3-lazy'<img v-lazy="user.avatar" >
虚拟列表
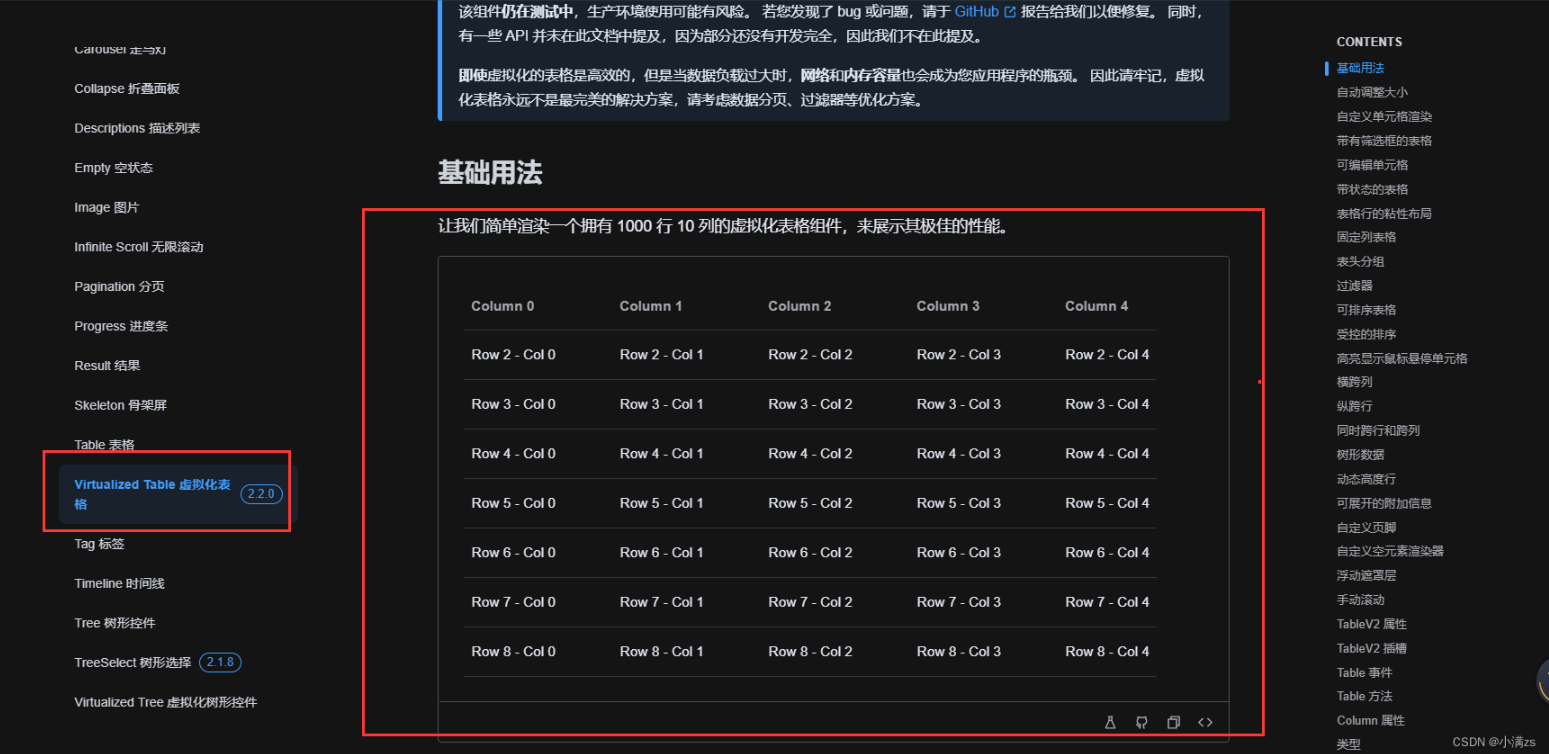
多线程 使用 new Worker 创建
- worker脚本与主进程的脚本必须遵守同源限制。他们所在的路径协议、域名、端口号三者需要相同ts
const myWorker1 = new Worker("./calcBox.js"); - 都使用postMessage发送消息ts
worker.postMessage(arrayBuffer, [arrayBuffer]); - 都使用onmessage接收消息ts
self.onmessage = function (e) { // xxx这里是worker脚本的内容 }; - 关闭ts
worker.terminate(); - VueUse 库已经集成了 webWorker
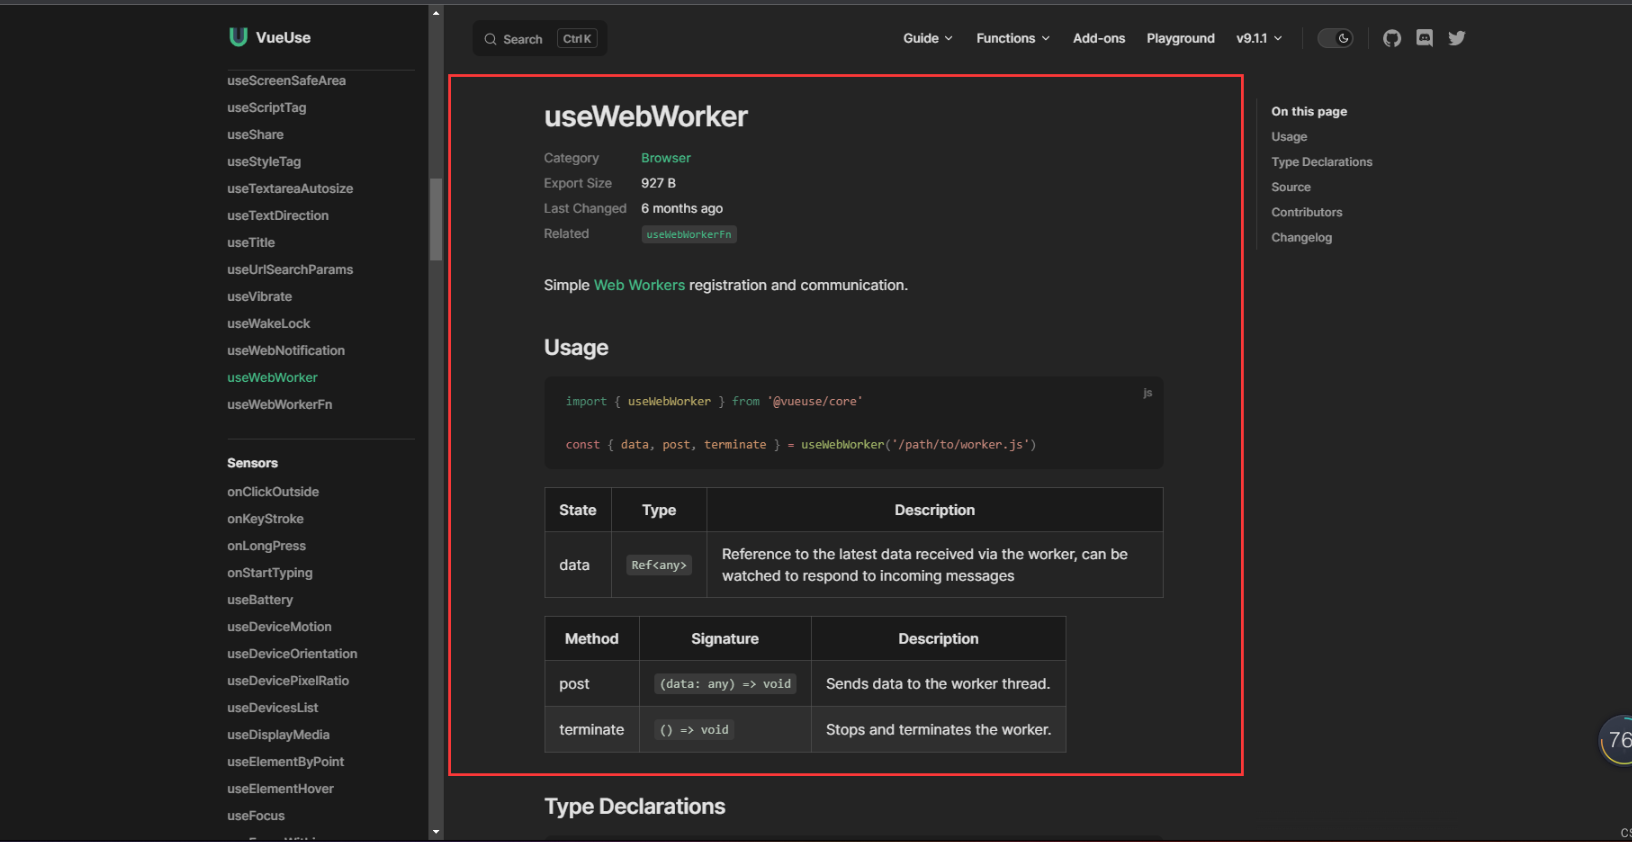
- worker脚本与主进程的脚本必须遵守同源限制。他们所在的路径协议、域名、端口号三者需要相同
防抖节流
- 同样VueUse 也是集成了
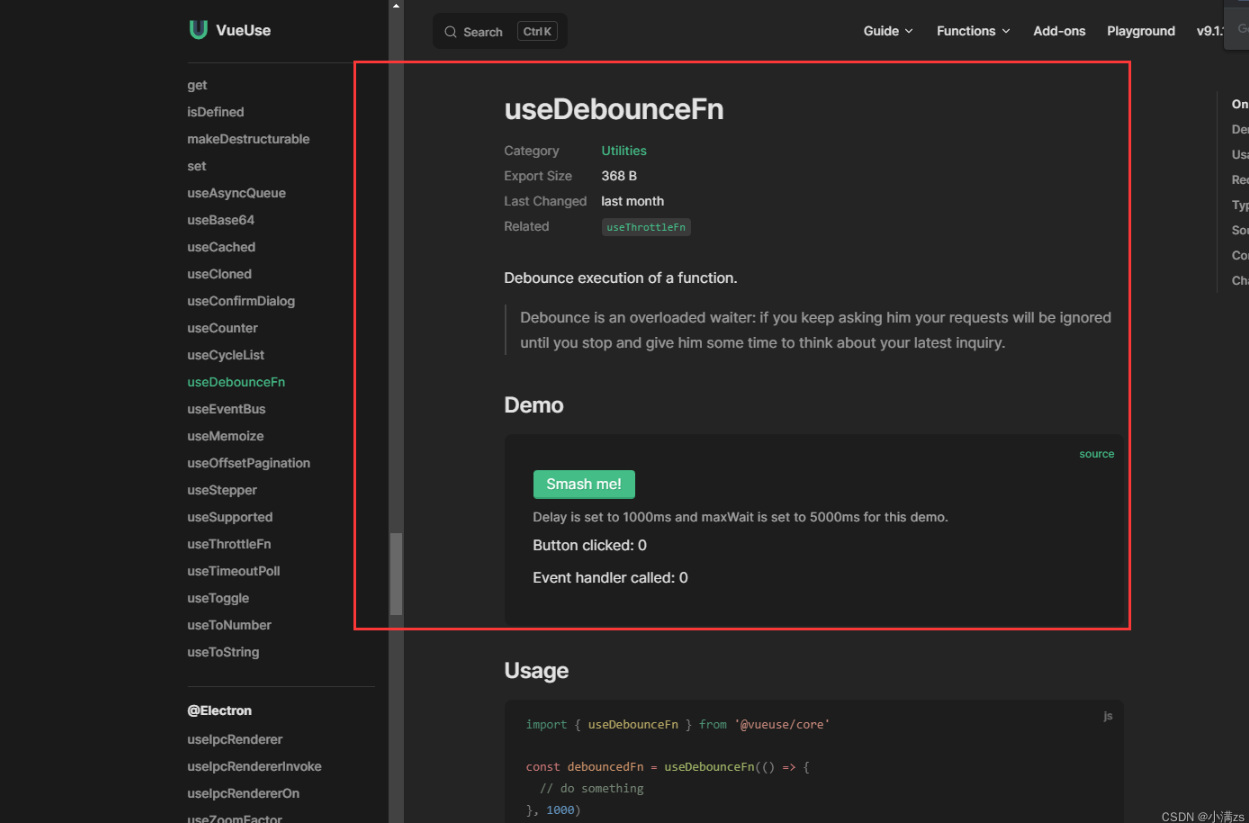
Chapter1 Pinia:介绍Pinia

- 前言 全局状态管理工具
- Pinia.js 有如下特点:
- 完整的 ts 的支持;
- 足够轻量,压缩后的体积只有1kb左右;
- 去除 mutations,只有 state,getters,actions;
- actions 支持同步和异步;
- 代码扁平化没有模块嵌套,只有 store 的概念,store 之间可以自由使用,每一个store都是独立的
- 无需手动添加 store,store 一旦创建便会自动添加;
- 支持Vue3 和 Vue2
- 官方文档Pinia
1. 起步 安装
yarn add pinia

npm install pinia2. 引入注册Vue3
import { createApp } from 'vue'
import App from './App.vue'
import {createPinia} from 'pinia'

const store = createPinia()
let app = createApp(App)

app.use(store)

app.mount('#app')- Vue2 使用js
import { createPinia, PiniaVuePlugin } from 'pinia'

Vue.use(PiniaVuePlugin)
const pinia = createPinia()
new Vue({
  el: '#app',
  // other options...
  // ...
  // note the same `pinia` instance can be used across multiple Vue apps on
  // the same page
  pinia,
})
Chapter2 Pinia:初始化仓库Store
- 新建一个文件夹Store
- 新建文件
[name].ts
- 新建文件
- 定义仓库Store
tsimport { defineStore } from 'pinia'- 我们需要知道存储是使用定义的defineStore(),并且它需要一个唯一的名称,作为第一个参数传递
- 我这儿名称抽离出去了
- 新建文件store-namespace/index.tsts
export const enum Names { Test = 'TEST' } - store 引入ts
import { defineStore } from 'pinia' import { Names } from './store-namespace' export const useTestStore = defineStore(Names.Test, { }) - 这个名称,也称为id,是必要的,Pania 使用它来将商店连接到 devtools。将返回的函数命名为use...是可组合项之间的约定,以使其使用习惯。
- 定义值
- State 箭头函数 返回一个对象 在对象里面定义值ts
import { defineStore } from 'pinia' import { Names } from './store-namespce' export const useTestStore = defineStore(Names.Test, { state:()=>{ return { current:1 } } })tsimport { defineStore } from 'pinia' import { Names } from './store-namespce' export const useTestStore = defineStore(Names.Test, { state:()=>{ return { current:1 } }, //类似于computed 可以帮我们去修饰我们的值 getters:{ }, //可以操作异步 和 同步提交state actions:{ } })
Chapter3 Pinia:State
- State 是允许直接修改值的 例如current++
vue<template> <div> <button @click="Add">+</button> <div> {{Test.current}} </div> </div> </template> <script setup lang='ts'> import {useTestStore} from './store' const Test = useTestStore() const Add = () => { Test.current++ } </script> <style> </style>- 批量修改State的值
在他的实例上有$patch方法可以批量修改多个值
vue<template> <div> <button @click="Add">+</button> <div> {{Test.current}} </div> <div> {{Test.age}} </div> </div> </template> <script setup lang='ts'> import {useTestStore} from './store' const Test = useTestStore() const Add = () => { Test.$patch({ current:200, age:300 }) } </script> <style> </style>- 批量修改函数形式
推荐使用函数形式 可以自定义修改逻辑
vue<template> <div> <button @click="Add">+</button> <div> {{Test.current}} </div> <div> {{Test.age}} </div> </div> </template> <script setup lang='ts'> import {useTestStore} from './store' const Test = useTestStore() const Add = () => { Test.$patch((state)=>{ state.current++; state.age = 40 }) } </script> <style> </style>- 通过原始对象修改整个实例
$state您可以通过将store的属性设置为新对象来替换store的整个状态
缺点就是必须修改整个对象的所有属性
vue<template> <div> <button @click="Add">+</button> <div> {{Test.current}} </div> <div> {{Test.age}} </div> </div> </template> <script setup lang='ts'> import {useTestStore} from './store' const Test = useTestStore() const Add = () => { Test.$state = { current:10, age:30 } } </script> <style> </style>- 通过actions修改
定义Actions
在actions 中直接使用this就可以指到state里面的值
tsimport { defineStore } from 'pinia' import { Names } from './store-naspace' export const useTestStore = defineStore(Names.TEST, { state:()=>{ return { current:1, age:30 } }, actions:{ setCurrent () { this.current++ } } })使用方法直接在实例调用
vue<template> <div> <button @click="Add">+</button> <div> {{Test.current}} </div> <div> {{Test.age}} </div> </div> </template> <script setup lang='ts'> import {useTestStore} from './store' const Test = useTestStore() const Add = () => { Test.setCurrent() } </script> <style> </style>
Chapter4 Pinia:解构store
在Pinia是不允许直接解构是会失去响应性的
tsconst Test = useTestStore() const { current, name } = Test console.log(current, name);差异对比
修改Test current 解构完之后的数据不会变
而源数据是会变的
vue<template> <div>origin value {{Test.current}}</div> <div> pinia:{{ current }}--{{ name }} change : <button @click="change">change</button> </div> </template> <script setup lang='ts'> import { useTestStore } from './store' const Test = useTestStore() const change = () => { Test.current++ } const { current, name } = Test console.log(current, name); </script> <style> </style>解决方案可以使用 storeToRefs
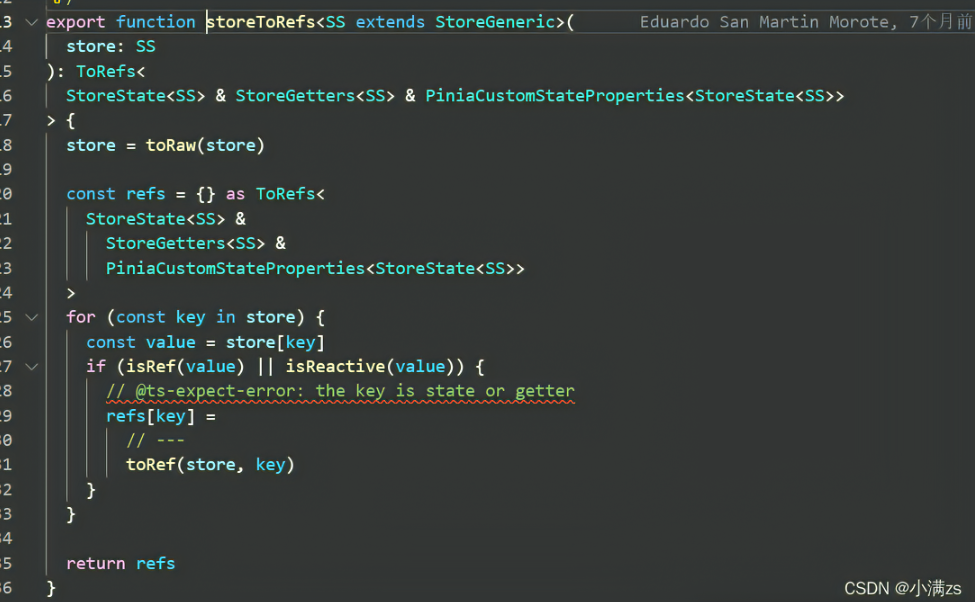
tsimport { storeToRefs } from 'pinia' const Test = useTestStore() const { current, name } = storeToRefs(Test)其原理跟toRefs 一样的给里面的数据包裹一层toref
源码 通过toRaw使store变回原始数据防止重复代理
循环store 通过 isRef isReactive 判断 如果是响应式对象直接拷贝一份给refs 对象 将其原始对象包裹toRef 使其变为响应式对象
Chapter5 Pinia:actions,getters
Actions(支持同步异步)
- 同步 直接调用即可
tsimport { defineStore } from 'pinia' import { Names } from './store-naspace' export const useTestStore = defineStore(Names.TEST, { state: () => ({ counter: 0, }), actions: { increment() { this.counter++ }, randomizeCounter() { this.counter = Math.round(100 * Math.random()) }, }, })vue<template> <div> <button @click="Add">+</button> <div> {{Test.counter}} </div> </div> </template> <script setup lang='ts'> import {useTestStore} from './store' const Test = useTestStore() const Add = () => { Test.randomizeCounter() } </script> <style> </style>- 异步 可以结合async await 修饰
tsimport { defineStore } from 'pinia' import { Names } from './store-naspace' type Result = { name: string isChu: boolean } const Login = (): Promise<Result> => { return new Promise((resolve) => { setTimeout(() => { resolve({ name: '小满', isChu: true }) }, 3000) }) } export const useTestStore = defineStore(Names.TEST, { state: () => ({ user: <Result>{}, name: "123" }), actions: { async getLoginInfo() { const result = await Login() this.user = result; } }, })template
vue<template> <div> <button @click="Add">test</button> <div> {{Test.user}} </div> </div> </template> <script setup lang='ts'> import {useTestStore} from './store' const Test = useTestStore() const Add = () => { Test.getLoginInfo() } </script> <style> </style>- 多个action互相调用getLoginInfo setName
tsstate: () => ({ user: <Result>{}, name: "default" }), actions: { async getLoginInfo() { const result = await Login() this.user = result; this.setName(result.name) }, setName (name:string) { this.name = name; } },
getters
- 使用箭头函数不能使用this this指向已经改变指向undefined 修改值请用state
- 主要作用类似于computed 数据修饰并且有缓存ts
getters:{ newPrice:(state)=> `$${state.user.price}` }, - 普通函数形式可以使用this
tsgetters:{ newCurrent ():number { return ++this.current } },- getters 互相调用
tsgetters:{ newCurrent ():number | string { return ++this.current + this.newName }, newName ():string { return `$-${this.name}` } },
Chapter6 Pinia:API
1. $reset
重置store到他的初始状态
tsstate: () => ({ user: <Result>{}, name: "default", current:1 }),Vue 例如我把值改变到了10
tsconst change = () => { Test.current++ }调用$reset();
- 将会把state所有值 重置回 原始状态
2. 订阅state的改变
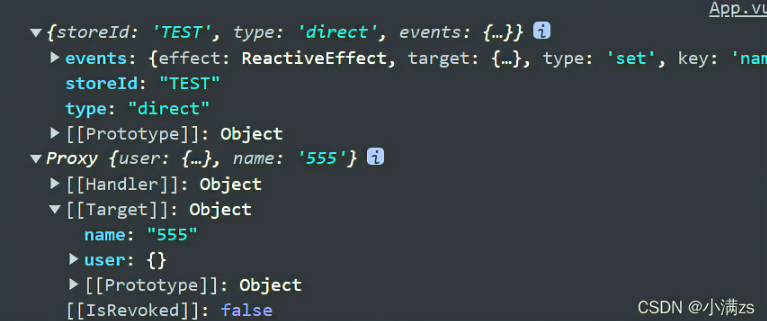
类似于Vuex 的 abscribe 只要有state 的变化就会走这个函数
tsTest.$subscribe((args,state)=>{ console.log(args,state); })返回值
第二个参数
如果你的组件卸载之后还想继续调用请设置第二个参数
tsTest.$subscribe((args,state)=>{ console.log(args,state); },{ detached:true })
3. 订阅Actions的调用
- 只要有actions被调用就会走这个函数ts
Test.$onAction((args)=>{
  console.log(args);

})
Chapter7 Pinia:Pinia插件
- pinia 和 vuex 都有一个通病 页面刷新状态会丢失
- 我们可以写一个pinia 插件缓存他的值ts
const __piniaKey = '__PINIAKEY__'
//定义兜底变量


type Options = {
  key?:string
}
//定义入参类型


//将数据存在本地
const setStorage = (key: string, value: any): void => {

localStorage.setItem(key, JSON.stringify(value))

}


//存缓存中读取
const getStorage = (key: string) => {

return (localStorage.getItem(key) ? JSON.parse(localStorage.getItem(key) as string) : {})

}


//利用函数柯丽华接受用户入参
const piniaPlugin = (options: Options) => {

//将函数返回给pinia  让pinia  调用 注入 context
return (context: PiniaPluginContext) => {

const { store } = context;

const data = getStorage(`${options?.key ?? __piniaKey}-${store.$id}`)

store.$subscribe(() => {

setStorage(`${options?.key ?? __piniaKey}-${store.$id}`, toRaw(store.$state));

})

//返回值覆盖pinia 原始值
return {

...data

}

}

}


//初始化pinia
const pinia = createPinia()


//注册pinia 插件
pinia.use(piniaPlugin({

key: "pinia"

}))
Chapter1 Router:入门
1.前言
- router 路由
- 因为vue是单页应用不会有那么多html 让我们跳转 所有要使用路由做页面的跳转
- Vue 路由允许我们通过不同的 URL 访问不同的内容。通过 Vue 可以实现多视图的单页Web应用
2. 安装
构建前端项目
shellnpm init vue@latest //或者 npm init vite@latest使用Vue3 安装对应的router4版本
使用Vue2安装对应的router3版本
npm install vue-router@4在src目录下面新建router 文件 然后在router 文件夹下面新建 index.ts
ts//引入路由对象 import { createRouter, createWebHistory, createWebHashHistory, createMemoryHistory, RouteRecordRaw } from 'vue-router' //vue2 mode history vue3 createWebHistory //vue2 mode hash vue3 createWebHashHistory //vue2 mode abstact vue3 createMemoryHistory //路由数组的类型 RouteRecordRaw // 定义一些路由 // 每个路由都需要映射到一个组件。 const routes: Array<RouteRecordRaw> = [{ path: '/', component: () => import('../components/a.vue') },{ path: '/register', component: () => import('../components/b.vue') }] const router = createRouter({ history: createWebHistory(), routes }) //导出router export default routerrouter-link#
- 请注意,我们没有使用常规的 a 标签,而是使用一个自定义组件 router-link 来创建链接。这使得 Vue Router 可以在不重新加载页面的情况下更改 URL,处理 URL 的生成以及编码。我们将在后面看到如何从这些功能中获益。
router-view
- router-view 将显示与 url 对应的组件。你可以把它放在任何地方,以适应你的布局。
vue<template> <div> <h1>小满最骚</h1> <div> <!--使用 router-link 组件进行导航 --> <!--通过传递 `to` 来指定链接 --> <!--`<router-link>` 将呈现一个带有正确 `href` 属性的 `<a>` 标签--> <router-link tag="div" to="/">跳转a</router-link> <router-link tag="div" style="margin-left:200px" to="/register">跳转b</router-link> </div> <hr /> <!-- 路由出口 --> <!-- 路由匹配到的组件将渲染在这里 --> <router-view></router-view> </div> </template>最后在main.ts 挂载
tsimport { createApp } from 'vue' import App from './App.vue' import router from './router' createApp(App).use(router).mount('#app')
Chapter2 Router:命名路由-编程式导航
命名路由
- 除了 path 之外,你还可以为任何路由提供 name。这有以下优点:
- 没有硬编码的 URL
- params 的自动编码/解码。
- 防止你在 url 中出现打字错误。
- 绕过路径排序(如显示一个)
tsconst routes:Array<RouteRecordRaw> = [ { path:"/", name:"Login", component:()=> import('../components/login.vue') }, { path:"/reg", name:"Reg", component:()=> import('../components/reg.vue') } ] - router-link跳转方式需要改变 变为对象并且有对应namehtml
<h1>小满最骚</h1> <div> <router-link :to="{name:'Login'}">Login</router-link> <router-link style="margin-left:10px" :to="{name:'Reg'}">Reg</router-link> </div> <hr />
### 编程式导航
- 除了使用
<router-link>创建 a 标签来定义导航链接,我们还可以借助 router 的实例方法,通过编写代码来实现。 - 字符串模式
tsimport { useRouter } from 'vue-router' const router = useRouter() const toPage = () => { router.push('/reg') }- 对象模式
tsimport { useRouter } from 'vue-router' const router = useRouter() const toPage = () => { router.push({ path: '/reg' }) }- 命名式路由模式
tsimport { useRouter } from 'vue-router' const router = useRouter() const toPage = () => { router.push({ name: 'Reg' }) }
a标签跳转
- 直接通过a href也可以跳转但是会刷新页面
<a href="/reg">rrr</a>
Chapter3 Router:历史记录
### replace的使用
- 采用replace进行页面的跳转会同样也会创建渲染新的Vue组件,但是在history中其不会重复保存记录,而是替换原有的vue组件;
- router-link 使用方法html
<router-link replace to="/">Login</router-link> <router-link replace style="margin-left:10px" to="/reg">Reg</router-link> - 编程式导航html
<button @click="toPage('/')">Login</button> <button @click="toPage('/reg')">Reg</button> - jsjs
import { useRouter } from 'vue-router' const router = useRouter() const toPage = (url: string) => { router.replace(url) }
横跨历史
- 该方法采用一个整数作为参数,表示在历史堆栈中前进或后退多少步html
<button @click="next">前进</button> <button @click="prev">后退</button>tsconst next = () => { //前进 数量不限于1 router.go(1) } const prev = () => { //后退 router.back() }
Chapter4 Router:路由传参
Query路由传参
- 编程式导航 使用router push 或者 replace 的时候 改为对象形式新增query 必须传入一个对象ts
const toDetail = (item: Item) => { router.push({ path: '/reg', query: item }) } - 接受参数
- 使用 useRoute 的 queryts
import { useRoute } from 'vue-router'; const route = useRoute()html<div>品牌:{{ route.query?.name }}</div> <div>价格:{{ route.query?.price }}</div> <div>ID:{{ route.query?.id }}</div>
Params路由传参
- 编程式导航 使用router push 或者 replace 的时候 改为对象形式并且只能使用name,path无效,然后传入paramsts
const toDetail = (item: Item) => { router.push({ name: 'Reg', params: item }) } - 接受参数
- 使用 useRoute 的 paramsts
import { useRoute } from 'vue-router'; const route = useRoute()html<div>品牌:{{ route.params?.name }}</div> <div>价格:{{ route.params?.price }}</div> <div>ID:{{ route.params?.id }}</div>
动态路由传参
- 很多时候,我们需要将给定匹配模式的路由映射到同一个组件。例如,我们可能有一个 User 组件,它应该对所有用户进行渲染,但用户 ID 不同。在 Vue Router 中,我们可以在路径中使用一个动态字段来实现,我们称之为 路径参数
- 路径参数 用冒号 : 表示。当一个路由被匹配时,它的 params 的值将在每个组件ts
const routes:Array<RouteRecordRaw> = [ { path:"/", name:"Login", component:()=> import('../components/login.vue') }, { //动态路由参数 path:"/reg/:id", name:"Reg", component:()=> import('../components/reg.vue') } ]tsconst toDetail = (item: Item) => { router.push({ name: 'Reg', params: { id: item.id } }) }tsimport { useRoute } from 'vue-router'; import { data } from './list.json' const route = useRoute() const item = data.find(v => v.id === Number(route.params.id))
二者的区别
- query 传参配置的是 path,而 params 传参配置的是name,在 params中配置 path 无效
- query 在路由配置不需要设置参数,而 params 必须设置
- query 传递的参数会显示在地址栏中
- params传参刷新会无效,但是 query 会保存传递过来的值,刷新不变 ;
- 路由配置
Chapter5 Router:嵌套路由
- 一些应用程序的 UI 由多层嵌套的组件组成。在这种情况下,URL 的片段通常对应于特定的嵌套组件结构,例如:ts
const routes: Array<RouteRecordRaw> = [ { path: "/user", component: () => import('../components/footer.vue'), children: [ { path: "", name: "Login", component: () => import('../components/login.vue') }, { path: "reg", name: "Reg", component: () => import('../components/reg.vue') } ] }, ] - 如你所见,children 配置只是另一个路由数组,就像 routes 本身一样。因此,你可以根据自己的需要,不断地嵌套视图
- TIPS:不要忘记写router-viewhtml
<div> <router-view></router-view> <div> <router-link to="/">login</router-link> <router-link style="margin-left:10px;" to="/user/reg">reg</router-link> </div> </div>
Chapter6 Router:命名视图
- 命名视图可以在同一级(同一个组件)中展示更多的路由视图,而不是嵌套显示。 命名视图可以让一个组件中具有多个路由渲染出口,这对于一些特定的布局组件非常有用。 命名视图的概念非常类似于“具名插槽”,并且视图的默认名称也是 default。
- 一个视图使用一个组件渲染,因此对于同个路由,多个视图就需要多个组件。确保正确使用 components 配置 (带上 s)ts
import { createRouter, createWebHistory, RouteRecordRaw } from 'vue-router' const routes: Array<RouteRecordRaw> = [ { path: "/", components: { default: () => import('../components/layout/menu.vue'), header: () => import('../components/layout/header.vue'), content: () => import('../components/layout/content.vue'), } }, ] const router = createRouter({ history: createWebHistory(), routes }) export default router - 对应Router-view 通过name 对应组件html
<div> <router-view></router-view> <router-view name="header"></router-view> <router-view name="content"></router-view> </div>
Chapter7 Router:重定向-别名
重定向 redirect
- 字符串形式配置,访问/ 重定向到 /user (地址栏显示/,内容为/user路由的内容)
tsconst routes: Array<RouteRecordRaw> = [ { path:'/', component:()=> import('../components/root.vue'), redirect:'/user1', children:[ { path:'/user1', components:{ default:()=> import('../components/A.vue') } }, { path:'/user2', components:{ bbb:()=> import('../components/B.vue'), ccc:()=> import('../components/C.vue') } } ] } ]- 对象形式配置
tsconst routes: Array<RouteRecordRaw> = [ { path: '/', component: () => import('../components/root.vue'), redirect: { path: '/user1' }, children: [ { path: '/user1', components: { default: () => import('../components/A.vue') } }, { path: '/user2', components: { bbb: () => import('../components/B.vue'), ccc: () => import('../components/C.vue') } } ] } ]- 函数模式(可以传参)
tsconst routes: Array<RouteRecordRaw> = [ { path: '/', component: () => import('../components/root.vue'), redirect: (to) => { return { path: '/user1', query: to.query } }, children: [ { path: '/user1', components: { default: () => import('../components/A.vue') } }, { path: '/user2', components: { bbb: () => import('../components/B.vue'), ccc: () => import('../components/C.vue') } } ] } ]
别名 alias
- 将 / 别名为 /root,意味着当用户访问 /root时,URL 仍然是 /user,但会被匹配为用户正在访问 /ts
const routes: Array<RouteRecordRaw> = [ { path: '/', component: () => import('../components/root.vue'), alias:["/root","/root2","/root3"], children: [ { path: 'user1', components: { default: () => import('../components/A.vue') } }, { path: 'user2', components: { bbb: () => import('../components/B.vue'), ccc: () => import('../components/C.vue') } } ] } ]
Chapter8 Router:导航守卫
全局前置守卫
- router.beforeEachts
router.beforeEach((to, form, next) => { console.log(to, form); next() }) - 每个守卫方法接收三个参数:
to: Route, 即将要进入的目标 路由对象; from: Route,当前导航正要离开的路由; next(): 进行管道中的下一个钩子。如果全部钩子执行完了,则导航的状态就是 confirmed (确认的)。 next(false): 中断当前的导航。如果浏览器的 URL 改变了 (可能是用户手动或者浏览器后退按钮),那么 URL 地址会重置到 from 路由对应的地址。 next('/') 或者 next({ path: '/' }): 跳转到一个不同的地址。当前的导航被中断,然后进行一个新的导航。 - 案例 权限判断ts
const whileList = ['/'] router.beforeEach((to, from, next) => { let token = localStorage.getItem('token') //白名单 有值 或者登陆过存储了token信息可以跳转 否则就去登录页面 if (whileList.includes(to.path) || token) { next() } else { next({ path:'/' }) } })
全局后置守卫
- 使用场景一般可以用来做loadingBar
- 你也可以注册全局后置钩子,然而和守卫不同的是,这些钩子不会接受 next 函数也不会改变导航本身:ts
router.afterEach((to,from)=>{ Vnode.component?.exposed?.endLoading() }) - loadingBar 组件vue
<template> <div class="wraps"> <div ref="bar" class="bar"></div> </div> </template> <script setup lang='ts'> import { ref, onMounted } from 'vue' let speed = ref<number>(1) let bar = ref<HTMLElement>() let timer = ref<number>(0) const startLoading = () => { let dom = bar.value as HTMLElement; speed.value = 1 timer.value = window.requestAnimationFrame(function fn() { if (speed.value < 90) { speed.value += 1; dom.style.width = speed.value + '%' timer.value = window.requestAnimationFrame(fn) } else { speed.value = 1; window.cancelAnimationFrame(timer.value) } }) } const endLoading = () => { let dom = bar.value as HTMLElement; setTimeout(() => { window.requestAnimationFrame(() => { speed.value = 100; dom.style.width = speed.value + '%' }) }, 500) } defineExpose({ startLoading, endLoading }) </script> <style scoped lang="less"> .wraps { position: fixed; top: 0; width: 100%; height: 2px; .bar { height: inherit; width: 0; background: blue; } } </style> - mian.tsts
import loadingBar from './components/loadingBar.vue' const Vnode = createVNode(loadingBar) render(Vnode, document.body) console.log(Vnode); router.beforeEach((to, from, next) => { Vnode.component?.exposed?.startLoading() }) router.afterEach((to, from) => { Vnode.component?.exposed?.endLoading() })
Chapter9 Router:路由元信息 meta
路由元信息
- 通过路由记录的 meta 属性可以定义路由的元信息。使用路由元信息可以在路由中附加自定义的数据,例如:
- 权限校验标识。
- 路由组件的过渡名称。
- 路由组件持久化缓存 (keep-alive) 的相关配置。
- 标题名称
- 我们可以在导航守卫或者是路由对象中访问路由的元信息数据。ts
const router = createRouter({ history: createWebHistory(import.meta.env.BASE_URL), routes: [ { path: '/', component: () => import('@/views/Login.vue'), meta: { title: "登录" } }, { path: '/index', component: () => import('@/views/Index.vue'), meta: { title: "首页", } } ] })
使用TS扩展
- 如果不使用扩展 将会是unknow 类型ts
declare module 'vue-router' { interface RouteMeta { title?: string } }
Chapter10 路由过渡动效
过渡动效
- 想要在你的路径组件上使用转场,并对导航进行动画处理,你需要使用 v-slot API:xml
<router-view #default="{route,Component}"> <transition :enter-active-class="`animate__animated ${route.meta.transition}`"> <component :is="Component"></component> </transition> </router-view> - 上面的用法会对所有的路由使用相同的过渡。如果你想让每个路由的组件有不同的过渡,你可以将元信息和动态的 name 结合在一起,放在
<transition>上:tsdeclare module 'vue-router'{ interface RouteMeta { title:string, transition:string, } } const router = createRouter({ history: createWebHistory(import.meta.env.BASE_URL), routes: [ { path: '/', component: () => import('@/views/Login.vue'), meta:{ title:"登录页面", transition:"animate__fadeInUp", } }, { path: '/index', component: () => import('@/views/Index.vue'), meta:{ title:"首页!!!", transition:"animate__bounceIn", } } ] })
Chapter11 Router:滚动行为
### 滚动行为
- 使用前端路由,当切换到新路由时,想要页面滚到顶部,或者是保持原先的滚动位置,就像重新加载页面那样。vue-router 可以自定义路由切换时页面如何滚动。
- 当创建一个 Router 实例,你可以提供一个 scrollBehavior 方法ts
const router = createRouter({ history: createWebHistory(), scrollBehavior: (to, from, savePosition) => { console.log(to, '==============>', savePosition); return new Promise((r) => { setTimeout(() => { r({ top: 10000 }) }, 2000); }) }, - scrollBehavior 方法接收 to 和 from 路由对象。第三个参数 savedPosition 当且仅当 popstate 导航 (通过浏览器的 前进/后退 按钮触发) 时才可用。
- scrollBehavior 返回滚动位置的对象信息,长这样:ts
{ left: number, top: number }tsconst router = createRouter({ history: createWebHistory(), scrollBehavior: (to, from, savePosition) => { return { top:200 } },
Chapter12 Router:动态路由
动态路由
- 我们一般使用动态路由都是后台会返回一个路由表前端通过调接口拿到后处理(后端处理路由)
- 主要使用的方法就是router.addRoute
### 添加路由
- 动态路由主要通过两个函数实现。router.addRoute() 和 router.removeRoute()。它们只注册一个新的路由,也就是说,如果新增加的路由与当前位置相匹配,就需要你用 router.push() 或 router.replace() 来手动导航,才能显示该新路由ts
router.addRoute({ path: '/about', component: About })
删除路由
- 有几个不同的方法来删除现有的路由:
- 通过添加一个名称冲突的路由。如果添加与现有途径名称相同的途径,会先删除路由,再添加路由:ts
router.addRoute({ path: '/about', name: 'about', component: About }) // 这将会删除之前已经添加的路由,因为他们具有相同的名字且名字必须是唯一的 router.addRoute({ path: '/other', name: 'about', component: Other }) - 通过调用 router.addRoute() 返回的回调:ts
const removeRoute = router.addRoute(routeRecord) removeRoute() // 删除路由如果存在的话- 当路由没有名称时,这很有用。
- 通过使用 router.removeRoute() 按名称删除路由:ts
router.addRoute({ path: '/about', name: 'about', component: About }) // 删除路由 router.removeRoute('about')- 需要注意的是,如果你想使用这个功能,但又想避免名字的冲突,可以在路由中使用 Symbol 作为名字。
- 当路由被删除时,所有的别名和子路由也会被同时删除
- 通过添加一个名称冲突的路由。如果添加与现有途径名称相同的途径,会先删除路由,再添加路由:
查看现有路由
Vue Router 提供了两个功能来查看现有的路由:
- router.hasRoute():检查路由是否存在。
- router.getRoutes():获取一个包含所有路由记录的数组。
案例
前端代码
注意一个事项vite在使用动态路由的时候无法使用别名@ 必须使用相对路径
 ts
tsconst initRouter = async () => { const result = await axios.get('http://localhost:9999/login', { params: formInline }); result.data.route.forEach((v: any) => { router.addRoute({ path: v.path, name: v.name, //这儿不能使用@ component: () => import(`../views/${v.component}`) }) router.push('/index') }) console.log(router.getRoutes()); }后端代码 nodejs express
tsimport express, { Express, Request, Response } from 'express' const app: Express = express() app.get('/login', (req: Request, res: Response) => { res.header("Access-Control-Allow-Origin", "*"); if (req.query.user == 'admin' && req.query.password == '123456') { res.json({ route: [ { path: "/demo1", name: "Demo1", component: 'demo1.vue' }, { path: "/demo2", name: "Demo2", component: 'demo2.vue' }, { path: "/demo3", name: "Demo3", component: 'demo3.vue' } ] }) }else{ res.json({ code:400, mesage:"账号密码错误" }) } }) app.listen(9999, () => { console.log('http://localhost:9999'); })